A Guide to AWS Instance Scheduler
In this article, we will cover a step-by-step guide to create an AWS schedule and apply it to several instances.
AWS Instance Scheduler is a popular option for saving up a large portion of the cost of computing services in situations where there are predictable planned times for operating compute services. In other words, since no clients are accessing particular environments during the period, it’s normal for development environments or workloads to be shut down during non-working times.
By evaluating when the instances are more widely used, you can implement more complex schedules, or even apply an always-stopped schedule and then start up the instances when you need them.
In this article, we will cover a step-by-step guide to create an AWS schedule and apply it to several instances. At the very end of the article, there is a section on how to do this with Microtica, without having to set up and manage the infrastructure for the scheduler, and it takes less than 5 mins.
Solution Overview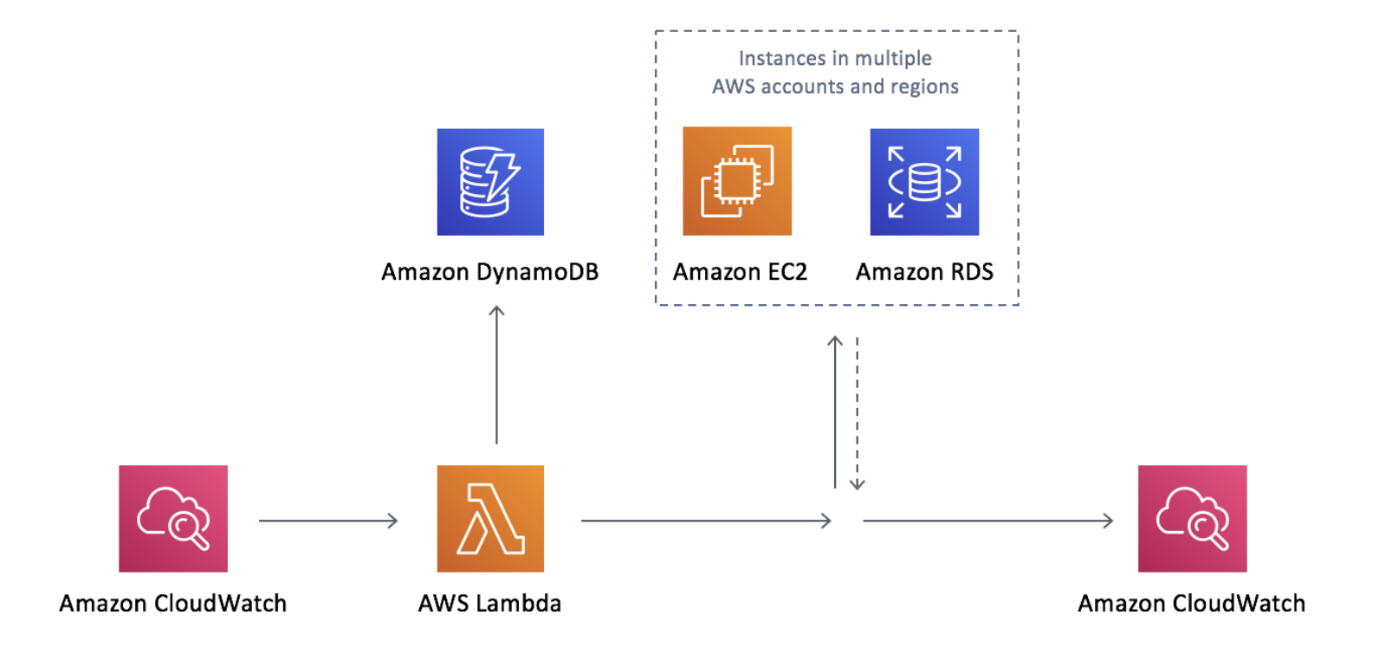
AWS Instance Scheduler Architecture.
This CloudFormation template creates an environment for the AWS Instance Scheduler. The solution uses the following AWS services:
A CloudWatch event triggers the Lambda function whose job is to check the EC2 and RDS instances, find the appropriate tag for a schedule, and match it against the definition of that schedule saved in DynamoDB. After that, depending on the targeted state the Lambda function decides to turn off or turn on the EC2 or RDS instance.
The default behavior of this solution is to stop EC2 and RDS instances, not terminate or delete them, as terminated instances cannot be restarted. It is also a good idea to create an RDS Instance Snapshot before stopping the instances. Each new snapshot overrides the last one. This is part of setting up the stack and is explained in the next section.
How It Works
Schedules actually define when the EC2 and RDS instances should be running. Each schedule has a unique name and its configuration is stored in the DynamoDB.
The entire setup revolves around tagging, which is basically a label you give to an instance to be able to categorize it and later quickly identify it. Tags are defined with a key-value pair that you define.
The AWS Instance Scheduler solution has a default tag key called Schedule. You can of course change it if you need. The tag value should be the unique name of the schedule you want to apply to the instance. Each time the Lambda function runs, it will retrieve the configuration for the schedule from the DynamoDB and apply it to the instance.
For example, you could define a tag with key: value = Schedule: work-days. The name work-days specifies a schedule where the instances should shut down on Friday evening and get started up on Monday morning. Therefore, the instances that are supposed to be covered by this schedule should be tagged with the key: value pair. In the example, this is Schedule: work-days.
Create an Instance Scheduler in Your AWS Account
Launch the Stack
Firstly make sure you’re signed in to your AWS account. The starting step is to launch the instance schedule stack in your AWS account. You can launch the cloud formation template by clicking on this link. The template launches in the US East – N. Virginia region by default, so adjust the region according to your needs. Likewise, verify that the correct template is being used, and move to the next step.

Creating the Instance
Scheduler stack – Step 1.
Secondly, you need to define the Stack name and some specific parameters, like tag name (if you’d like to change the default tag name Schedule), which service you want to schedule: EC2, RDS, or Both, whether you want an RDS instance snapshot before shutting down the resource, the frequency of running for the AWS Lambda function, whether you want CloudWatch metrics and logs and a couple more parameters.

Deployed Instance Scheduler stack.
In your AWS console, you will find an Amazon DynamoDB table
(ConfigTable) where the configurations for the periods and schedules are going
to be stored. The schedule is defined by several parameters, from which the
most important is the period. This is
the time in which the instances should be active. It can be as specific as
hours, days, and months. For the schedule to work you must specify at least one
of the period’s definitions: begintime, endtime, weekdays, months or monthdays.
The begintime field
defines when the instance schedule should start the instances, and accordingly,
the endtime is when the instances
should be stopped. If you define only a starting time then the instance will
have to be stopped manually.
In the ConfigTable are already some predefined samples that you can use or create your own. A sample period will look like this:
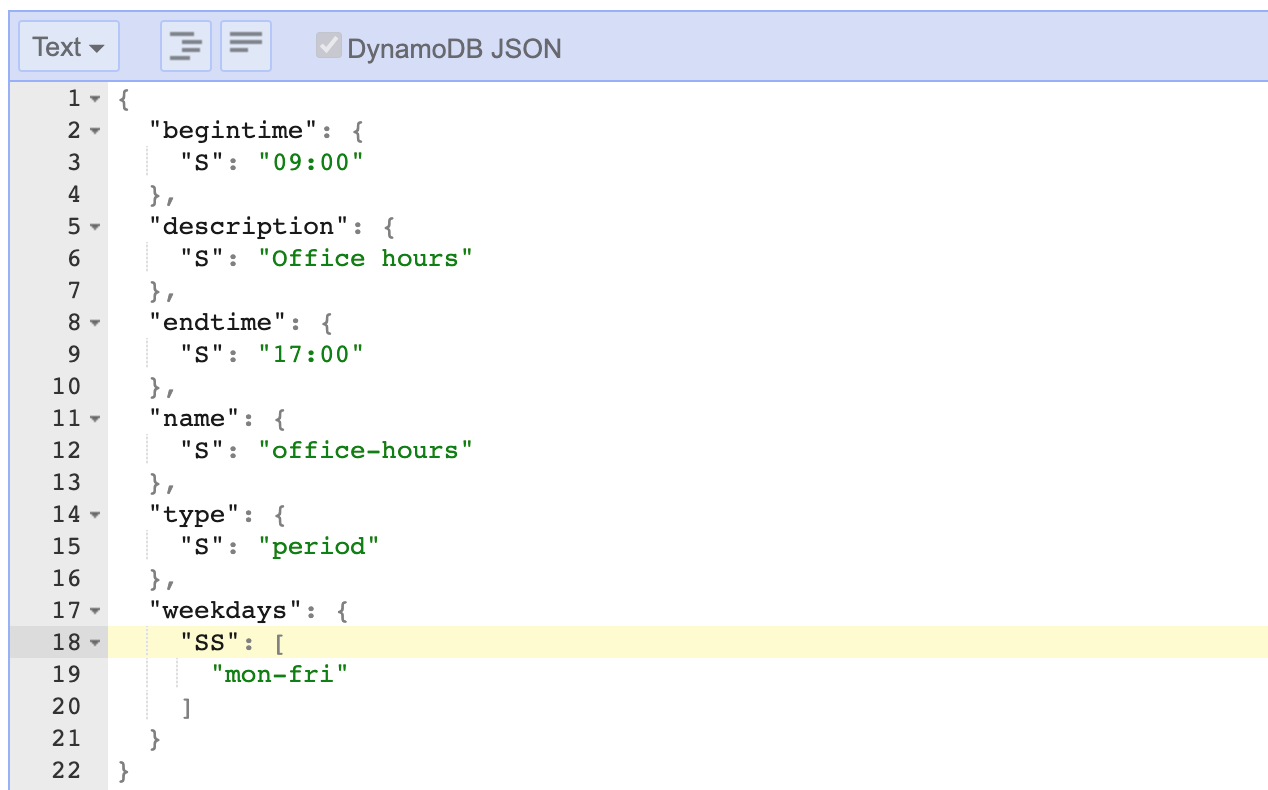
Office hours sample period.
This is a period set to
define office hours with a begintime of 9
am and an endtime of 5 pm, applied only
Monday to Friday. This period is used in a schedule to define UK office hours.
You can change the periods according to your needs directly from the AWS
console.
Schedules don’t have to be used only for shutting down resources. There are also some more complicated schedules you can create, for example, if you look at the Vertical scaling on weekdays schedule. Here you’ll see its purpose is to run on smaller EC2 instances on weekends and use micro instances on working days.
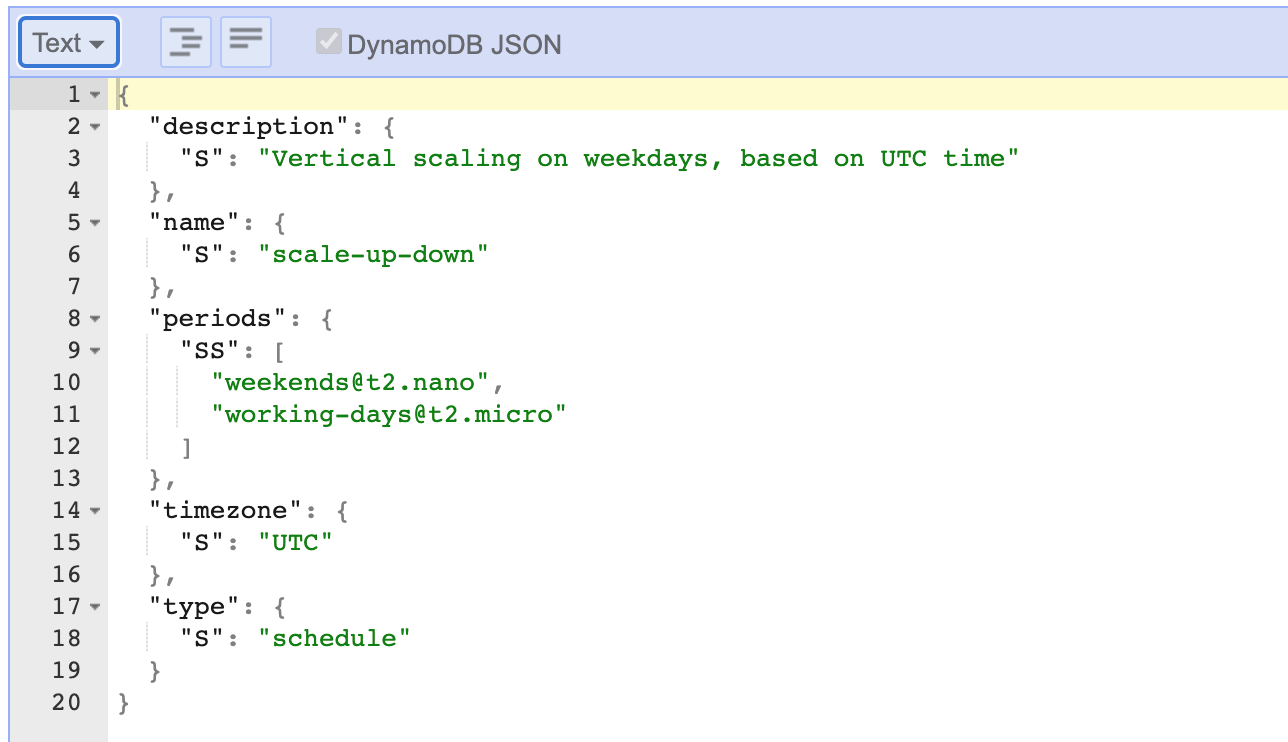
Vertical scaling on weekdays schedule
Tag the Appropriate Instances
In order for a schedule to work, you need to tag the EC2/RDS instances you want the schedule to be applied on. You should use the tag key (the tag name you defined when creating the CFN stack – default value is Schedule) and the tag value – which is the name of the schedule stored in the Config table. When you find your resource you go to Manage Tags and enter the key-value pair defining the schedule. You can also use the Tag Editor to tag multiple instances at once.
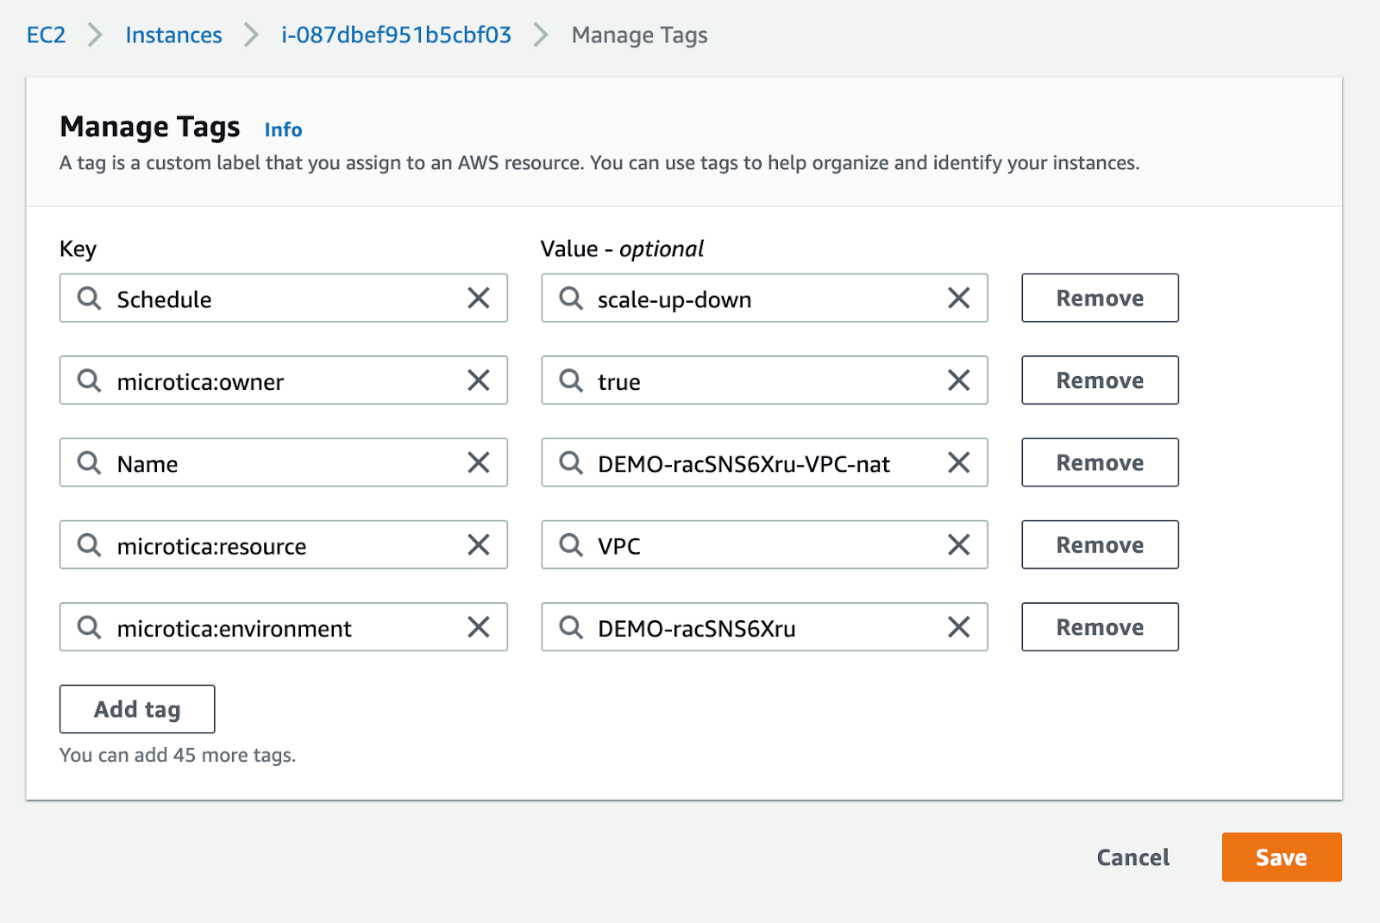
Managing tags for an EC2
instance.
CloudWatch Metrics
In conclusion, after the tag is applied, the instance will be part of the resources managed by the schedule you defined for it. You can check the CloudWatch metrics to make sure the solution runs as it’s designed to. In the CloudWatch console, there will be a namespace.
We ZippyOPS, Provide consulting, implementation, and management services on DevOps, DevSecOps, Cloud, Automated Ops, Microservices, Infrastructure, and Security
Services offered by us: https://www.zippyops.com/services
Our Products: https://www.zippyops.com/products
Our Solutions: https://www.zippyops.com/solutions
For Demo, videos check out YouTube Playlist: https://www.youtube.com/watch?v=4FYvPooN_Tg&list=PLCJ3JpanNyCfXlHahZhYgJH9-rV6ouPro
Relevant Blogs:
Questions on Monitoring: Before You Monitor
How To Trigger AWS Lambda by SMS
Decoding Disaster Recovery Scenarios in AWS
Removing the Bastion Host and Improving the Security in AWS
Recent Comments
No comments
Leave a Comment
We will be happy to hear what you think about this post