A Service Mesh for Kubernetes
You can use Linkerd as a service mesh with Kubernetes, helping to manage communications for cloud-native apps and services while also feeding you data.
What is a service mesh, and how is it used by cloud-native apps — apps designed for the cloud? In this article, we’ll show you how to use Linkerd as a service mesh on Kubernetes, and how it can capture and report top-level service metrics such as success rates, request volumes, and latencies without requiring changes to application code.
One of the most common questions we see about Linkerd is, what exactly is a service mesh? And why is a service mesh a critical component of cloud-native apps, when environments like Kubernetes provide primitives like service objects and load balancers?
In short, a service mesh is a layer that manages the communication between apps (or between parts of the same app, e.g. microservices). In traditional apps, this logic is built directly into the application itself: retries and timeouts, monitoring/visibility, tracing, service discovery, etc. are all hard-coded into each application.
However, as application architectures become increasingly segmented into services, moving communications logic out of the application and into the underlying infrastructure becomes increasingly important. Just as applications shouldn’t be writing their own TCP stack, they also shouldn’t be managing their own load balancing logic, or their own service discovery management, or their own retry and timeout logic. (For example, see Oliver Gould’s MesosCon talk for more about the difficulty of coordinating retries and timeouts across multiple services.)
A service mesh like Linkerd provides critical features to multi-service applications running at scale:
· Baseline resilience: retry budgets, deadlines, circuit-breaking.
· Top-line service metrics: success rates, request volumes, and latencies.
· Latency and failure tolerance: Failure- and latency-aware load balancing that can route around slow or broken service instances.
· Distributed tracing a la Zipkin and OpenTracing.
· Service discovery: locate destination instances.
· Protocol upgrades: wrapping cross-network communication in TLS, or converting HTTP/1.1 to HTTP/2.0.
· Routing: route requests between different versions of services, failover between clusters, etc.
Using Linkerd for Service Monitoring in Kubernetes
One of the advantages of operating at the request layer is that the service mesh has access to protocol-level semantics of success and failure. For example, if you’re running an HTTP service, Linkerd can understand the semantics of 200 versus 400 versus 500 responses and can calculate metrics like success rate automatically (Operating at this layer becomes doubly important when we talk about retries).
Let’s walk through a quick example of how to install Linkerd on Kubernetes to automatically capture aggregated, top-line service success rates without requiring application changes.
Step 1: Install Linkerd
Install Linkerd using this Kubernetes config. This will install Linkerd as a DaemonSet (i.e., one instance per host) running in the default Kubernetes namespace:
You should see a dashboard, including selectors by service and instance. The Linkerd-viz dashboard includes three sections:
- TOP LINE: Cluster-wide success rate and request volume.
- SERVICE METRICS: One section for each application deployed. Includes success rate, request volume, and latency.
- PER-INSTANCE METRICS: Success rate, request volume, and latency for each node in your cluster.
With just three simple commands we were able to install Linkerd on our Kubernetes cluster, install an app, and use Linkerd to gain visibility into the health of the app’s services. Of course, Linkerd is providing much more than visibility: under the hood, we’ve enabled latency-aware load balancing, automatic retries and circuit breaking, distributed tracing, and more.
As a service mesh, Linkerd is designed to be run alongside application code, managing and monitoring inter-service communication, including performing service discovery, retries, load-balancing, and protocol upgrades.
At a first glance, this sounds like a perfect fit for a sidecar deployment in Kubernetes. After all, one of Kubernetes’s defining characteristics is its pod model. Deploying as a sidecar is conceptually simple, has clear failure semantics, and we’ve spent a lot of time optimizing Linkerd for this use case.
However, the sidecar model also has a downside: deploying per pod means that resource costs scale per pod. If your services are lightweight and you run many instances, like Monzo (who built an entire bank on top of Linkerd and Kubernetes), then the cost of using sidecars can be quite high.
We can reduce this resource cost by deploying Linkerd per host rather than per pod. This allows resource consumption to scale per host, which is typically a significantly slower-growing metric than pod count. And, happily, Kubernetes provides DaemonSets for this very purpose.
Unfortunately, for Linkerd, deploying per host is a bit more complicated than just using DaemonSets. We can solve the service mesh problem with per-host deployments in Kubernetes.
Per-Host Deployments in Kubernetes
One of the defining characteristics of a service mesh is its
ability to decouple application communication from transport communication. For
example, if services A and B speak HTTP, the service mesh may convert that to
HTTPS across the wire, without the application being aware. The service mesh
may also be doing connection pooling, admission control, or other
transport-layer features, also in a way that’s transparent to the application.
In order to fully accomplish this, Linkerd must be on the
sending side and the receiving side of each request, proxying to and from local
instances. E.g. for HTTP to HTTPS upgrades, Linkerd must be able to both
initiate and terminate TLS.
A request that starts in Pod A on Host 1 and is destined for Pod
J on Host 2 must go through Pod A’s host-local Linkerd instance, then to Host
2’s Linkerd instance, and finally to Pod J. This path introduces three problems
that Linkerd must address:
· How does an application identify its host-local Linkerd?
· How does Linkerd route an outgoing request to the destination’s
Linkerd?
· How does Linkerd route an incoming request to the destination
application?
What follows are the technical details on how we solve these
three problems.
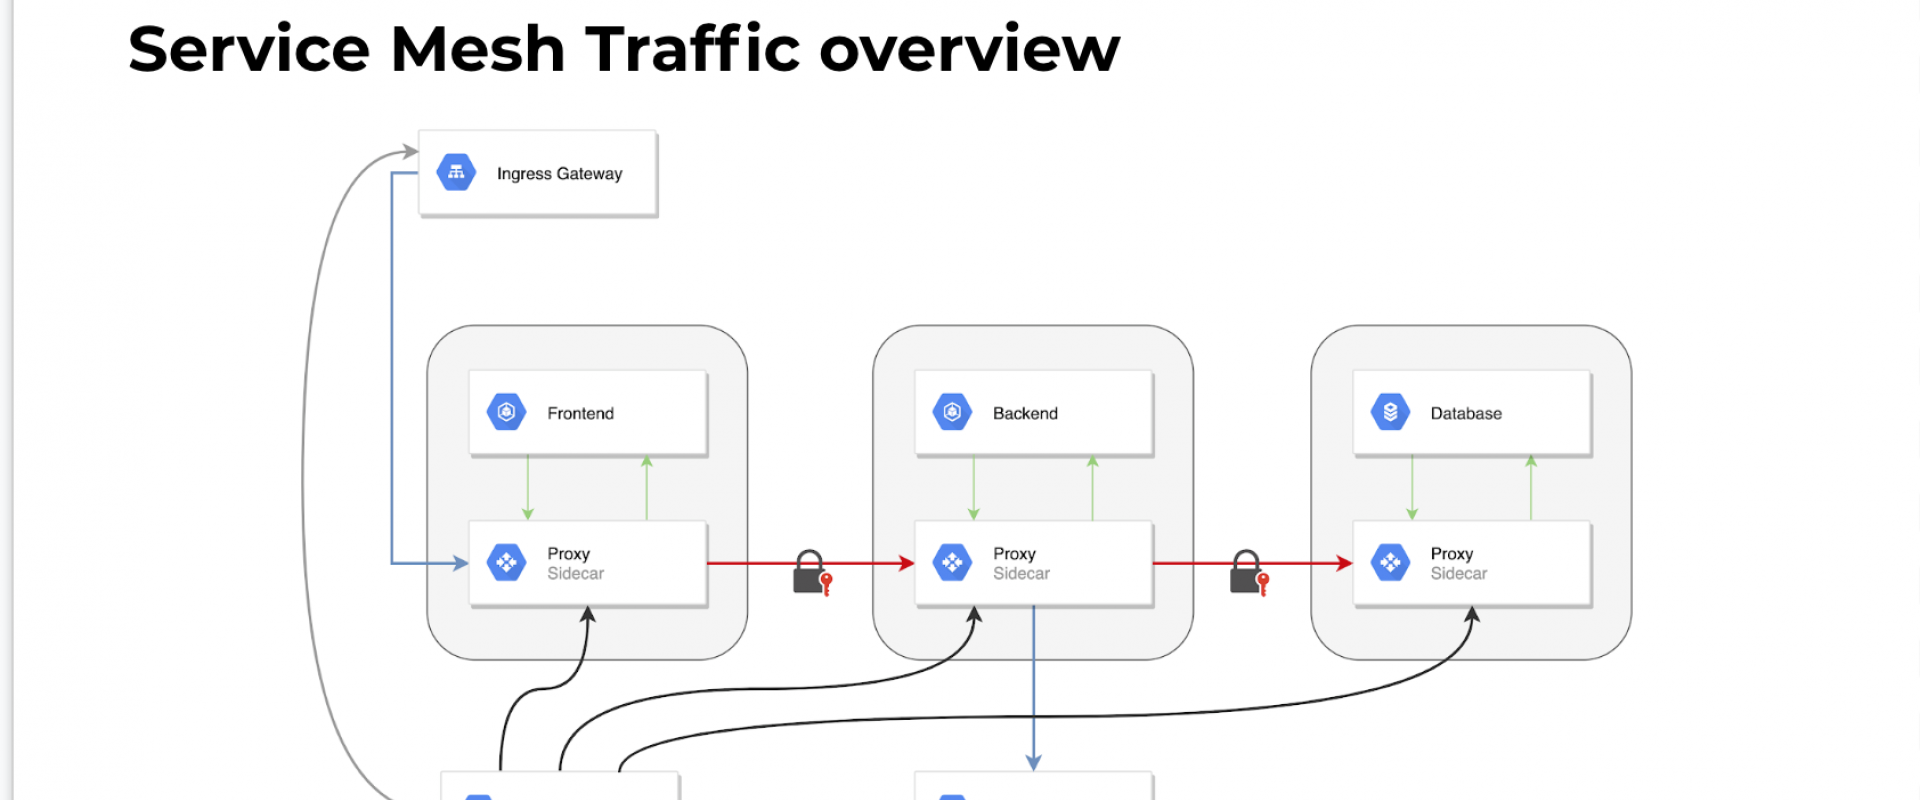
One of the defining characteristics of a service mesh is its ability to decouple application communication from transport communication. For example, if services A and B speak HTTP, the service mesh may convert that to HTTPS across the wire, without the application being aware. The service mesh may also be doing connection pooling, admission control, or other transport-layer features, also in a way that’s transparent to the application.
In order to fully accomplish this, Linkerd must be on the sending side and the receiving side of each request, proxying to and from local instances. E.g. for HTTP to HTTPS upgrades, Linkerd must be able to both initiate and terminate TLS.
A request that starts in Pod A on Host 1 and is destined for Pod J on Host 2 must go through Pod A’s host-local Linkerd instance, then to Host 2’s Linkerd instance, and finally to Pod J. This path introduces three problems that Linkerd must address:
· How does an application identify its host-local Linkerd?
· How does Linkerd route an outgoing request to the destination’s Linkerd?
· How does Linkerd route an incoming request to the destination application?
What follows are the technical details on how we solve these three problems.
How Does an Application Identify Its Host-Local Linkerd?
Since DaemonSets use a Kubernetes hostPort, we know that Linkerd
is running on a fixed port on the host’s IP. Thus, in order to send a request
to the Linkerd process on the same machine that it’s running on, we need to
determine the IP address of its host.
In Kubernetes 1.4 and later, this information is directly
available through the Downward API. Here is an except from hello-world.yml that shows how the node name
can be passed into the application:
env:
- name: NODE_NAME
valueFrom:
fieldRef:
fieldPath: spec.nodeName
- name: http_proxy
value: $(NODE_NAME):4140
args:
- "-addr=:7777"
- "-text=Hello"
- "-target=world"
Since DaemonSets use a Kubernetes hostPort, we know that Linkerd is running on a fixed port on the host’s IP. Thus, in order to send a request to the Linkerd process on the same machine that it’s running on, we need to determine the IP address of its host.
In Kubernetes 1.4 and later, this information is directly available through the Downward API. Here is an except from hello-world.yml that shows how the node name can be passed into the application:
env:- name: NODE_NAMEvalueFrom:fieldRef:fieldPath: spec.nodeName- name: http_proxyvalue: $(NODE_NAME):4140args:- "-addr=:7777"- "-text=Hello"- "-target=world"(Note that this example sets the http_proxy environment
variable to direct all HTTP calls through the host-local Linkerd instance.
While this approach works with most HTTP applications, non-HTTP applications
will need to do something different.)
In Kubernetes releases prior to 1.4, this information is still available, but in a less direct way. We provide a simple script that queries the Kubernetes API to get the host IP; the output of this script can be consumed by the application, or used to build anhttp_proxy environment variable as in the example above.
Here is an excerpt from hello-world-legacy.yml that shows how the host IP can be passed into the application:
env: - name: POD_NAME valueFrom: fieldRef: fieldPath: metadata.name - name: NS valueFrom: fieldRef: fieldPath: metadata.namespace command: - "/bin/sh" - "-c" - "http_proxy=`hostIP.sh`:4140 helloworld -addr=:7777 -text=Hello -target=world"Note that the hostIP.sh script requires that the pod’s name and namespace be set as environment variables in the pod.
How Does Linkerd Route an Outgoing Request to the Destination's Linkerd?
In our service mesh deployment, outgoing requests should not be sent directly to the destination application, but instead should be sent to the Linkerd running on that application’s host. To do this, we can take advantage of a powerful new feature introduced in Linkerd 0.8.0 called transformers, which can do arbitrary post-processing on the destination addresses that Linkerd routes to. In this case, we can use the DaemonSet transformer to automatically replace destination addresses with the address of a DaemonSet pod running on the destination’s host. For example, this outgoing router Linkerd config sends all requests to the incoming port of the Linkerd running on the same host as the destination app:
routers:- protocol: http label: outgoing interpreter: kind: default transformers: - kind: io.l5d.k8s.daemonset namespace: default port: incoming service: l5d …How Does Linkerd Route an Incoming Request to the Destination Application?
When a request finally arrives at the destination pod’s Linkerd instance, it must be correctly routed to the pod itself. To do this we use the localnode transformer to limit routing to only pods running on the current host. Example Linkerd config:
routers:- protocol: http label: incoming interpreter: kind: default transformers: - kind: io.l5d.k8s.localnode ...Deploying Linkerd as a Kubernetes DaemonSet gives us the best of both worlds—it allows us to accomplish the full set of goals of a service mesh (such as transparent TLS, protocol upgrades, latency-aware load balancing, etc), while scaling Linkerd instances per host rather than per pod.
In the case where no data transformation is required, Linkerd can use this decoupling to automatically do protocol upgrades. Examples of the sorts of protocol upgrades that Linkerd can do include HTTP/1.x to HTTP/2, thrift to thrift-mux, and HTTP to HTTPS.
Deploying Linkerd as a Service Mesh
When Linkerd is deployed as a service mesh on Kubernetes, we place a Linkerd instance on every host using DaemonSets. For HTTP services, pods can send HTTP traffic to their host-local Linkerd by using the http_proxy environment variable. (For non-HTTP traffic the integration is slightly more complex.)
Above, we illustrated the basic pattern of using Linkerd to “wrap” HTTP calls in TLS by proxying at both ends of the connection, both originating and terminating TLS. However, now that we have the service mesh deployment in place, things are significantly simpler. Encrypting all cross-host communication is largely a matter of providing a TLS certificate to the service mesh.
Let’s walk through an example. The first two steps will be identical to what we did in earlier — we’ll install Linkerd as a service mesh and install a simple microservice “hello world” application. So, we will skip right to Step 3:
Step 3: Configure Linkerd to Use TLS
Now that Linkerd is installed, let’s use it to encrypt traffic. We’ll place TLS certificates on each of the hosts, and configure Linkerd to use those certificates for TLS.
We’ll use a global certificate (the mesh certificate) that we generate ourselves. Since this certificate is not tied to a public DNS name, we don’t need to use a service like Let’s Encrypt. We can instead generate our own CA certificate and use that to sign our mesh certificate (“self-signing”). We’ll distribute three things to each Kubernetes host: the CA certificate, the mesh key, and the mesh certificate.
The following scripts use sample certificates that we’ve generated. Please don’t use these certificates in production. For instructions on how to generate your own self-signed certificates, see our previous post, where we have instructions on how to generate your own certificates).
Step 4: Deploy Certificates and Config Changes to Kubernetes
We’re ready to update Linkerd to encrypt traffic. We will distribute the sample certificates as Kubernetes secrets.
kubectl apply -f https://raw.githubusercontent.com/Linkerd/Linkerd-examples/master/k8s-daemonset/k8s/certificates.ymlNow we will configure Linkerd to use these certificates by giving it this configuration and restarting it:
kubectl delete ds/l5d configmap/l5d-configkubectl apply -f https://raw.githubusercontent.com/Linkerd/Linkerd-examples/master/k8s-daemonset/k8s/Linkerd-tls.ymlStep 5: Success!
At this point, Linkerd should be transparently wrapping all communication between these services in TLS. Let’s verify this by running the same command as before:
http_proxy=$INGRESS_LB:4140 curl -s http://helloIf all is well, you should still see the string “Hello world” — but under the hood, communication between the hello and world services is being encrypted. We can verify this by making an HTTPS request directly to port 4141, where Linkerd is listening for requests from other Linkerd instances:
curl -skH 'l5d-dtab: /svc=>/#/io.l5d.k8s/default/admin/l5d;' https://$INGRESS_LB:4141/admin/pingHere we’re asking curl to make an HTTPS call, and telling it to skip TLS validation (since curl is expecting a website, not Linkerd). We’re also adding a dtab override to route the request to the Linkerd instance’s own admin interface. If all is well, you should again see a successful “pong” response. Congratulations! You’ve encrypted your cross-service traffic.
Now, we’ll show you an example of how to use Linkerd’s routing rules, called dtabs, to automatically alter traffic flow through your application at the end of a CI/CD pipeline to perform a blue-green deployment between old and new versions of a service.
Continuous deployment (CD) is an extension of continuous integration (CI), in which code is pushed to production on a continuous basis, tightly coupled to the development process. While it requires powerful automation, minimizing the time between development and deployment allows companies to iterate very rapidly on their product.
For multi-service or microservice architectures, the final step of the CD process, the deployment itself, can be risky because so much runtime behavior is determined by the runtime environment, including the other services that are handling production traffic. In these situations, gradual rollouts such as blue-green deployments become increasingly important.
Coordinating traffic shifting across multiple Linkerds requires a centralized traffic control tool. For this we recommend namerd, a service with an API that serves routing rules backed by a consistent store.
We’ll demonstrate a blue-green deployment using an example app from the Linkerd-examples GitHub repo. The example app is a contrived “hello world” microservice application, consisting of a “hello” service that handles incoming requests and calls a “world” service before returning a response. With Jenkins as our automation server, we’ll deploy a new version of the world service using the Jenkins Pipeline Plugin.
Routing Requests With Linkerd and Namerd
Before we start continuously deploying, we’ll need to initially deploy the hello world app to Kubernetes, routing requests using Linkerd and Namerd. We can do this easily by using the Kubernetes configs in the Linkerd-examples repo.
Step 1: Install Namerd
We’ll start by installing Namerd, which will manage the dtabs that we use to orchestrate our blue-green deployments. Please note that our Namerd configuration uses the ThirdPartyResource APIs, which requires a cluster running Kubernetes 1.2+ with the ThirdPartyResource feature enabled.
To install Namerd in the default Kubernetes namespace, run:
kubectl apply -f https://raw.githubusercontent.com/Linkerd/Linkerd-examples/master/k8s-daemonset/k8s/namerd.ymlYou can confirm that installation was successful by viewing Namerd’s admin page (note that it may take a few minutes for the ingress IP to become available):
NAMERD_INGRESS_LB=$(kubectl get svc namerd -o jsonpath="{.status.loadBalancer.ingress[0].*}")open http://$NAMERD_INGRESS_LB:9990 # on OS XThe admin page displays all configured Namerd namespaces, and we’ve configured two namespaces — “external” and “internal.” For the sake of continuous deployment, we’re mostly concerned with the “internal” namespace.
In addition to the admin UI, we can also use the namerctl utility to talk directly to Namerd. This utility will be used by the deploy script to start sending traffic to newly deployed services. To install it locally, run:
go get -u github.com/Linkerd/namerctlgo install github.com/Linkerd/namerctlThe utility uses the NAMERCTL_BASE_URL environment
variable to connect to Namerd. In order to connect to the version of Namerd
that we just deployed to Kubernetes, set the variable as follows:
export NAMERCTL_BASE_URL=http://$NAMERD_INGRESS_LB:4180And now try using namerctl to display the internal dtab:
$ namerctl dtab get internal# version MjgzNjk5NzI=/srv => /#/io.l5d.k8s/default/http ;/host => /srv ;/tmp => /srv ;/svc => /host ;/host/world => /srv/world-v1 ;The last line of the dtab maps the logical name of the world service to the currently deployed version of the world service, world-v1. In a production system, versions could be shas, dates, or anything else that guarantees name uniqueness. We’ll use this dtab entry to safely introduce new versions of the world service into production.
Step 2: Install Linkerd
Next, we’ll install Linkerd and configure it to resolve routes using Namerd. To install Linkerd as a DaemonSet (i.e., one instance per host) in the default Kubernetes namespace, run:
kubectl apply -f https://raw.githubusercontent.com/Linkerd/Linkerd-examples/master/k8s-daemonset/k8s/Linkerd-namerd.ymlYou can confirm that installation was successful by viewing Linkerd’s admin UI (note that it may take a few minutes for the ingress IP to become available):
L5D_INGRESS_LB=$(kubectl get svc l5d -o jsonpath="{.status.loadBalancer.ingress[0].*}")open http://$L5D_INGRESS_LB:9990 # on OS XWe’ll use the admin UI to verify steps of the blue-green deploy.
Step 3: Install the Sample Apps
Now we’ll install the hello and world apps in the default namespace, by running:
kubectl apply -f https://raw.githubusercontent.com/Linkerd/Linkerd-examples/master/k8s-daemonset/k8s/hello-world.ymlAt this point, we actually have a functioning service mesh and an application that makes use of it. You can see the entire setup in action by sending traffic through Linkerd’s external IP:
$ curl $L5D_INGRESS_LBHello (10.196.2.5) world (10.196.2.6)!!If everything is working, you’ll see a “Hello world” message similar to that above, with the IPs of the pods that served the request.
Continuous Deployment
We’ll now use Jenkins to perform blue-green deploys of the “world” service that we deployed in the previous step.
Set Up Jenkins
Let’s start by deploying the buoyantio/jenkins-plus Docker image to our Kubernetes cluster. This image provides the base Jenkins image, along with the kubectl and namerctl binaries that we need, as well as additional plugins and a pre-configured pipeline job that we can use to run deployments. The pipeline job makes use of the Jenkins Pipeline Plugin and a custom Groovy script that handles each of the steps in the blue-green deploy for us.
To deploy the Jenkins image to the default Kubernetes namespace, run:
kubectl apply -f https://raw.githubusercontent.com/Linkerd/Linkerd-examples/master/k8s-daemonset/k8s/jenkins.ymlYou can confirm that installation was successful by opening up the Jenkins web UI (note that it may take a few minutes for the ingress IP to become available):
JENKINS_LB=$(kubectl get svc jenkins -o jsonpath="{.status.loadBalancer.ingress[0].*}")open http://$JENKINS_LB # on OS XYou should see a “hello_world” job in the
UI.
Committing Code
Now it’s time to make some code changes to the world service, and have the Jenkins job deploy them to production for us. To do this, start by forking the Linkerd-examples repo in the Github UI. Once you’ve created a fork, clone your fork locally:
git clone https://github.com/esbie/Linkerd-examples.gitcd Linkerd-examplesFor the sake of this example, we’re going to change a text file that controls the output of the world service. By default, the world service outputs the string “world”:
$ cat k8s-daemonset/helloworld/world.txtworldLet’s spice that up a bit:
echo "hal, open the pod bay doors" > k8s-daemonset/helloworld/world.txtAnd commit it:
git commit -am "Improve the output of the world service"git push origin masterNow it’s time to get this critical change into production.
Running the Job
With our change committed and pushed to our fork of the Linkerd-examples repo, we can kick off the Jenkins “hello_world” pipeline job to safely deploy the change into production. Each of the six steps in the pipeline job is controlled by a custom Groovy script and described below in more detail. The deploy is fully automated, with the exception of three places in the pipeline where it pauses for human-in-the-loop verification of critical metrics before proceeding.
Build with Parameters
To start the deploy, click into the “hello_world” job in the
Jenkins UI, and then click “Build with the parameters” in the sidebar. You’ll
be taken to a page that lets you customize the deploy.
Change the value of the gitRepo form field to point to your fork of the Linkerd-examplesrepo, and then click the “Build” button. Note that if you pushed your changes to a separate branch in your fork, you should also change the value of the gitBranch form field to match your branch name.
Clone
The first step in the pipeline is to clone the git repo using the build parameters specified above. Pretty straightforward.
Deploy
The second step in the deploy pipeline is to actually deploy the new version of the world service to our cluster, without sending it any traffic. The script determines that the currently deployed version of the world service is world-v1, so it creates a new service called world-v2 and deploys that to our Kubernetes cluster. At this point you will see two different versions of the world service running simultaneously:
$ kubectl get po | grep worldworld-v1-9eaxk 1/1 Running 0 3hworld-v1-kj6gi 1/1 Running 0 3hworld-v1-vchal 1/1 Running 0 3hworld-v2-65y9g 1/1 Running 0 30mworld-v2-d260q 1/1 Running 0 30mworld-v2-z7ngo 1/1 Running 0 30mEven with the world-v2 version fully deployed, we still have not made any changes to production traffic! Linkerd and namerd are still configured to route all world service traffic to the existing world-v1 version. Fully deploying a new version of the service before sending it any traffic is key to performing a blue-green deploy.
Integration Testing
Once the new version of our service is deployed, the script performs a test request to make sure the new version can be reached. If the test request succeeds, it pauses the deploy and waits for us to acknowledge that the newly deployed version looks correct before proceeding.
At this point, we want to make sure that the new pods are running as expected — not just by themselves, but in conjunction with the rest of the production environment. Normally this would involve a deployment to a separate staging cluster, combined with some mechanism for sending or replaying production traffic to that cluster.
Since we’re using Linkerd, we can significantly simplify this operation by taking advantage of Linkerd’s per-request routing to accomplish the same thing without a dedicated staging environment. At ingress, we can tag our request with a special header, l5d-dtab, that will instruct Linkerd to route this request through the production cluster, but replace all service calls to world-v1 with calls to world-v2 instead for this request only.
The Jenkins UI provides the dtab override that we need to route requests to the new version of our service, and using that information we can make our own test request:
$ curl -H 'l5d-dtab: /host/world => /tmp/world-v2' $L5D_INGRESS_LBHello (10.196.2.5) hal, open the pod bay doors (10.196.1.17)!!Success! Our request is being routed to the world-v2 service, which is returning the new world text that we added on our branch. Even though we can reach the new service, it’s worth noting that we still have not changed the behavior of any production traffic, aside from the request that we just made. We can verify that by omitting the l5d-dtab header and ensuring that we still get the world-v1 response:
$ curl $L5D_INGRESS_LBHello (10.196.2.5) world (10.196.2.6)!!If everything looks good, we can proceed to the next step in the pipeline by clicking the “Ok, I’m done with manual testing” button in the Jenkins UI.
Shift Traffic (10 Percent)
After some manual testing, we’re ready to start the blue-green deployment by sending 10% of production traffic to the newly deployed version of the service. The script makes the change in routing policy and again pauses, asking us to confirm that everything looks OK with 10% traffic before proceeding.
Note that if the user aborts on any pipeline step, the script assumes there was something wrong with the new service, and automatically reverts the routing change, sending all traffic back to the original service. Since we’re not tearing down instances of the old version of the service while shifting traffic, reverting traffic back can happen quickly, minimizing the impact of a bad deploy.
We can verify that our service is taking 10 percent of requests by sending it 10 requests and hoping that the odds are in our favor:
$ for i in {1..10}; do curl $L5D_INGRESS_LB; echo ""; doneHello (10.196.2.5) world (10.196.1.16)!!Hello (10.196.2.5) world (10.196.1.16)!!Hello (10.196.2.5) hal, open the pod bay doors (10.196.2.13)!!Hello (10.196.2.5) world (10.196.2.6)!!Hello (10.196.1.13) world (10.196.2.6)!!Hello (10.196.1.13) world (10.196.2.6)!!Hello (10.196.2.5) world (10.196.1.16)!!Hello (10.196.2.5) world (10.196.2.6)!!Hello (10.196.1.14) world (10.196.2.6)!!Hello (10.196.1.14) world (10.196.1.16)!!Looking good! Now is also a good time to check Linkerd’s admin dashboard, to verify that the new service is healthy. If your application were receiving a small amount of steady traffic, then the dashboard would look like this:
We can see right away that the world-v2 service
is taking roughly 10 percent of traffic, with 100 percent success rate. If
everything looks good, we can proceed to the next step by clicking the “Ok,
success rates look stable” button in the Jenkins UI.
Shift Traffic (100 Percent)
In this step, the script shifts additional traffic to the new version of our service. For a concise example, we’re moving immediately to 100 percent of traffic, but in a typical deployment, you could include additional intermediary percentages as separate steps in the pipeline.
We can verify that the new service is serving traffic by sending it a request without a dtab override header:
$ curl $L5D_INGRESS_LBHello (10.196.2.5) hal, open the pod bay doors (10.196.2.13)!!Once we’re confident that world-v2 is successfully handling 100% of production traffic, we can proceed to the final step by clicking the “Ok, everything looks good” button in the Jenkins UI.
Cleanup
In the final step, the script finalizes the deploy by making the routing rules to route traffic to the new version of the service permanent. It also tears down the previous version of the service that was still running in our cluster but not receiving any traffic.
The final version of Namerd’s dtab is now:
$ namerctl dtab get internal# version MTIzMzU0OTE=/srv => /#/io.l5d.k8s/default/http ;/host => /srv ;/tmp => /srv ;/http/*/* => /host ;/host/world => /srv/world-v2 ;We can verify that the old service has been torn down by looking at the world service pods that are currently deployed to our cluster.
$ kubectl get po | grep worldworld-v2-65y9g 1/1 Running 0 1hworld-v2-d260q 1/1 Running 0 1hworld-v2-z7ngo 1/1 Running 0 1hEverything looks good. Kicking off a subsequent pipeline job will deploy a world-v3version of the service, gradually shift traffic over, and then promote it to the current version when the deploy successfully completes.
Using Linkerd as an Ingress Point
Next, let’s talk about using Linkerd as an ingress point for traffic to a Kubernetes network.
Step 1: Deploy the Linkerd Service Mesh
Starting with our basic Linkerd service mesh Kubernetes config from the previous sections, we’ll make two changes to support ingress: we’ll modify the Linkerd config to add an additional logical router, and we’ll tweak the VIP in the Kubernetes Service object around Linkerd. (The full config is here: Linkerd-ingress.yml.)
Here’s the new ingress logical router on Linkerd instances that will handle ingress traffic and route it to the corresponding services:
routers:- protocol: http label: ingress dtab: | /srv => /#/io.l5d.k8s/default/http ; /domain/world/hello/www => /srv/hello ; /domain/world/hello/api => /srv/api ; /host => /$/io.buoyant.http.domainToPathPfx/domain ; /svc => /host ; interpreter: kind: default transformers: - kind: io.l5d.k8s.daemonset namespace: default port: incoming service: l5d servers: - port: 4142 ip: 0.0.0.0In this config, we’re using Linkerd’s routing syntax, dtabs, to route requests from domain to service — in this case from “api.hello.world” to the api service, and from “www.hello.world” to the world service. For simplicity’s sake, we’ve added one rule per domain, but this mapping can easily be generified for more complex setups. (If you’re a Linkerd config aficionado, we’re accomplishing this behavior by combining Linkerd’s default header token identifier to route on the Host header, the domainToPathPfx namer to turn dotted hostnames into hierarchical paths, and the io.l5d.k8s.daemonset transformer to send requests to the corresponding host-local Linkerd.)
We’ve added this ingress router to every Linkerd instance — in true service mesh fashion, we’ll fully distribute ingress traffic across these instances so that no instance is a single point of failure.
We also need to modify our k8s Service object to replace the outgoing VIP with an ingress VIP on port 80. This will allow us to send ingress traffic directly to the Linkerd service mesh — mainly for debugging purposes, since this traffic will not be sanitized before hitting Linkerd. (In the next step, we’ll fix this.)
The Kubernetes change looks like this:
---apiVersion: v1kind: Servicemetadata: name: l5dspec: selector: app: l5d type: LoadBalancer ports: - name: ingress port: 80 targetPort: 4142 - name: incoming port: 4141 - name: admin port: 9990All of the above can be accomplished in one fell swoop by running this command to apply the full Linkerd service mesh plus ingress Kubernetes config:
$ kubectl apply -f https://raw.githubusercontent.com/Linkerd/Linkerd-examples/master/k8s-daemonset/k8s/Linkerd-ingress.ymlStep 2: Deploy the Services
For services in this example, we’ll use the same hello and world configs and we’ll add two new services: an API service, which calls both hello and world, and a new version of the world service, world-v2, which will return the word “earth” rather than “world” — our growth hacker team has assured us their A/B tests show this change will increase engagement tenfold.
The following commands will deploy the three hello world services to the default namespace:
$ kubectl apply -f https://raw.githubusercontent.com/Linkerd/Linkerd-examples/master/k8s-daemonset/k8s/hello-world.yml$ kubectl apply -f https://raw.githubusercontent.com/Linkerd/Linkerd-examples/master/k8s-daemonset/k8s/api.yml$ kubectl apply -f https://raw.githubusercontent.com/Linkerd/Linkerd-examples/master/k8s-daemonset/k8s/world-v2.ymlAt this point, we should be able to test the setup by sending traffic through the ingressKubernetes VIP. In the absence of futzing with DNS, we’ll set a Host header manually on the request:
$ INGRESS_LB=$(kubectl get svc l5d -o jsonpath="{.status.loadBalancer.ingress[0].*}")$ curl -s -H "Host: www.hello.world" $INGRESS_LBHello (10.0.5.7) world (10.0.4.7)!!$ curl -s -H "Host: api.hello.world" $INGRESS_LB{"api_result":"api (10.0.3.6) Hello (10.0.5.4) world (10.0.1.5)!!"}Success! We’ve set up Linkerd as our ingress controller, and we’ve used it to route requests received on different domains to different services. And as you can see, production traffic is hitting the world-v1 service — we aren’t ready to bring world-v2 out just yet.
Step 3: A Layer of NGINX
At this point, we have functioning ingress. However, we’re not ready for production just yet. For one thing, our ingress router doesn’t strip headers from requests, which means that external requests may include headers that we do not want to accept. For instance, Linkerd allows setting the l5d-dtab header to apply routing rules per-request. This is a useful feature for the ad-hoc staging of new services, but it’s probably not appropriate calls from the outside world!
For example, we can use the l5d-dtab header to override the routing logic to use world-v2 rather than the production world-v1 service the outside world:
$ curl -H "Host: www.hello.world" -H "l5d-dtab: /host/world => /srv/world-v2;" $INGRESS_LBHello (10.100.4.3) earth (10.100.5.5)!!Note the earth in the response, denoting the result of the world-v2 service. That’s cool, but definitely not the kind of power we want to give just anyone!
We can address this (and other issues, such as serving static files) by adding NGINX to the mix. If we configure NGINX to strip incoming headers before proxying requests to the Linkerd ingress route, we’ll get the best of both worlds: an ingress layer that is capable of safely handling external traffic, and Linkerd doing dynamic, service-based routing.
Let’s add nginx to the cluster. We’ll configure it using this nginx.conf. We’ll use the proxy_pass directive under our virtual servers www.hello.world and api.hello.world to send requests to the Linkerd instances, and, for maximum fanciness, we’ll strip Linkerd’s context headers using the more_clear_input_headers directive (with wildcard matching) provided by the Headers More module.
(Alternatively, we could avoid third-party nginx modules by
using nginx’sproxy_set_header directive
to clear headers. We’d need separate entries for each l5d-ctx- header as well
as the l5d-dtab and l5d-sample headers.)
Note that as of Linkerd 0.9.0, we can clear incoming l5d-* headers by setting clearContext: true on the ingress router server. However, nginx has many features we can make use of (as you’ll see presently), so it is still valuable to use nginx in conjunction with Linkerd.
For those of you following along at home, we’ve published an nginx Docker image with the Headers More module installed (Dockerfile here) as buoyantio/nginx:1.11.5. We can deploy this image with our config above using this Kubernetes config:
$ kubectl apply -f https://raw.githubusercontent.com/Linkerd/Linkerd-examples/master/k8s-daemonset/k8s/nginx.ymlAfter waiting a bit for the external IP to appear, we can test that NGINX is up by hitting the simple test endpoint in the nginx.conf:
$ INGRESS_LB=$(kubectl get svc nginx -o jsonpath="{.status.loadBalancer.ingress[0].*}")$ curl $INGRESS_LB200 OKWe should be able to now send traffic to our services through NGINX:
$ curl -s -H "Host: www.hello.world" $INGRESS_LBHello (10.0.5.7) world (10.0.4.7)!!$ curl -s -H "Host: api.hello.world" $INGRESS_LB{"api_result":"api (10.0.3.6) Hello (10.0.5.4) world (10.0.1.5)!!"}Finally, let’s try our header trick and attempt to communicate directly with the world-v2service:
$ curl -H "Host: www.hello.world" -H "l5d-dtab: /host/world => /srv/world-v2;" $INGRESS_LBHello (10.196.1.8) world (10.196.2.13)!!Great! No more earth. NGINX is sanitizing external traffic.
Step 4: Time for Some Delicious Dogfood
OK, we’re ready for the good part: Let’s set up a dogfood environment that uses the world-v2 service, but only for some traffic!
For simplicity, we’ll target traffic that sets a particular cookie, special_employee_cookie. In practice, you probably want something more sophisticated than this — authenticate it, require that it comes from the corp network IP range, etc.
With NGINX and Linkerd installed, accomplishing this is quite simple. We’ll use NGINX to check for the presence of that cookie, and set a dtab override header for Linkerd to adjust its routing. The relevant NGINX config looks like this:
if ($cookie_special_employee_cookie ~* "dogfood") { set $xheader "/host/world => /srv/world-v2;";} proxy_set_header 'l5d-dtab' $xheader;If you’ve been following the steps above, the deployed NGINX already contains this configuration. We can test it like so:
$ curl -H "Host: www.hello.world" --cookie "special_employee_cookie=dogfood" $INGRESS_LBHello (10.196.1.8) earth (10.196.2.13)!!The system works! When this cookie is set, you’ll be in dogfood mode. Without it, you’ll be in regular, production traffic mode. Most importantly, dogfood mode can involve new versions of services that appear anywhere in the service stack, even many layers deep — as long as service code forwards Linkerd context headers, the Linkerd service mesh will take care of the rest.
Why Is Staging So Important?
In modern software development, code goes through a rigorous set of practices designed to assess correctness: code review, unit tests, integration tests, etc. Having passed these hurdles, we move to assess ;
The fundamental principle of staging is that the closer to the production environment, the more realistic staging will be. Thus, while mocks and stub implementations make sense for tests, for staging, we ideally want actual running services. The best staging environment is one in which the surrounding environment is exactly the same as it will be in production.
Why Is Staging Hard for Microservices?
When your application consists of many services, the interaction between these services becomes a critical component of end-to-end application behavior. In fact, the more that the application is disaggregated into services, the more that the runtime behavior of the application is determined not just by the services themselves, but by the interactions between them.
Unfortunately, increasing the number of services doesn’t just increase the importance of proper staging, it also increases the difficulty of doing this properly. Let’s take a look at a couple of common ways of staging, and why they suffer in multi-service environments.
A frequent choice for staging is the shared staging cluster, wherein your staged service is deployed into a dedicated staging environment alongside other staged services. The problem with this approach is that there is no isolation. If, as in the diagram below, Alex deploys his Foo service and sees weird behavior, it’s difficult to determine the source—it could be due to the staging deploys of Alex, Alice, or Bob, or simply the mock data in the database. Keeping the staging environment in sync with production can be very difficult, especially as the number of services, teams, and releases all start to increase.
An alternative to the shared environment that addresses the lack of isolation is the “personal” or per-developer, staging cluster. In this model, every developer can spin up a staging cluster on demand. To keep our staging effective, staging a service requires staging its upstream and downstream dependencies as well. (For example, in the diagram below, Alex would need to deploy Web FE and API in order to ensure the changes he made to his Foo service are correctly reflected there.) Unfortunately, maintaining the ability to deploy arbitrary subsets of the application topology on demand also becomes very complex, especially as the application topology becomes larger, and as services have independent deployment models.
Finally, there is the (sadly prevalent!) option of simply deploying fresh code into production and rolling it back when flaws are discovered. Of course, this is rather risky, and may not be an option for applications that handle, e.g., financial transactions. There are many other ways you could obtain a staging environment, but in this article, we’ll describe a straightforward, tear-free approach.
A Better Path
Fortunately, with Linkerd, we can do staging without incurring the costs detailed above, by creating ad-hoc staging environments. In fact, one of the prime motivations for the routing layer in Finagle, the library underlying Linkerd, was solving this very problem at Twitter!
Let’s consider again the goal of staging Alex’s Foo service. What if, rather than deploying to a separate environment, we could simply substitute Foo-staging in place of Foo-production, for a specific request? That would give us the ability to stage Foo safely, against the production environment, without requiring any deployment other than that of Foo-staging itself. This is the essence of ad-hoc staging environments. The burden on the developer is now greatly eased: Alex must simply stage his new code, set a header on ingress requests, and voila!
Linkerd’s per-request routing allows us to do just this. With
Linkerd proxying traffic, we can set a routing “override” for a particular
request using the l5d-dtabheader. This header allows you to set routing rules
(called, in Finagle parlance, “Dtabs”) for that request. For example, the dtab
rule /s/foo => /srv/alex-foo might
override the production routing rule for Foo. Attaching this change to a single
request would allow us to reach Alex’s Foo service, but only for that request.
Linkerd propagates this rule, so any usage of Alex’s Foo service anywhere in
the application topology, for the lifetime of that request, will be properly
handled.
Trying This at Home
Let’s deploy two versions of a service and use Linkerd’s routing capabilities to test our new service before using it in production. We’ll deploy our hello and world-v1services as our running prod services, and then we’ll create an ad-hoc staging environment to stage and test a new version of world, world-v2.
Step 1: Deploy Linkerd and Our Hello-World Services
We’ll use the hello world service from the previous blog posts. This consists of a hello service that calls a world service.
Let’s deploy our prod environment (Linkerd, and the hello and world services):
$ kubectl apply -f https://raw.githubusercontent.com/Linkerd/Linkerd-examples/master/k8s-daemonset/k8s/Linkerd-ingress.yml$ kubectl apply -f https://raw.githubusercontent.com/Linkerd/Linkerd-examples/master/k8s-daemonset/k8s/hello-world.ymlLet’s also deploy the service we want to stage, world-v2, which will return the word “earth” rather than “world.”
$ kubectl apply -f https://raw.githubusercontent.com/Linkerd/Linkerd-examples/master/k8s-daemonset/k8s/world-v2.ymlStep 2: Use Per Request Overrides in Our Ad-Hoc Staging Environment
So now that we have a running world-v2, let’s test it by running a request through our production topology, except that instead of hitting world-v1, we’ll hit world-v2. First, let’s run an unmodified request through our default topology (you may have to wait for l5d’s external IP to appear):
$ INGRESS_LB=$(kubectl get svc l5d -o jsonpath="{.status.loadBalancer.ingress[0].*}")$ curl -H "Host: www.hello.world" $INGRESS_LBHello (10.196.2.232) world (10.196.2.233)!!As we expect, this returns Hello (......) World (.....) from our production topology.
Now, how do we get to the staging environment? All we have to do
is pass the following dtab override and requests through the prod topology will
go to world-v2! A dtab override is another dtab entry that we pass using
headers in the request. Since later dtab rules are applied first, this rule
will replace (override) our current “/host/world =>
/srv/world-v1” rule with a rule to send requests with /host/world to /srv/world-v2
instead.
$ curl -H "Host: www.hello.world" -H "l5d-dtab: /host/world => /srv/world-v2;" $INGRESS_LBHello (10.196.2.232) earth (10.196.2.234)!!We now see “earth” instead of “world”! The request is successfully served from the world-v2 service wired up to our existing production topology, with no code changes or additional deploys. Success! Staging is now fun and easy.
Dtabs and routing in Linkerd are well documented. During
development, you can also make use of Linkerd’s “dtab playground” at http://$INGRESS_LB:9990/delegator. By going
to the “outgoing” router and testing a request name like /http/1.1/GET/world, you
can see Linkerd’s routing policy in action.
In Practice
In practice, there are some caveats to using this approach. First, the issue of writing to production databases must be addressed. The same dtab override mechanism can be used to send any writes to a staging database, or, with some application-level intelligence, to /dev/null. It is recommended that these rules are not created by hand so as to avoid expensive mistakes with production data!
Secondly, your application needs to forward Linkerd’s context headers for this to work.
Lastly, it’s important to ensure that the l5d-dtab header is not settable from the outside world! In the previous example above, NGINX configuration for ingress stripped unknown headers from the outside world — good practice for a variety of reasons.
Now, we’ll demonstrate how to use Linkerd with gRPC, allowing applications that speak gRPC to take full advantage of Linkerd’s load balancing, service discovery, circuit breaking, and distributed tracing logic.
We’ll use our familiar hello world microservice app and configs, which can be found in the Linkerd-examples repo (k8s configs here and hello world code here).
The hello world application consists of two components—a hello service which calls a world service to complete a request. hello and world use gRPC to talk to each other. We’ll deploy Linkerd as a DaemonSet (so one Linkerd instance per host). When the hello service wants to call world, the request goes through the outgoing router of its host-local Linkerd, which does not send the request directly to the destination world service, but to a Linkerd instance running on the same host as world (on its incoming router). That Linkerd instance then sends the request to the world service on its host. This three-hop model allows Linkerd to decouple the application’s protocol from the transport protocol—for example, by wrapping cross-node connections in TLS.
Let’s see this setup in action! Deploy hello, world, and Linkerd to the default k8s namespace:
kubectl apply -f https://raw.githubusercontent.com/BuoyantIO/Linkerd-examples/master/k8s-daemonset/k8s/hello-world-grpc.ymlkubectl apply -f https://raw.githubusercontent.com/BuoyantIO/Linkerd-examples/master/k8s-daemonset/k8s/Linkerd-grpc.ymlOnce Kubernetes provisions an external LoadBalancer IP for Linkerd, we can do some test requests! Note that the examples in this post assume k8s is running on GKE (e.g. external LoadBalancer IPs are available, no CNI plugins are being used). Slight modifications may be needed for other environments.
We’ll use the helloworld-client provided by the hello world Docker image in order to send test gRPC requests to our hello world service:
$ L5D_INGRESS_LB=$(kubectl get svc l5d -o jsonpath="{.status.loadBalancer.ingress[0].*}")$ docker run --rm --entrypoint=helloworld-client buoyantio/helloworld:0.1.3 $L5D_INGRESS_LB:4140Hello (10.196.1.242) world (10.196.1.243)!!It works!
We can check out the Linkerd admin dashboard by doing:
$ open http://$L5D_INGRESS_LB:9990 # on OSXAnd that’s it! We now have gRPC services talking to each other, with their HTTP/2 requests being routed through Linkerd. Now we can use all of Linkerd’s awesome features, including per-request routing, load balancing, circuit-breaking, retries, TLS, distributed tracing, service discovery integration and more, in our gRPC microservice applications!
How Linkerd and Zipkin Work Together in Kubernetes
Linkerd’s role as a service mesh makes it a great source of data around system performance and runtime behavior. This is especially true in polyglot or heterogeneous environments, where instrumenting each language or framework can be quite difficult. Rather than instrumenting each of your apps directly, the service mesh can provide a uniform, standard layer of application tracing and metrics data, which can be collected by systems like Zipkin and Prometheus.
Now, we’ll walk through a simple example of how Linkerd and Zipkin can work together in Kubernetes to automatically get distributed traces, with only minor changes to the application.
Before we start looking at traces, we’ll need to deploy Linkerd and Zipkin to Kubernetes, along with some sample apps. The Linkerd-examples repo provides all of the configuration files that we’ll need to get tracing working end-to-end in Kubernetes. We’ll walk you through the steps below.
Step 1: Install Zipkin
We’ll start by installing Zipkin, which will be used to collect and display tracing data. In this example, for convenience, we’ll use Zipkin’s in-memory store. (If you plan to run Zipkin in production, you’ll want to switch to using one of its persistent backends.)
To install Zipkin in the default Kubernetes namespace, run:
kubectl apply -f https://raw.githubusercontent.com/Linkerd/Linkerd-examples/master/k8s-daemonset/k8s/zipkin.ymlYou can confirm that installation was successful by viewing Zipkin’s web UI:
ZIPKIN_LB=$(kubectl get svc zipkin -o jsonpath="{.status.loadBalancer.ingress[0].*}")open http://$ZIPKIN_LB # on OS XNote that it may take a few minutes for the ingress IP to become available. (Also note that if you’re running on Minikube, you need to run a different set of commands to load the web UI.)
But the web UI won’t show any traces until we install Linkerd.
Step 2: Install the Service Mesh
Next, we’ll install the Linkerd service mesh, configured to write tracing data to Zipkin. To install Linkerd as a DaemonSet (i.e., one instance per host) in the default Kubernetes namespace, run:
kubectl apply -f https://raw.githubusercontent.com/Linkerd/Linkerd-examples/master/k8s-daemonset/k8s/Linkerd-zipkin.ymlThis installed Linkerd as a service mesh, exporting tracing data with Linkerd’s Zipkin telemeter. The relevant config snippet is:
telemetry:- kind: io.l5d.zipkin host: zipkin-collector.default.svc.cluster.local port: 9410 sampleRate: 1.0Here we’re telling Linkerd to send tracing data to the Zipkin service that we deployed in the previous step, on port 9410. The configuration also specifies a sample rate, which determines the number of requests that are traced. In this example, we’re tracing all requests, but in a production setting, you may want to set the rate to be much lower (the default is 0.001, or 0.1 percent of all requests).
You can confirm the installation was successful by viewing Linkerd’s admin UI (note, again, that it may take a few minutes for the ingress IP to become available, depending on the vagaries of your cloud provider):
L5D_INGRESS_LB=$(kubectl get svc l5d -o jsonpath="{.status.loadBalancer.ingress[0].*}")open http://$L5D_INGRESS_LB:9990 # on OS XStep 3: Install the Sample Apps
Now we’ll install the “hello” and “world” apps in the default namespace, by running:
kubectl apply -f https://raw.githubusercontent.com/Linkerd/Linkerd-examples/master/k8s-daemonset/k8s/hello-world.ymlCongrats! At this point, we have a functioning service mesh with distributed tracing enabled, and an application that makes use of it.
Let’s see the entire setup in action by sending traffic through Linkerd’s outgoing router running on port 4140:
http_proxy=http://$L5D_INGRESS_LB:4140 curl -s http://helloHello () world ()!If everything is working, you’ll see a “Hello world” message similar to that above, with the IPs of the pods that served the request.
Step 4: Enjoy the View
Now it’s time to see some traces. Zipkin’s UI allows you to search by “span” name, and in our case, we’re interested in spans that originated with the Linkerd router running on 0.0.0.0:4140, which is where we sent our initial request. We can search for that span as follows:
open http://$ZIPKIN_LB/?serviceName=0.0.0.0%2F4140 # on OS XFrom this view, you can see the timing information for all 8 spans that Linkerd emitted for this trace. The fact that there are 8 spans for a request between 2 services stems from the service mesh configuration, in which each request passes through two Linkerd instances (so that the protocol can be upgraded or downgraded, or TLS can be added and removed across node boundaries). Each Linkerd router emits both a server span and a client span, for a total of eight spans.
Clicking on a span will bring up additional details for that span. For instance, the last span in the trace above represents how long it took the world service to respond to a request—8 milliseconds. If you click on that span, you’ll see the span detail view.
This view has a lot more information about the span. At the top of the page, you’ll see timing information that indicates when Linkerd sent the request to the service, and when it received a response. You’ll also see a number of key-value pairs with additional information about the request, such as the request URI, the response status code, and the address of the server that served the request. All of this information is populated by Linkerd automatically and can be very useful in tracking down performance bottlenecks and failures.
A Note About Request Context
In order for distributed traces to be properly disentangled, we need a little help from the application. Specifically, we need services to forward Linkerd’s “context headers” (anything that starts with l5d-ctx-) from incoming requests to outgoing requests. Without these headers, it’s impossible to align outgoing requests with incoming requests through a service. (The hello and world services provided above do this by default.
The L5d-sample header can be used to adjust the tracing sample rate on a per-request basis. To guarantee that a request will be traced, set L5d-sample: 1.0. If you’re sending a barrage of requests in a loadtest that you don’t want flooding your tracing system, consider setting it to something much lower than the steady-state sample rate defined in your Linkerd config.
Conclusion
By using Linkerd for egress, external services are able to share the same benefits that services running inside of Kubernetes get from the Linkerd service mesh. These include adaptive load balancing, circuit breaking, observability, dynamic routing, and TLS initiation. Most importantly, Linkerd gives you a uniform, consistent model of request handling and naming that’s independent of whether those requests are destined for internal services, or for external, third-party APIs.
We Provide consulting, implementation, and management services on DevOps, DevSecOps, Cloud, Automated Ops, Microservices, Infrastructure, and Security
Services offered by us: https://www.zippyops.com/services
Our Products: https://www.zippyops.com/products
Our Solutions: https://www.zippyops.com/solutions
For Demo, videos check out YouTube Playlist: https://www.youtube.com/watch?v=4FYvPooN_Tg&list=PLCJ3JpanNyCfXlHahZhYgJH9-rV6ouPro
If this seems interesting, please email us at [email protected] for a call.
Relevant Blogs:
Go CDK! What This Means for the World of IaC
Best Practices for Building a Cloud-Native Data Warehouse or Data Lake
Google Cloud - For AWS Professionals
Recent Comments
No comments
Leave a Comment
We will be happy to hear what you think about this post