Ansible windows jump host for windows node

To connect with Windows Target Server through Windows Jump Host From Ansible Controller.
Basically, Ansible Will connect to windows Nodes using Winrm.
WinRM is a management protocol used by Windows to remotely communicate with another server. It is a SOAP-based protocol that communicates over HTTP/HTTPS and is included in all recent Windows operating systems. Since Windows Server 2012, WinRM has been enabled by default, but in most cases, the extra configuration is required to use WinRM with Ansible.
In a strictly secured environment, you may not be allowed to perform tasks freely. Only the bastion host (a.k.a jump host) is the one freely allowed to access all systems. In some scenarios, restricted environment access is via only jump host.
Here we are going to install Nginx in Windows Jump Host and it acts as the proxy to send winrm traffics. If you set up a rule per "target node" in your Nginx config so that each node gets a unique URL (proxy.domain.com/node1, proxy.domain.com/node2, etc) and each node points to real.fqdn.com/wsman) you will be able to proxy multiple winrm connections thru one jump host.
Prerequisites
Make Sure Ansible Installed With 2.9 VersionWindows Target server – Windows Server 2012R2
Open SSL Application
Nginx Application
Ansible Controller
Make Sure Ansible is Installed with the 2.9 version

Windows Jump Host Configuration with Nginx
Installing Nginx in the Windows Jump host will act as the Proxy to Windows Target servers.
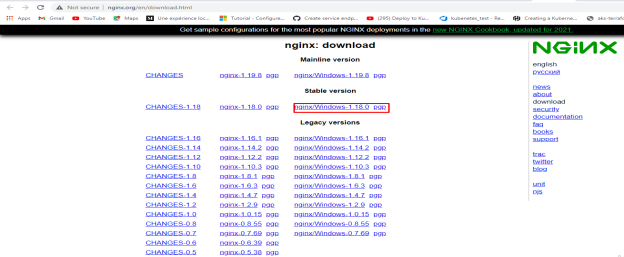
Download Nginx stable version from https://nginx.org/en/download.html
Download and Extract it to C:\Program Files.
Check Whether Nginx Installed properly in windows 2012R2 (Jump Host)
Run the Nginx from Powershell

Check the Nginx Welcome Page is available from the localhost from the server.

OpenSSL Installation in Windows jump host
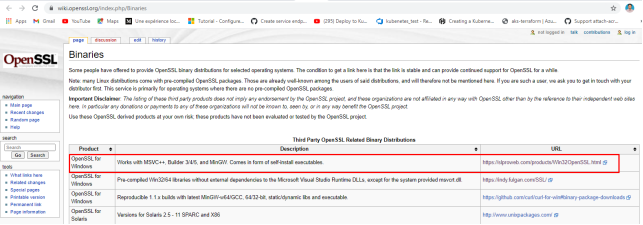
Download and Install OpenSSL package
from the https://wiki.openssl.org/index.php/Binaries
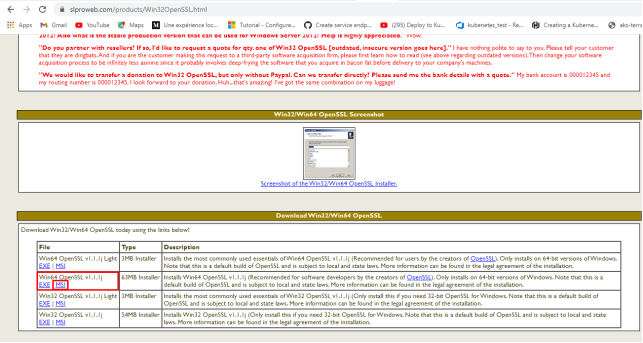
Download OpenSSL from mentioned link and download installer package MSI.
To install OpenSSL requires Visual Studio 2017 so it wants to be installed first.
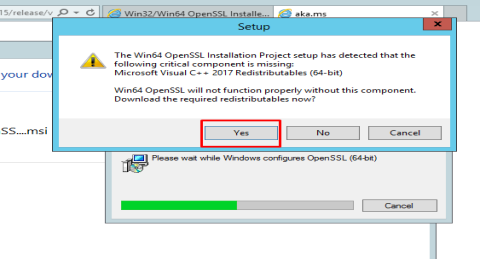
Install Visual studio first and then install OpenSSL Package.

Go to Path of OpenSSL Path in PowerShell and run the command to create SSL private key and Certificate
./oppenssl.exe openssl req -x509 -nodes -days 365 -newkey rsa:2048 -keyout privatekey.key -out certificate.crt
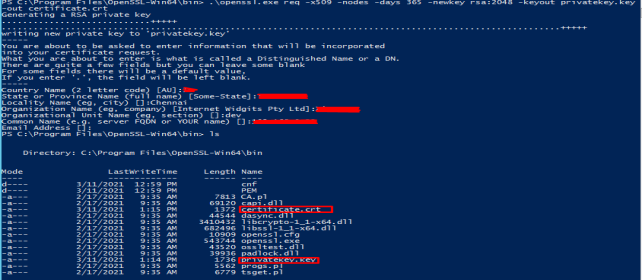
After Running the OpenSSL command it asks for the country, state, company details.
In Common Name, Give IP of your Server.
Create One Folder named SSL in C: and copy privatekey.key and certificate.crt file from C:\Program Files\OpenSSL-Win64\bin .
Nginx Configuration
After Creating the SSL key and Certificate and time to change the nginx config file to connect with Target Windows Server.
In the Nginx Config file, we have to write the rule to send winrm traffic thru a proxy such as Nginx since it's just basic HTTPS traffic.
Here are the changes we need to mention in the Nginx config file to proxy to the target server using SSL.
server {
listen 8080 ssl;
server_name 192.168.0.23;
ssl_certificate C:\SSL\certificate.crt;
ssl_certificate_key C:\SSL\privateKey.key;
location /192.168.0.48 {
proxy_pass http://192.168.0.48:5985/wsman;
proxy_set_header Host $host;
proxy_set_header X-Real-IP $remote_addr;
proxy_set_header X-Forwarded-For $proxy_add_x_forwarded_for;
client_max_body_size 10m;
client_body_buffer_size 128k;
proxy_connect_timeout 90;
proxy_send_timeout 90;
proxy_read_timeout 90;
proxy_buffers 32 4k;
}
We have to mention the SSL certificate path and ssl_certificate_key path in a config file.
In proxy Pass mention the target server like http://TargetServerIP:Port/wsman
The Ansible will connect to the 8080 port which was opened in Windows JumpHost through that it will connect to the target server using service_name.
forwarding "/192.168.0.48" to "/wsman" on the backend windows node
Basically, Ansible will connect to Windows using WINRM only so we need to mention the winrm port.
Before changing the Nginx configuration, stop the Nginx: ./nginx -s stop from Powershell.
Here, Server_name 192.168.0.23 – Jump Host IP
proxy_pass – Targetserver IP with Port number
Start the Nginx Service after changing the Nginx Configuration

Ansible Inventory
We can directly mention the Target host details behind the proxy in the Ansible inventory.
Check pywirm is installed on Ansible controller by checking command
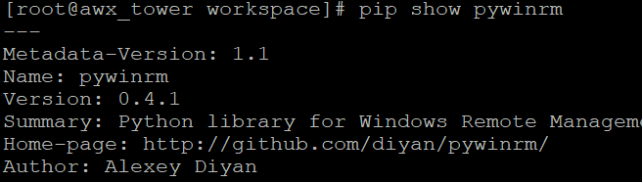
If pywinrm is not installed through pip install pywinrm.
Go to Ansible Controller,/etc/ansible/workspace/

Vi /etc/ansible/workspace/windows
192.168.0.48 ansible_host=192.168.0.23 ansible_user=demo ansible_password=2!ppy0ps ansible_port=8080 ansible_connection=winrm ansible_winrm_path=service_name ansible_winrm_server_cert_validation=ignore
Here,192.168.0.48 - Target Windows Server
Ansible_host - Proxy server(Jump Host IP)
Ansible_User - Target Server’s user
Ansible_password – Target Server Password
Ansible_port – port that runs on the Jump Host Server
Ansible_connection – winrm
Ansible_winrm_path –
Configure Winrm in Target Windows Server
Ansible requires PowerShell version 3.0 and .NET Framework 4.0 or newer to function on older operating systems like Server 2008 and Windows 7. The base image does not meet this requirement. You can use the Upgrade-PowerShell.ps1 script to update these.
Set-ExecutionPolicy -ExecutionPolicy Unrestricted -Force
PS D:\> .\Upgrade-PowerShell.ps1
Once completed, you will need to remove auto-login and set the execution policy back to the default of Restricted. You can do this with the following PowerShell commands:
Set-ExecutionPolicy -ExecutionPolicy Restricted -Force
The script works by checking to see what programs need to be installed (such as .NET Framework 4.5.2) and what PowerShell version is required. If a reboot is required and the username and password parameters are set, the script will automatically reboot and log on when it comes back up from the reboot. The script will continue until no more actions are required and the PowerShell version matches the target version. If the username and password parameters are not set, the script will prompt the user to manually reboot and log on when required. When the user is next logged in, the script will continue where it left off and the process continues until no more actions are required.
WinRM Setup
Once Powershell has been upgraded to at least version 3.0, the final step is for the WinRM service to be configured so that Ansible can connect to it. There are two main components of the WinRM service that governs how Ansible can interface with the Windows host: the listener and the service configuration settings.
Details about each component can be read below,
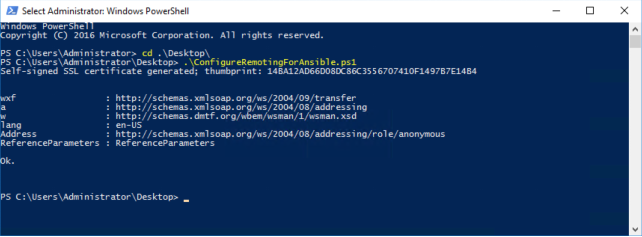
but the script ConfigureRemotingForAnsible.ps1 can be used to set up the basics. This script sets up both HTTP and HTTPS listeners with a self-signed certificate and enables the Basic authentication option on the service.
To use this script, run the following in PowerShell as shown below:
D:\> .\ConfigureRemotingForAnsible.ps1
WinRM Listener
The WinRM services listen for requests on one or more ports. Each of these ports must have a listener created and configured.
To view the current listeners that are running on the WinRM service, run the following command:
winrm enumerate winrm/config/Listener
This will output something like the following:
Listener
Address = *
Transport = HTTP
Port = 5985
Hostname
Enabled = true
URLPrefix = wsman
CertificateThumbprint
ListeningOn = 10.0.2.15, 127.0.0.1, 192.168.56.155, ::1, fe80::5efe:10.0.2.15%6, fe80::5efe:192.168.56.155%8, fe80::
ffff:ffff:fffe%2, fe80::203d:7d97:c2ed:ec78%3, fe80::e8ea:d765:2c69:7756%7
Listener
Address = *
Transport = HTTPS
Port = 5986
Hostname = Windows 2012
Enabled = true
URLPrefix = wsman
CertificateThumbprint = E6CDAA82EEAF2ECE8546E05DB7F3E01AA47D76CE
ListeningOn = 10.0.2.15, 127.0.0.1, 192.168.56.155, ::1, fe80::5efe:10.0.2.15%6, fe80::5efe:192.168.56.155%8, fe80::
ffff:ffff:fffe%2, fe80::203d:7d97:c2ed:ec78%3, fe80::e8ea:d765:2c69:7756%7
In the example above there are two listeners activated; one is listening on port 5985 over HTTP and the other is listening on port 5986 over HTTPS.
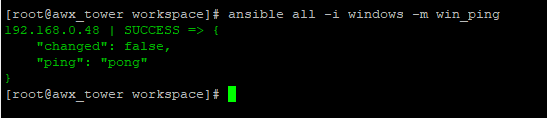
Ping Windows From Controller
Run command and check its pinging the target server through proxy:
Ansible all –I windows –m win_ping
Relevant Blogs:
Ansible Windows Jump Host for Linux server
Ansible Linux jump host for Linux node
Ansible Linux jump host for windows node
Ansible installation in Ubuntu
Ahmed alamiry says:
hello,
Thank you for your wonderful topic.
I followed your blog and it worked fine, except when I tried to create users in Active Directory using ansible through a Jump host. it is not reaching the DC behind the Jump host instead it gives an error that the Jump Host has no Active Directory Web Services running.
"Error
TCP error code 10060: A connection a ttempt failed because the connected party did not properly respond after a period of time, or established connection failed because connected host has failed to respond xxx.xxx.xxx.xxx:9389."
where the xxx.xx.xxx.xxx are jump host IP.
Do you have any suggestions?