GKE Cluster Optimization: 14 Tactics for a Smoother K8s Deployment

Learn how to optimize your GKE cluster with these 14 tactics across security, resource management, and networking for high availability and optimal cost.
Most engineers don’t want to spend more time than necessary to keep their clusters highly available, secure, and cost-efficient. How do you make sure your Google Kubernetes engine cluster is ready for the storms ahead?
Here are fourteen optimization tactics divided into three core areas of your cluster. Use them to build a resource-efficient, highly-available GKE cluster with airtight security.
Here are the three core sections in this article:
1. Resource Management
2. Security
3. Networking
Resource Management Tips for a GKE Cluster
1. Autoscaling
Use the autoscaling capabilities of Kubernetes to make sure your workloads perform well during peak load and control costs in times of normal or low loads.
Kubernetes gives you several autoscaling mechanisms. Here’s a quick overview to get you up to speed:
- Horizontal pod autoscaler: HPA adds or removes pod replicas automatically based on utilization metrics. It works great for scaling stateless and stateful applications. Use it with Cluster Autoscaler to shrink the number of active nodes when the pod number decreases. HPA also comes in handy for handling workloads with short high utilization spikes.
- Vertical pod autoscaler: VPA increases and lowers the CPU and memory resource requests of pod containers to make sure the allocated and actual cluster usage match. If your HPA configuration doesn’t use CPU or memory to identify scaling targets, it’s best to use it with VPA.
- Cluster autoscaler: it dynamically scales the number of nodes to match the current GKE cluster utilization. Works great with workloads designed to meet dynamically changing demand.
Best Practices for Autoscaling in a GKE Cluster
- Use HPA, VPA and Node Auto Provisioning (NAP): By using HPA, VPA and NAP together, you let GKE efficiently scale your cluster horizontally (pods) and vertically (nodes). VPA sets values for CPU, memory requests, and limits for containers, while NAP manages node pools and eliminates the default limitation of starting new nodes only from the set of user-created node pools.
- Check if your HPA and VPA policies clash: Make sure the VPA and HPA policies don’t interfere with each other. For example, if HPA only relies on CPU and memory metrics, HPA and VPA cannot work together. Also, review your bin packing density settings when designing a new GKE cluster for a business-or purpose-class tier of service.
- Use instance weighted scores: This allows you to determine how much of your chosen resource pool will be dedicated to a specific workload and ensure that your machine is best suited for the job.
- Slash costs with a mixed-instance strategy: Using mixed instances helps achieve high availability and performance at a reasonable cost. It’s basically about choosing from various instance types, some of which may be cheaper and good enough for lower-throughput or low-latency workloads. Or you could run a smaller number of machines with higher specs.This way it would bring costs down because each node requires Kubernetes to be installed on it, which always adds a little overhead.
2. Choose the Topology for Your GKE Cluster
You can choose from two types of clusters:
1. Regional topology: In a regional Kubernetes cluster, Google replicates the control plane and nodes across multiple zones in a single region.
2. Zonal topology: In a zonal cluster, they both run in a single compute zone specified upon cluster creation.
If your application depends on the availability of a cluster API, pick a regional cluster topology, which offers higher availability for the cluster’s control plane API.
Since it’s the control plane that does jobs like scaling, replacing, and scheduling pods, if it becomes unavailable, you’re in for reliability trouble. On the other hand, regional clusters have nodes spreaded across multiple zones, which may increase your cross-zone network traffic and, thus, costs.
3. Bin Pack Nodes for Maximum Utilization
This is a smart approach to GKE cost optimization shared by the engineering team at Delivery Hero.
To maximize node utilization, it’s best to add pods to nodes in a compacted way. This opens the door to reducing costs without any impact on performance. This strategy is called bin packing and goes against the Kubernetes that favors even distribution of pods across nodes.
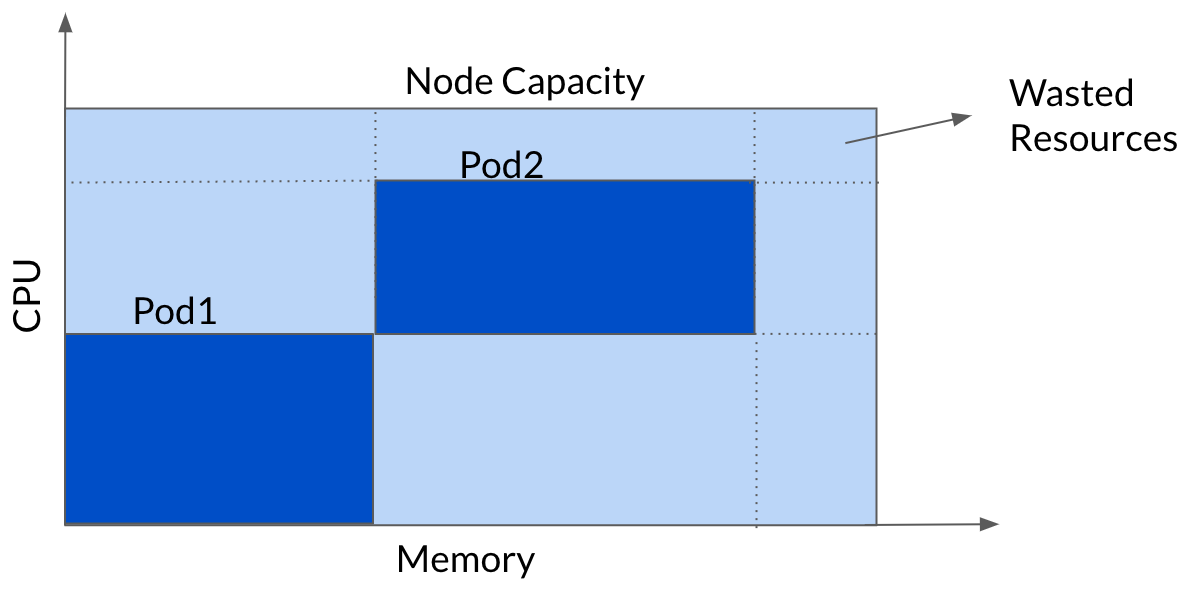
The team at Delivery Hero used GKE Autopilot, but its limitations made the engineers build bin packing on their own. To achieve the highest node utilization, the team defines one or more node pools in a way that allows nodes to include pods in the most compacted way (but leaving some buffer for the shared CPU).
By merging node pools and performing bin packing, pods fit into nodes more efficiently, helping Delivery Hero to decrease the total number of nodes by ~60% in that team.
4. Implement Cost Monitoring
Cost monitoring is a big part of resource management because it lets you keep an eye on your expenses and instantly act on cost spike alerts.
To understand your Google Kubernetes Engine costs better, implement a monitoring solution that gathers data about your cluster’s workload, total cost, costs divided by labels or namespaces, and overall performance.
The GKE usage metering enables you to monitor resource usage, map workloads, and estimate resource consumption. Enable it to quickly identify the most resource-intensive workloads or spikes in resource consumption.
This step is the bare minimum you can do for cost monitoring. Tracking these 3 metrics is what really makes a difference in how you manage your cloud resources: daily cloud spend, cost per provisioned and requested CPU, and historical cost allocation.
5. Use Spot VMs
Spot VMs are an incredible cost-saving opportunity—you can get a discount reaching up to 91% off the pay-as-you-go pricing. The catch is that Google may reclaim the machine at any time, so you need to have a strategy in place to handle the interruption.
That’s why many teams use spot VMs for workloads that are fault-and interruption-tolerant like batch processing jobs, distributed databases, CI/CD operations, or microservices.
Best Practices for Running Your GKE Cluster on Spot VMs
- How to choose the right spot VM? Pick a slightly less popular spot VM type—it’s less likely to get interrupted. You can also check its frequency of interruption (the rate at which this instance reclaimed capacity within the trailing month).
- Set up spot VM groups: This increases your chances of snatching the machines you want. Managed instance groups can request multiple machine types at the same time, adding new spot VMs when extra resources become available.
Security Best Practices for GKE Clusters
Red Hat 2022 State of Kubernetes and Container Security found that almost 70% of incidents happen due to misconfigurations.
GKE secures your Kubernetes cluster in many layers, including the container image, its runtime, the cluster network, and access to the cluster API server. Google generally recommends implementing a layered approach to GKE cluster security.
The most important security aspects to focus on are:
- Authentication and authorization
- Control plane
- Node
- Network security
1. Follow CIS Benchmarks
All of the key security areas are part of Center of Internet Security (CIS) Benchmarks, a globally recognized best practices collection that gives you a helping hand for structuring security efforts.
When you use a managed service like GKE, you don’t have the power over all the CIS Benchmark items. But some things are definitely within your control, like auditing, upgrading, and securing the cluster nodes and workloads.
You can either go through the CIS Benchmarks manually or use a tool that does the benchmarking job for you. We recently introduced a container security module that scans your GKE cluster to check for any benchmark discrepancies and prioritizes issues to help you take action.
2. Implement RBAC
Role-Based Access Control (RBAC) is an essential component for managing access to your GKE cluster. It lets you establish more granular access to Kubernetes resources at cluster and namespace levels, and develop detailed permission policies.
CIS GKE Benchmark 6.8.4 emphasizes that teams give preference to RBAC over the legacy Attribute-Based Access Control (ABAC).
Another CIS GKE Benchmark (6.8.3) suggests using groups for managing users. This is how you make controlling identities and permissions simpler and don’t need to update the RBAC configuration whenever you add or remove users from the group.
3. Follow the Principle of Least Privilege
Make sure to grant user accounts only the privileges that are essential for them to do their jobs. Nothing more than that.
The CIS GKE Benchmark 6.2.1 states: Prefer not running GKE clusters using the Compute Engine default service account.
By default, nodes get access to the Compute Engine service account. This comes in handy for multiple applications but opens the door to more permissions than necessary to run your GKE cluster. Create and use a minimally privileged service account instead of the default—and follow the same principle everywhere else.
4. Boost Your Control Plane’s Security
Google implements the Shared Responsibility Model to manage the GKE control plane components. Still, you’re the one responsible for securing nodes, containers, and pods.
The Kubernetes API server uses a public IP address by default. You can secure it with the help of authorized networks and private Kubernetes clusters that let you assign a private IP address.
Another way to improve your control plane’s security is performing a regular credential rotation. The TLS certificates and cluster certificate authority get rotated automatically when you initiate the process.
5. Protect Node Metadata
CIS GKE Benchmarks 6.4.1 and 6.4.2 point out two critical factors that may compromise your node security—and fall on your plate.
Kubernetes deprecated the v0.1 and v1beta1 Compute Engine metadata server endpoints in 2020. The reason was that they didn’t enforce metadata query headers.
Some attacks against Kubernetes clusters rely on access to the metadata server of virtual machines. The idea here is to extract credentials. You can fight such attacks with workload identity or metadata concealment.
6. Upgrade GKE Regularly
Kubernetes often releases new security features and patches, so keeping your deployment up-to-date is a simple but powerful approach to improving your security posture.
The good news about GKE is that it patches and upgrades the control plane automatically. The node auto-upgrade also upgrades cluster nodes and CIS GKE Benchmark 6.5.3 recommends that you keep this setting on.
If you want to disable the auto-upgrade for any reason, Google suggests performing upgrades on a monthly basis and following the GKE security bulletins for critical patches.
Networking Optimization Tips for Your GKE Cluster
1. Avoid Overlaps With IP Addresses From Other Environments
When designing a larger Kubernetes cluster, keep in mind to avoid overlaps with IP addresses used in your other environments. Such overlaps might cause issues with routing if you need to connect cluster VPC network to on-premises environments or other cloud service provider networks via Cloud VPN or Cloud Interconnect.
2. Use GKE Dataplane V2 and Network Policies
If you want to control traffic flow at the OSI layer 3 or 4 (IP address or port level), you should consider using network policies. Network policies allow specifying how a pod can communicate with other network entities (pods, services, certain subnets, etc.).
To bring your cluster networking to the next level, GKE Dataplane V2 is the right choice. It’s based on eBPF and provides extended integrated network security and visibility experience.
Adding to that, if the cluster uses the Google Kubernetes Engine Dataplane V2, you don’t need to enable network policies explicitly as the former manages services routing, network policy enforcement, and logging.
3. Use Cloud DNS for GKE
Pod and Service DNS resolution can be done without the additional overhead of managing the cluster-hosted DNS provider. Cloud DNS for GKE requires no additional monitoring, scaling, or other management activities as it’s a fully hosted Google service.
Conclusion
In this article, you have learned how to optimize your GKE cluster with fourteen tactics across security, resource management, and networking for high availability and optimal cost. Hopefully, you have taken away some helpful information that will help you in your career as a developer.
We Provide consulting, implementation, and management services on DevOps, DevSecOps, Cloud, Automated Ops, Microservices, Infrastructure, and Security
Services offered by us: https://www.zippyops.com/services
Our Products: https://www.zippyops.com/products
Our Solutions: https://www.zippyops.com/solutions
For Demo, videos check out YouTube Playlist: https://www.youtube.com/watch?v=4FYvPooN_Tg&list=PLCJ3JpanNyCfXlHahZhYgJH9-rV6ouPro
If this seems interesting, please email us at sales@zippyops.com for a call.
Relevant Blogs:
A Guide to Implementing Passwordless Login
Keep Your Application Secrets Secret
Top 10 Practices for Secure Software Development
Recent Comments
No comments
Leave a Comment
We will be happy to hear what you think about this post