Kubernetes Requests and Limits Demystified
We will look at basic resource configuration options and ways to think about tradeoffs between the cost and performance of your containerized apps.
Kubernetes provides a shared pool of resources that it allocates based on how we configure our containerized applications. The allocation process occurs when a scheduler places pods on nodes. After checking the container’s resource configuration, the scheduler selects a node that can guarantee the availability of the resources specified by the container configuration. It then places the container’s pod on the suitable node. Typically, this ensures that the deployed microservice will not encounter a resource shortage.
However, some workloads may require more resources than the containerized application has been configured to use. Without a means to restrict the resources that an application can request to use, our application can incur any combination of excessive costs, wasted resources, poor application performance and even application failures. Therefore, it is essential to implement a system of boundaries to prevent resource waste and costly failures.
This is why resource requests and limits are vital components of the Kubernetes environment.
Resource Request
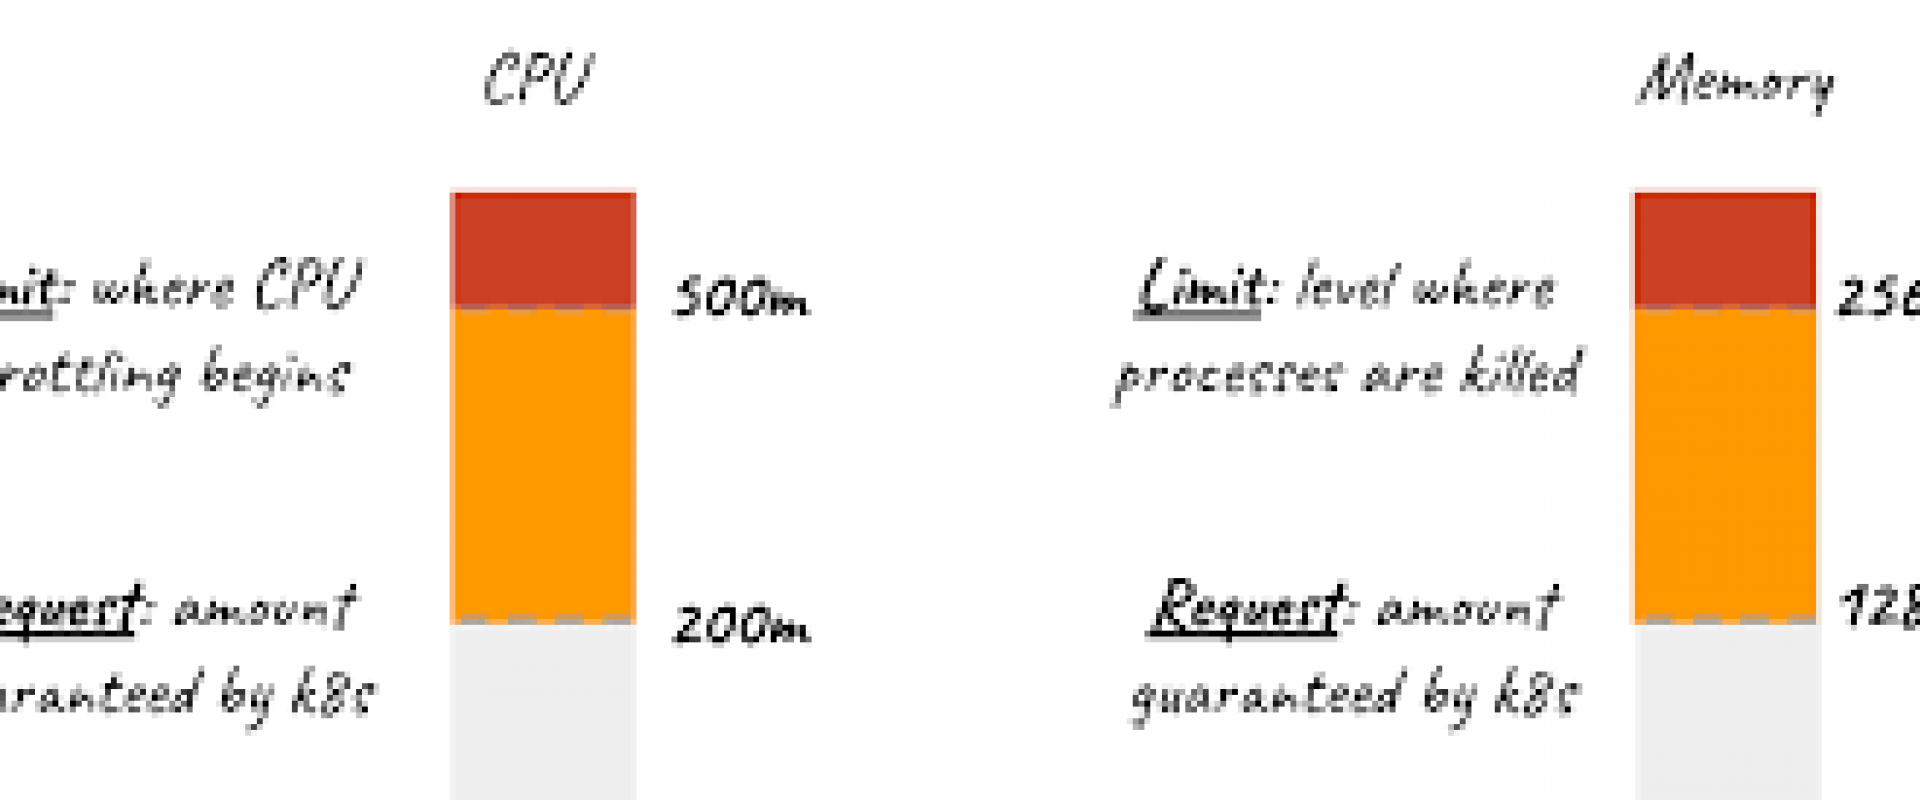
A request refers to the resources that must be reserved for a container. Including a resource request ensures that the container will receive at least what is requested.
When a container includes a resource request, the scheduler can ensure that the node to which it assigns the pod will guarantee the availability of the necessary resources.
Resource Limit
A limit is the maximum amount of resources that a container is allowed to use. When we do not configure a limit, Kubernetes automatically selects one. Therefore, when a limit is poorly configured — whether by a developer or Kubernetes — we can experience any number of unpleasant and costly consequences.
These consequences, which we will explore later in greater depth, include unnecessarily high cloud costs and poor performance due to CPU throttling and out-of-memory (OOM) errors.
While there are several types of resources, in this article we’ll focus on CPU and memory. We’ll refer to these resources collectively as “compute resources.”
CPU and Memory Requests and Limits
CPU
In the Kubernetes environment, CPU represents overall processing power. We measure it in Kubernetes CPUs, where one CPU unit represents one physical CPU or virtual core.
To accommodate a wide variety of application types, we can express CPU measurements with great precision — down to 1/1000th of a CPU or core. If, for instance, we want to request 0.5 of a CPU, we should express it as 500m — where m represents millicores:
cpu: "500m"When creating a container, we can
use resources:requests and resources:limits in the manifest to specify CPU resources:
apiVersion: v1kind: Podmetadata:name: example-podnamespace: example-namespacespec:containers:- name: example-nameimage: repo/example-imageresources:limits:cpu: "500m"requests:cpu: "250m"
In the example above, we’ve specified the container’s requested CPU as 250m and the limit as 500m. This means the processing power that will be reserved for the container is 250m. Furthermore, if a process requires more than 250m, it can access the additional CPU resources that the scheduler will ensure are available on the node — up to the 500m limit.
Memory
Memory resources are measured in
bytes and can be expressed as fixed-point numbers, integers, or power-of-two
equivalents. We will use the most common type of expression — the power-of-two
equivalent, Mi.
This represents a Mebibyte, or 220 bytes.
For instance:
memory: “258Mi”Just as we did with CPU, we can
use resources:requests and resources:limits in the manifest to specify memory resource requests and
limits.
Let’s add a memory request and limit to the manifest below:
apiVersion: v1kind: Podmetadata:name: example-podnamespace: example-namespacespec:containers:- name: example-nameimage: repo/example-imageresources:requests:memory: "64Mi"cpu: "250m"limits:memory: "128Mi"cpu: "500m"
A container created using this manifest will have 64Mi of memory guaranteed and reserved. If a process requires more than that and it is available on the node, it can access the additional amount as long as it doesn’t surpass the 128Mi limit.
Moreover, if a container specifies its compute resource limits but doesn’t specify the resource requests, then Kubernetes will automatically configure the requests to equal the limits.
The Importance of Requests and Limits
Requests are a critical component of pod scheduling, a task executed by Kube-scheduler.
Scheduling is the process of matching pods to the right nodes before the Kubelet runs them. This process accounts for the pod’s resource requirements and the free resources on available nodes. In our example — and as is often the case — the pod’s resources include the container’s required resources and the resources required by the pod itself.
In a cluster, nodes that have the resource capacity to accommodate new pods are called feasible nodes. The scheduler works to evaluate these nodes and select the optimal one for the pod. The assessment process requires the scheduler to consider several factors, including:
- Resource requirements
- Affinity and anti-affinity specifications
- Inter-workload
- Hardware and software constraints
The pod is then placed on the selected node. Then, the Kubelet starts the container inside the pod by passing the container’s memory and CPU limits and requests to the container runtime.
If a process inside a container exceeds the requested memory and its node runs out of memory, the pod hosting the process will likely be evicted.
However, it is important to note that there is a sequence to follow when evicting pods. It all depends on the pod’s quality of service.
Quality of Service for Pods
When a pod is created, it receives an assigned quality-of-service (QoS) class depending on its resource specifications. There are three classes of QoS:
- BestEffort: This class is assigned to a Pod that has containers without specified memory and CPU requests and limits.
- Burstable: A pod receives this assigned class if one of its containers has a specified memory or CPU request and limit.
- Guaranteed: A pod is assigned this class if it meets the following conditions:
- All containers in a pod have memory and CPU requests and limits.
- All containers have memory requests equal to the limit.
- All containers have CPU requests equal to the limit.
QoS is important in determining which pods the Kubelet can evict from a node if it runs out of computing resources. An eviction occurs when a node wants to reclaim some resources to ensure the continued operations of the remaining pods.
The Kubelet will evict BestEffort pods before Burstable pods. It will then evict Burstable pods before guaranteed pods.
Consequences of Not Setting Limits and Requests
If we fail to set resource limits and requests, Kubernetes will automatically set them for us. This might sound convenient, but Kubernetes aims to ensure that the application doesn’t fail. As a result, it will assign unreasonably generous limits.
For instance, if we do not specify a request or limit for a cluster that only requires 250m of CPU resources, Kubernetes might set a CPU request of 900m. This will bloat the resource requirements of our cluster, making it excessively expensive to run.
Additionally, if Kubernetes unnecessarily reserves large amounts of resources, we might encounter frequent OOM errors.
Furthermore, when the evicted pods accumulate, our clusters become untidy. Even when the evicted pods no longer consume the nodes’ resources, they require extra resources from within the Kubernetes environment.
CPU throttling is another consequence of failing to set — or improperly setting — CPU limits. When we specify a CPU limit, Kubernetes attaches a timeframe within which that CPU capacity is allowed. If the container exceeds the limit before the cycle ends, it must pause and wait for the next cycle to begin before it can continue executing. This can lead to significant increases in response time.
Accuracy is paramount in determining requests and limits. Whereas setting the limit too high results in wasted resources, setting it too low dramatically increases the potential for CPU throttling.
Reaping the Benefits of Well-Configured Requests and Limits
When performed correctly, setting compute resource requests and limits results in smooth and fast performance at a low cost. But getting it right can be tricky.
Therefore, it can be extremely beneficial to employ a resource optimization solution that can account for application performance when providing recommendations. One such solution is StormForge.
StormForge uses machine learning to determine the optimal configurations automatically. From its recommended options, we can choose CPU limits that optimize our clusters for performance or cost, ensuring that we can align our Kubernetes environments to our business goals. Depending on our choice, StormForge acts in one of the following ways:
- If performance is a higher priority than cost, it recommends a higher CPU limit to prevent throttling.
- If cost is a higher priority than performance, it determines a lower CPU limit, which results in throttling when necessary.
Conclusion
The more resources a Kubernetes cluster consumes, the more expensive it is to run. If we allocate minimal resources to save on cost, we face poor performance and frequent, costly OOM errors.
By properly specifying our compute resource requests and limits, we can minimize overspending, optimize performance, and ensure the most efficient use of our Kubernetes resources. However, trying to determine the optimal balance can be arduous.
We Provide consulting, implementation, and management services on DevOps, DevSecOps, Cloud, Automated Ops, Microservices, Infrastructure, and Security
Services offered by us: https://www.zippyops.com/services
Our Products: https://www.zippyops.com/products
Our Solutions: https://www.zippyops.com/solutions
For Demo, videos check out YouTube Playlist: https://www.youtube.com/watch?v=4FYvPooN_Tg&list=PLCJ3JpanNyCfXlHahZhYgJH9-rV6ouPro
If this seems interesting, please email us at [email protected] for a call.
Relevant blogs:
Cloud Tagging Strategic Practices
AWS, Azure, and GCP: Find the Right Platform
Introduction to AWS Config: Simplified Cloud Auditing
AWS, Azure, and GCP: The Ultimate IAM Comparison
Recent Comments
No comments
Leave a Comment
We will be happy to hear what you think about this post