OpenStack Installation

What is Openstack?
OpenStack is a set of software tools for building and managing cloud computing platforms for public and private clouds. OpenStack lets users deploy virtual machines and other instances that handle different tasks for managing a cloud environment on the fly. It makes horizontal scaling easy, which means that tasks that benefit from running concurrently can easily serve more or fewer users on the fly by just spinning up more instances.
Most importantly, OpenStack is open-source software, which means that anyone who chooses to can access the source code, make any changes or modifications they need, and freely share these changes back out to the community at large. It also means that OpenStack has the benefit of thousands of developers all over the world working in tandem to develop the strongest, most robust, and most secure product that they can.
How is OpenStack used in a cloud environment?
The cloud is all about providing computing for end-users in a remote environment, where the actual software runs as a service on reliable and scalable servers rather than on each end-user computer. Cloud computing can refer to a lot of different things, but typically the industry talks about running different items "as a service"—software, platforms, and infrastructure. OpenStack falls into the latter category and is considered Infrastructure as a Service (IaaS). Providing infrastructure means that OpenStack makes it easy for users to quickly add new instances, upon which other cloud components can run. Typically, the infrastructure then runs a "platform" upon which a developer can create software applications that are delivered to the end-users.
Components in OpenStack
OpenStack is made up of many different moving parts. Because of its open nature, anyone can add additional components to OpenStack to help it to meet their needs. But the OpenStack community has collaboratively identified nine key components that are a part of the "core" of OpenStack, which are distributed as a part of any OpenStack system and officially maintained by the OpenStack community.
Nova: is the primary computing engine behind OpenStack. It is used for deploying and managing large numbers of virtual machines and other instances to handle computing tasks.
Swift: is a storage system for objects and files. Rather than the traditional idea of referring to files by their location on a disk drive, developers can instead refer to a unique identifier referring to the file or piece of information and let OpenStack decide where to store this information. This makes scaling easy, as developers don’t worry about the capacity of a single system behind the software. It also allows the system, rather than the developer, to worry about how best to make sure that data is backed up in case of the failure of a machine or network connection.
Cinder is a block storage component, which is more analogous to the traditional notion of a computer being able to access specific locations on a disk drive. This more traditional way of accessing files might be important in scenarios in which data access speed is the most important consideration.
Neutron provides the networking capability for OpenStack. It helps to ensure that each of the components of an OpenStack deployment can communicate with one another quickly and efficiently.
Horizon is the dashboard behind OpenStack. It is the only graphical interface to OpenStack, so for users wanting to give OpenStack a try, this may be the first component they actually “see.” Developers can access all of the components of OpenStack individually through an application programming interface (API), but the dashboard provides system administrators a look at what is going on in the cloud, and manage it as needed.
Keystone provides identity services for OpenStack. It is essentially a central list of all of the users of the OpenStack cloud, mapped against all of the services provided by the cloud, which they have permission to use. It provides multiple means of access, meaning developers can easily map their existing user access methods against Keystone.
Glance: provides image services to OpenStack. In this case, "images" refers to images (or virtual copies) of hard disks. Glance allows these images to be used as templates when deploying new virtual machine instances.
Ceilometer provides telemetry services, which allow the cloud to provide billing services to individual users of the cloud. It also keeps a verifiable count of each user’s system usage of each of the various components of an OpenStack cloud. Think metering and usage reporting.
Heat is the orchestration component of OpenStack, which allows developers to store the requirements of a cloud application in a file that defines what resources are necessary for that application. In this way, it helps to manage the infrastructure needed for a cloud service to run.
Openstack Installation
Setup the System.
Install CentOS in a system
Use LVM and add maximum space in /var location. (volumes are created in this space only)
Make sure the Storage node has a volume group named cinder-volumes and Logical Volume Name as cinder-volumes-pool and the command to create lvm is lvcreate -L 408576 -T cinder-volumes/cinder-volumes-pool.
Minimum System Requirement
Controller Node: 1 processor, 4 GB memory, and 5 GB storage
Compute Node: 1 processor, 2 GB memory, and 10 GB storage
Update the OS by run - $sudo yum update –y
Install Development Tools - $ sudo yum group install “Development-tools” –y
Disable SELinux and firewall.
You have to run the below commands to all machines in OpenStack before using it as the controller or compute or network whatever it is,
[root@compute ~]#Systemctl stop firewalld
[root@compute ~]#Systemctl disable firewalld
[root@compute ~]#Systemctl stop NetworkManage
[root@compute ~]#Systemctl disable NetworkManager
[root@compute ~]#yum install ntp –y
[root@compute ~]#yum remove postfix -y
[root@compute ~]#Setenforce 0
Install OpenStack
Red Hat Enterprise Linux (RHEL) 7 is the minimum recommended version, or the equivalent version of one of the RHEL-based Linux distributions such as CentOS, Scientific Linux, and so on. x86_64 is currently the only supported architecture.
Name the host with a fully qualified domain name rather than a short-form name to avoid DNS issues with Packstack.
Hardware
Machine with at least 16GB RAM, processors with hardware virtualization extensions, and at least one network adapter.
Network
If you plan on having external network access to the server and instances, this is a good moment to properly configure your network settings. A static IP address to your network card, and disabling NetworkManager are good ideas.
If your system meets all the prerequisites mentioned above, proceed with running the following commands.
[root@controller ~]# cat /etc/selinux/config
# This file controls the state of SELinux on the system.
# SELINUX= can take one of these three values:
# enforcing - SELinux security policy is enforced.
# permissive - SELinux prints warnings instead of enforcing.
# disabled - No SELinux policy is loaded.
SELINUX=disable
# SELINUXTYPE= can take one of three two values:
# targeted - Targeted processes are protected,
# minimum - Modification of targeted policy. Only selected processes are protected.
# mls - Multi Level Security protection.
SELINUXTYPE=targeted
[root@controller ~]# sudo systemctl disable firewalld
[root@controller ~]# sudo systemctl stop firewalld
[root@controller ~]# sudo systemctl disable NetworkManager
Removed symlink /etc/systemd/system/multi-user.target.wants/NetworkManager.service.
Removed symlink /etc/systemd/system/dbus-org.freedesktop.NetworkManager.service.
Removed symlink /etc/systemd/system/dbus-org.freedesktop.nm-dispatcher.service.
[root@controller ~]# systemctl stop NetworkManager
[root@controller ~]# systemctl mask NetworkManager
Remove postfix,
[root@controller ~]#yum remove postfix –y
It is a must for time-synchronous in all OpenStack machine (control, compute, network whatever it is) So install ntpd service in all nodes,
[root@control ~]# yum install ntp -y
[root@osticket ~]# systemctl start ntpd
[root@osticket ~]# systemctl enable ntpd
Created symlink from /etc/systemd/system/multi-user.target.wants/ntpd.service
to /usr/lib/systemd/system/ntpd.service.
[root@osticket ~]# systemctl status ntpd
Restart and check the network connectivity,
[root@controller ~]# systemctl enable network
network.service is not a native service, redirecting to /sbin/chkconfig.
Executing /sbin/chkconfig network on
[root@controller ~]# systemctl start network
Software repositories
On RHEL, download and install the RDO repository RPM to set up the OpenStack repository:
[root@controller ~]# sudo yum install -y https://rdoproject.org/repos/rdo-release.rpm
On CentOS, the Extras repository provides the RPM that enables the OpenStack repository. Extras are enabled by default on CentOS 7, so you can simply install the RPM to set up the OpenStack repository.
Make sure the repository is enabled:
[root@192 zippyops]# sudo yum install -y centos-release-openstack-rocky
Now confirm the rocky package is enabled
[root@controller ~]# yum-config-manager --enable openstack-rocky
[root@controller ~]# yum update -y
[root@controller ~]# sudo yum install -y openstack-packstack
Run Packstack to install OpenStack
Neutron with existing external network
To use Packstack –all in one with an existing external network, follow this method and it should allow any machine on the network to be able to access launched instances via their floating IPs. Also, at the end of this message, there are some ideas for making this process better than we thought we could discuss.
[root@controller ~]# packstack --allinone --provision-demo=n --os-neutron-ovs-bridge-mappings=extnet:br-ex --os-neutron-ovs-bridge-interfaces=br-ex:eth0 --os-neutron-ml2-type-drivers=vxlan,flat
1. Openstack controller.pp -> Error: Execution of '/usr/bin/yum -d 0 -e 0 -y install OpenStack-neutron' returned 1: Error: Package: 1:openvswitch-2.10.1-1.el7.x86_64 (centos-OpenStack-rocky) Check log file and found DPDK package makes error then install it (rpm DPDK package link :
https://rpmfind.net/linux/centos/7.6.1810/extras/x86_64/Packages/dpdk-17.11-13.el7.x86_64.rpm )
This will define a logical name for our external physical L2 segment as "extnet". Later we will refer to our provider network by the name when creating external networks. The command also adds 'flat' network type to the list of types supported by the installation.
This is needed when your provider network is a simple flat network (the most common setup for PoCs). If you use a VLAN segment for external connectivity, you should add 'VLAN' to the list of type drivers. To make external connectivity for the controller need to change the network adaptor properties and we need to change it to a bridged adaptor for that we need to change the adaptor script file like,(OpenStack created one bridged adaptor we need to change its property also.)
Make the ethernet adaptor file like below,
[root@controller ~]# cat /etc/sysconfig/network-scripts/ifcfg-enp1s0
DEVICE=enp1s0
TYPE=OVSPort
DEVICETYPE=ovs
OVS_BRIDGE=br-ex
ONBOOT=yes
The bridged adaptor like,
[root@controller ~]# cat /etc/sysconfig/network-scripts/ifcfg-br-ex
DEVICE=br-ex
DEVICETYPE=ovs
TYPE=OVSBridge
BOOTPROTO=static
IPADDR=192.168.1.60
NETMASK=255.255.255.0
GATEWAY=192.168.1.1
DNS1=192.168.1.1
ONBOOT=yes
After that restart your controller machine or restart the network service of the machine by running command init 6 (or) systemctl restart network
Now, create the external network with Neutron.
[root@control ~# . keystone_admin
[root@control ~(keystone_admin)]# neutron net-create external_network --provider:network_type flat --provider:physical_network extnet --router:external
neutron CLI is deprecated and will be removed in the future. Use openstack CLI instead.
Please note: "extnet" is the L2 segment we defined with –os-neutron-ovs-bridge-mappings above.
You need to create a public subnet with an allocation range outside of your external DHCP range and set the gateway to the default gateway of the external network.
[root@control ~(keystone_admin)]# neutron subnet-create --name public_subnet --enable_dhcp=False --allocation-pool=start=192.168.1.180,end=192.168.1.185 --gateway=192.168.1.1 external_network 192.168.1.0/24
neutron CLI is deprecated and will be removed in the future. Use OpenStack CLI instead.
Download a sample image, Get a CirrOS image, not provisioned without demo provisioning:
[root@controller1 ~(keystone_admin)]# curl http://download.cirros-cloud.net/0.3.4/cirros-0.3.4-x86_64-disk.img | glance image-create --name='cirros image'
--visibility=public --container-format=bare --disk-format=qcow2
That's all you need to do from an admin perspective to allow your users to connect their private networks to the outside world. Now let's switch to the user.
Since you haven't created a user yet. Create project first
[root@control ~(keystone_admin)]# openstack project create --enable internal
Now create user
[root@control ~(keystone_admin)]# openstack user create --project internal --password zippyops --email [email protected] --enable zippyops
Now login in OpenStack dashboard as an Admin user then assign user in project, To do that goto Identity -> Projects -> ProjectName(internal) -> Manage members
Then save it. Now log in as a user who is assigned to the project.
Download the users OpenStack RC File V2 from the dashboard, To do that go to the dropdown list in OpenStack user name (Right corner) and click on the file to download it.
Now, let's switch to the newly created user:
To do that copy the user’s Openstack RC File v2 into the root directory(~).
Add tow lines in that file shown below
export OS_PROJECT_DOMAIN_ID=default
export OS_USER_DOMAIN_ID=default
then source that file and enter the password of that user to run OpenStack commands as a user
[root@control ~]# source internal-openrc.sh
Please enter your OpenStack Password for project internal as user zippyops:
[root@control ~]#
Then create a router and set its gateway using the external network created by the admin in one of the previous steps:
[root@control ~ ]# neutron router-create router1
neutron CLI is deprecated and will be removed in the future. Use OpenStack CLI instead.
Now create a public network for internet connectivity
[root@control ~]# . keystone_admin
[root@ctrl ~(keystone_admin)]# neutron net-create public --router:external
neutron CLI is deprecated and will be removed in the future. Use OpenStack CLI instead.
[root@ctrl ~]# neutron router-gateway-set router1 external_network
neutron CLI is deprecated and will be removed in the future. Use OpenStack CLI instead.
Set gateway for router router1
OR
Login in OpenStack as a user and goto Network -> Routers
No click on that router -> set gateway then click and select the external network (Name: external_network) which is listed in the window.
After that, it shows look like,
Now create a private network and a subnet in it, since demo provisioning has been disabled:
It is a must create a private network is created by the user because multiple projects did not affect each other instance network. For that purpose, we create a private network for each project. Log in as a user then goto Networks -> Create Network
Now click create to create a network.
(OR)
We can do these steps in the command line also, to do that go to the command line and log in as a user using the OpenStack file.
The commands to create a private network are,
[root@ctrl ~]# . internal-openrc.sh
[root@ctrl ~]# neutron net-create private_network
neutron CLI is deprecated and will be removed in the future. Use OpenStack CLI instead.
[root@ctrl ~]# neutron subnet-create --name private_subnet private_network 10.1.1.0/24
neutron CLI is deprecated and will be removed in the future. Use OpenStack CLI instead.
connect your new private network to the public network through the router, which will provide floating IP addresses. To do that go to Routers -> router1 -> Interface -> Add Interface -> subnet then select private subnet which is created earlier for the private network.
(OR)
[root@ctrl ~]# neutron router-interface-add router1 private_subnet
neutron CLI is deprecated and will be removed in the future. Use OpenStack CLI instead.
Added interface b279de6a-82e7-4610-a5a2-1f10528f1db1 to router router1.
Now the Network Topology looks like,
In a security group select default -> Manage Rules -> Add Rule Then select the SSH in a window
Set in CIDR in Remote then click Add button.
Now we can create instances with the external network but we need more CPU and memory for big instances so next, we need to add compute nodes and storage nodes to enlarge the OpenStack.
3.Adding Compute Nodes
Note: Please run the below commands in compute node before adding them into the OpenStack
[root@compute ~]#Systemctl stop firewalld
[root@compute ~]#Systemctl disable firewalld
[root@compute ~]#Systemctl stop NetworkManage
[root@compute ~]#Systemctl disable NetworkManager
[root@compute ~]#yum install ntp –y
[root@compute ~]#yum remove postfix -y
[root@compute ~]#Setenforce 0
[root@computer ~]# systemctl stop firewalld
[root@computer ~]# systemctl disable firewalld
Removed symlink /etc/systemd/system/multi-user.target.wants/firewalld.service.
Removed symlink /etc/systemd/system/dbus-org.fedoraproject.FirewallD1.service.
[root@computer ~]# yum remove postfix
[root@computer ~]# systemctl stop NetworkManager
[root@computer ~]# systemctl disable NetworkManager
Removed symlink /etc/systemd/system/multi-user.target.wants/NetworkManager.service.
Removed symlink /etc/systemd/system/dbus-org.freedesktop.NetworkManager.service.
Removed symlink /etc/systemd/system/dbus-org.freedesktop.nm-dispatcher.service.
Removed symlink /etc/systemd/system/network-online.target.wants/NetworkManager-wait-online.service.
[root@computer ~]# systemctl mask NetworkManager
Created symlink from /etc/systemd/system/NetworkManager.service to /dev/null.
Goto the $HOME directory, the OpenStack created an answer.txt file for configuration and execution purposes. Now go to that file and enter the IP address of the compute node in line 97 (or)
CONFIG_COMPUTE_HOSTS= with comma-separated for each node.
Now run the answer file like below,
[root@control ~]# packstack --answer-file=packstack-answers-20190215-184249.txt
If you get any timeout error then run --timeout=600 with an answer file
Now we need the image to start the instance. We can use our existing VirtualBox machines, Vmware machines and we can download them from the internet. In this document, we just used our VirtualBox machine imported as in ova formate. Run the below command to upload this image into OpenStack.
[root@control ~(keystone_admin)]# openstack image create --public --disk-format qcow2 --container-format bare --file cent-origin.ova --property murano_image_info='{"title": "centui", "type": "centos.7"}' centui
5.adding storage node
Prerequisites
Before you install and configure the Block Storage service on the storage node, you must prepare the storage device.
Install CentOS in storage node In partition side select Manual Partition -> select and
Set LV name
create a new partition named as /sd* based on your partition table
Goto Volume Group and create a new volume group named cinder-volumes
Select RAID Level as None and save it.
Continue all the steps in the installation of centos Then See the status of PV, VG, and LV
To check it install lvm2 and device-mapper-present-data in a storage node
# yum install lvm2 device-mapper-persistent-data
Then start and enable the lvm2 service by using the below command
# systemctl enable lvm2-lvmetad.service
# systemctl start lvm2-lvmetad.service
Now see the physical volume properties and volume group properties that are created by us.
[root@storage ~]# pvdisplay
[root@storage ~]# vgdisplay
Now create the logical volume for the cinder-volume group. To do that use the below command (The namings are a must)
[root@storage ~]# lvcreate -L 408576 -T cinder-volumes/cinder-volumes-pool
The option –L mentioned for input the size. It must be in MB value (399 GB = 408576MB). The option –T to create Thinpool logical volume now check the LV which is created.
It is must LV Name and VG Name and LV Type(Thinpool)
Start The cinder Installation
Now Add repo of rdo project in storage node, Then
$ sudo yum install -y https://rdoproject.org/repos/rdo-release.rpm
Now install cinder, targetcli and pyhton-keystone
# yum install openstack-cinder targetcli python-keystone
Edit the /etc/cinder/cinder.conf file like given below,
[DEFAULT]
backup_swift_url=http://
backup_driver = cinder.backup.drivers.swift
my_ip =
glance_api_servers = http://
volume_api_class = cinder.volume.api.API
auth_strategy = keystone
enabled_backends = lvm
osapi_volume_listen = 0.0.0.0
osapi_volume_listen_port = 8776
osapi_volume_workers = 4
transport_url = rabbit://guest:guest@
[backend]
[backend_defaults]
volume_driver = cinder.volume.drivers.lvm.LVMVolumeDriver
[barbican]
[brcd_fabric_example]
[cisco_fabric_example]
[coordination]
[cors]
[database]
connection = mysql+pymysql://cinder:CINDER_DBPASS@
[fc-zone-manager]
[healthcheck]
[key_manager]
[keystone_authtoken]
www_authenticate_uri = http://
auth_url = http://
memcached_servers =
auth_type = password
project_domain_id = default
user_domain_id = default
project_name = service
username = cinder
password = CINDER_PASS_KS_PW
[matchmaker_redis]
[nova]
[oslo_concurrency]
lock_path = /var/lib/cinder/tmp
[oslo_messaging_amqp]
[oslo_messaging_kafka]
[oslo_messaging_notifications]
[oslo_messaging_rabbit]
[oslo_messaging_zmq]
[oslo_middleware]
[oslo_policy]
[oslo_reports]
[oslo_versionedobjects]
[profiler]
[sample_remote_file_source]
[service_user]
[ssl]
[vault]
[lvm]
volume_driver = cinder.volume.drivers.lvm.LVMVolumeDriver
volume_group = cinder-volumes
iscsi_protocol = iscsi
iscsi_helper = lioadm
Now start and enable the services,
# systemctl enable openstack-cinder-volume.service target.service cinder-api
# systemctl start openstack-cinder-volume.service target.service cinder-api
Thats all check the /var/log/cinder/volume.log and check it has no error.
Now check the services using the below command,
[root@storage ~]# cinder-manage service list
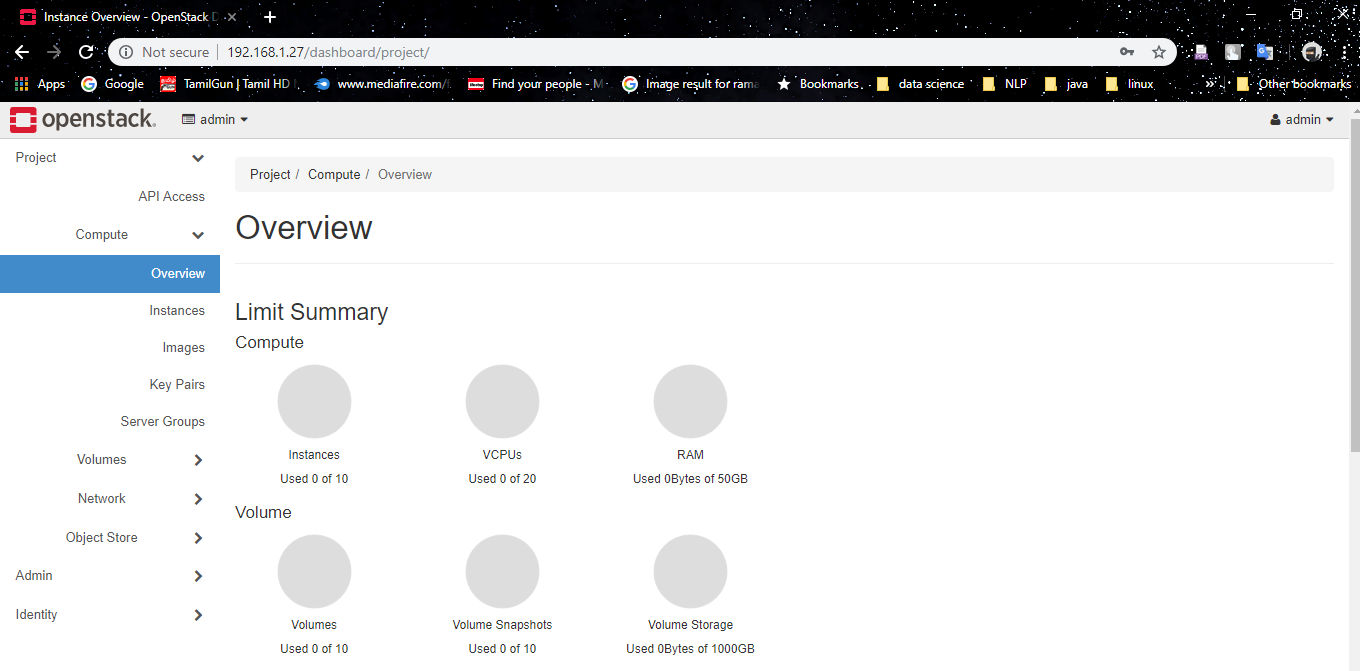
6.Access OpenStack
Now we can able to see the dashboard by HTTP://

The dashboard looks like,
Now the time to launch an instance, we already added images through the terminal but we can add them through the dashboard also without that we can’t able to run the instances because images are the source of the instances. We upload our own OS images in OpenStack with various format (.iso, .vdi, .vmdk, .vhd)
Now goto the admin tab -> compute -> Images then click create image


Now go to the Instance tab and select Launch Instance

Enter the name, Select network,
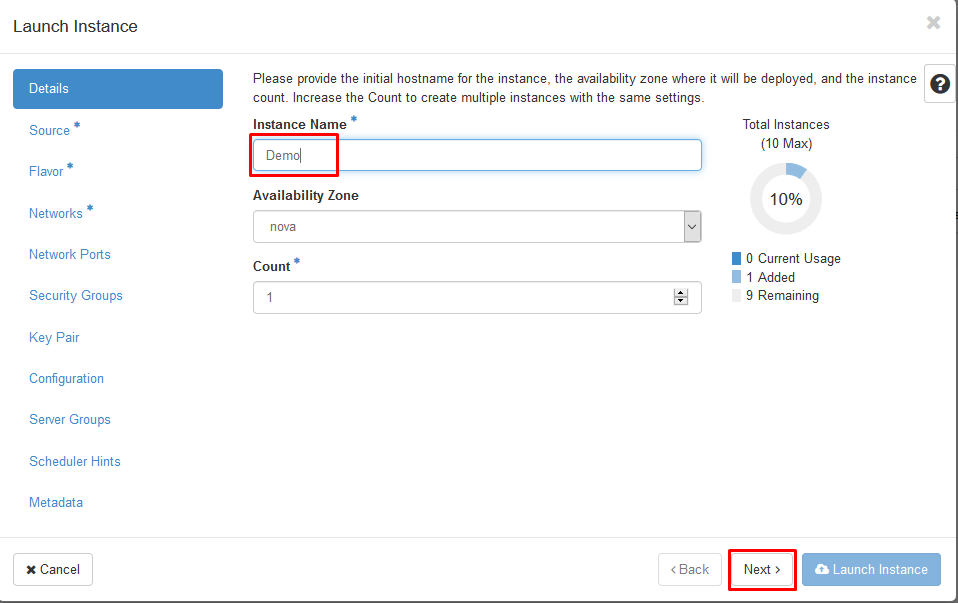
Select Source and flavor


Then select networks
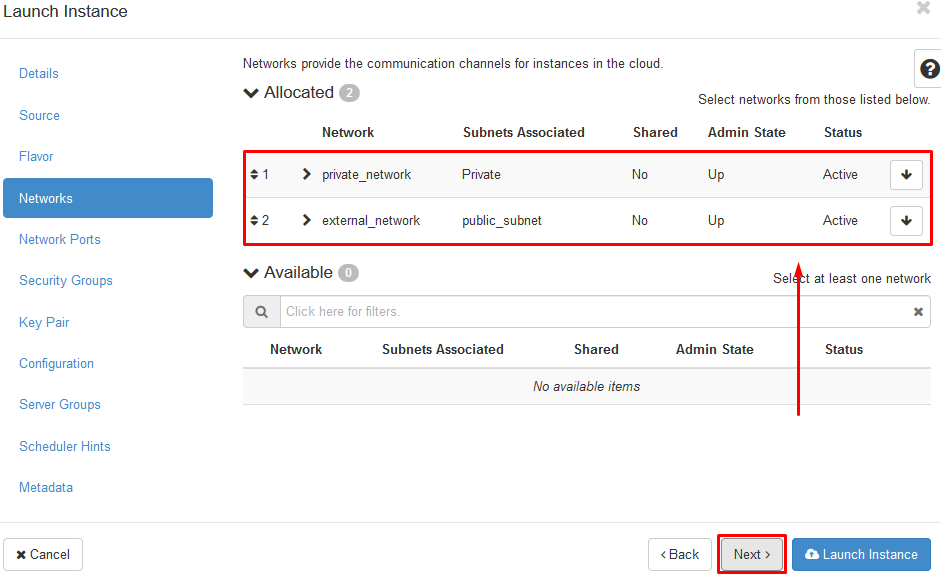
Select security groups. If you need more ports then create them from the network tab.
To login in that instance, we need ssh key to access it so create it from the keypair tab

Select keypair and run the instance by click launch instance,


The pem file is automatically downloaded when you create the key convert it into a PPK file to connect it through putty.
After cooking the instance click Associate floating IP and assign an IP

Then click the + button then

select pool=external network and click Allocate IP.

The instance run with that IP

Now goto putty and enter that instance associate IP and in authentication tab select PPK file and click open

We successfully login into that instance with the user of centos.

On RHEL, download and install the RDO repository RPM to set up the OpenStack repository:
rpm -Uvh https://repos.fedorapeople.org/repos/openstack/openstack-rocky/rdo-release-rocky-0.noarch.rpm
Recent Comments
No comments
Leave a Comment
We will be happy to hear what you think about this post