OS_Ticket

WHAT IS TICKETING SYSTEM AND WHY WE NEED IT?
A ticketing system allows IT support to be organized, focused, efficient, and effective. This directly impacts costs and revenues, customer retention, and public brand image. Ultimately, ticketing systems are a means to support and help you deal with any issues/incidents in your organization, managing the incidents from the moment they’re captured through to their resolution.
All organizations need a way to efficiently deal with the issues and requests raised by their customers and other users of their services. The nature of the issues raised can vary greatly from organization to organization, and even within an organization from month to month and across the range of end users that the IT department supports.
Without an appropriate ticketing system, issues can still be addressed with skill, enthusiasm, and the efforts of committed staff – but these issues will most likely not be dealt with effectively or efficiently. Instead, to ensure that all end-user issues are captured, matched, monitored, and recorded by the IT help desk or service desk a fit-for-purpose ticketing system is required, to support staff skills and enthusiasm in their endeavors.
HOW DOES IT WORKS IN IT INDUSTRIES?
A business has employees turn in work on a web form that is connected with their
database. A particular employee keeps having issues getting the form to save. This employee opens the help desk box and lets the tech team know that they are having problems.
The example would also work if the help desk form was being used by a customer of a
retail company who wanted to know where their order was, because it hadn’t arrived on time. This ticket is then put into the hands of someone who has the ability to resolve the problem. All solutions are tracked on the ticket file and when the problem is fixed, the reporter is notified.
This not only lets the reporting employee or customer know that their problem has been
addressed, but allows the tech team and management to keep track of how well they are handling problems that come up.
While email isn’t an efficient way to manage a trouble ticket, it is an excellent way to
communicate with clients and employees. In fact, most people have a specific help desk and support email addresses associated with their business or company.
OS_TICKET – AN OPEN SOURCE TICKETING TOOL
osTicket is a widely-used open source support ticket system. It seamlessly integrates inquiries created via email, phone, and web-based forms into a simple easy-to-use multi-user web interface.
Manage, organize and archive all your support requests and responses in one place while providing your customers with the accountability and responsiveness they deserve.
It is designed to help you manage your support requests more efficiently and improve customer service by providing your employees with the tools they need for noticeably better, more effective, and faster service.
OS_TICKET INSTALLATION
SETUP THE SYSTEM.
Install CentOS in a system
Update the OS by run - $sudo yum update –y
InstallDevelopment Tools - $ sudo yum group install “Development-tools” –y
INSTALL APACHE, MYSQL, AND PHP
The OSTicket tool is a simple PHP application to run on CentOS we need to install PHP.
OSTicket tool uses MySQL to store data of the tickets and users so we need MySQL to run it and
finally, the WebUI is accessible through web servers only so we need an Apache webserver to run
WebUI of the tool. To install these packages run the below commands,
[root@osticket ~]# yum -y install epel-release mariadb mariadb-server httpd php
unzip php-mysql php-imap php-xml php-mbstring php-pecl-apcu php-pecl-zendopcache php-intl php-gd -y
CONFIGURE MYSQL AND START ALL SERVICES
We must configure MySQL and it is necessary to create a user and database for osTicket. With the help of this database osTicket store users and ticket details.First start and setup Mysql,
[root@osticket ~]# systemctl enable mariadb
Created symlink from /etc/systemd/system/multi-user.target.wants/mariadb.service to
/usr/lib/systemd/system/mariadb.service.
[root@osticket ~]# systemctl start mariadb
Set admin password to access MySQL, To do that follow the below commands,
[root@osticket ~]# mysql_secure_installation
NOTE: RUNNING ALL PARTS OF THIS SCRIPT IS RECOMMENDED FOR ALL MariaDB
SERVERS IN PRODUCTION USE! PLEASE READ EACH STEP CAREFULLY!
In order to log into MariaDB to secure it, we'll need the current password for the root user. If you've just installed MariaDB, and you haven't set the root password yet, the password will be blank, so you should just press enter here.
Enter current password for root (enter for none):
OK, successfully used password, moving on...
Setting the root password ensures that nobody can log into the MariaDB
root user without the proper authorization.
Set root password? [Y/n] y
New password:
Re-enter new password:
Password updated successfully!
Reloading privilege tables...
... Success!
By default, a MariaDB installation has an anonymous user, allowing anyone to log into MariaDB without having to have a user account created for them. This is intended only for testing, and to make the installation go a bit smoother. You should remove them before moving into a production environment.
Remove anonymous users? [Y/n] n
... skipping.
Normally, root should only be allowed to connect from 'localhost'. This ensures that someone cannot guess the root password from the network.
Disallow root login remotely? [Y/n] n
... skipping.
By default, MariaDB comes with a database named 'test' that anyone can access. This is also intended only for testing and should be removed before moving into a production environment.
Remove test database and access to it? [Y/n] n
... skipping.
Reloading the privilege tables will ensure that all changes made so far
will take effect immediately.
Reload privilege tables now? [Y/n] n
... skipping.
Cleaning up...
All done! If you've completed all of the above steps, your MariaDB
installation should now be secure.
Thanks for using MariaDB!
Log in in MySQL and create user and database by following commands,
[root@osticket ~]# mysql -u root -p
Enter password:
Welcome to the MariaDB monitor. Commands end with; or \g.
Your MariaDB connection id is 5
Server version: 5.5.60-MariaDB MariaDB Server
Copyright (c) 2000, 2018, Oracle, MariaDB Corporation Ab, and others.
Type 'help;' or '\h' for help. Type '\c' to clear the current input statement.
MariaDB [(none)]> create user 'ost'@'%' identified by 'zippyops';
Query OK, 0 rows affected (0.00 sec)
MariaDB [(none)]> create database osticket;
Query OK, 1 row affected (0.00 sec)
MariaDB [(none)]> grant all privileges on osticket.* to 'ost'@'%';
Query OK, 0 rows affected (0.00 sec)
MariaDB [(none)]> flush privileges;
Query OK, 0 rows affected (0.00 sec)
MariaDB [(none)]> exit
Bye
Now check all services status
[root@osticket ~]# systemctl restart mariadb
[root@osticket ~]# systemctl status mariadb
[root@osticket ~]# systemctl start httpd
[root@osticket ~]# systemctl status httpd
We must add ports in the firewall if it is in an active state. There are two options one we add ports in the firewall to open it otherwise we need to stop firewall service. In this method, we add ports to the firewall. To do that follow the below command,
[root@osticket ~]# firewall-cmd --zone=public --add-port=80/tcp --permanent
success
[root@osticket ~]# firewall-cmd --zone=public --add-port=443/tcp --permanent
Success
[root@osticket ~]# firewall-cmd --reload
success
DOWNLOAD AND START OSTICKET
You will need to manually download the latest osTicket release. In this example, we see how to use osTicket 1.10. You can download it from the osTicket Download Page. Save the resulting zip file into /home. In our example we are going to call the ticket system "helpdesk" and we will be able to navigate to it by appending /helpdesk to the IP address of our server. You can name this whatever you like, helpdesk is simply a common option.
Goto osTicket download page and follow instructions below mentioned,
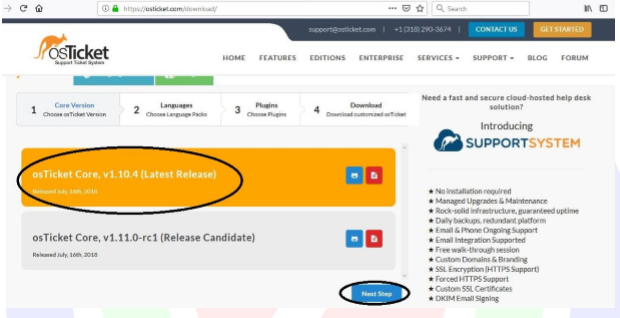
Select the version of the os ticket and click next,
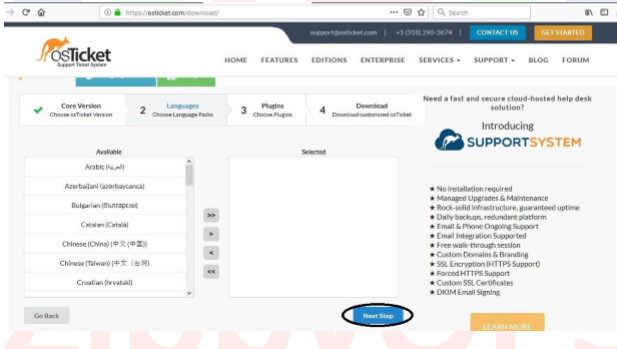
preferred language if it is English don’t select anything and click next,
Select plugins based on your need. In case, we select three plugins and click next

Now the webpage asks for your details. To skip it click no thanks,

It automatically triggers the download.
Extract the zip file by using below command,
[root@osticket zippyops]# unzip osTicket-v1.10.4.zip | more
The extraction is create two directories goto osTicket-v1.10.4/scripts directory
[root@osticket zippyops]# ls
auth-ldap.phar auth-passthru.phar __MACOSX osTicket-v1.10.4 osTicket-v1.10.4.zip storagefs.phar
[root@osticket zippyops]# cd osTicket-v1.10.4
[root@osticket osTicket-v1.10.4]# ls
scripts upload
[root@osticket osTicket-v1.10.4]# cd upload/
[root@osticket upload]# ls
create directory in /var/www/html/helpdesk and copy the upload directory into /var/www/html/helpdesk.
[root@osticket upload]# mkdir /var/www/html/helpdesk
[root@osticket upload]# cp -rp /home/zippyops/osTicket-v1.10.4/upload/* /var/www/html/helpdesk/
[root@osticket helpdesk]# ls
change the owner of the helpdesk directory,
[root@osticket helpdesk]# chown -R apache:apache /var/www/html/helpdesk
Create a copy of ost-sampleconfig.php file and rename it ost-config.php.
[root@osticket helpdesk]# cp include/ost-sampleconfig.php include/ost-config.php
And change the access permission of the file by using below command,
chmod 0666 include/ost-config.php
At this point if you navigate to http://
INSTALLING OSTICKET
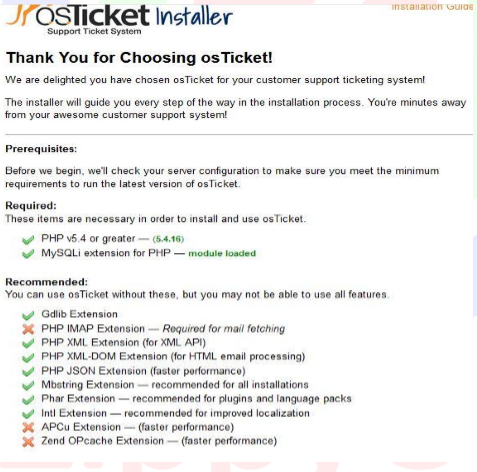
Install php-imap by following command
[root@osticket zippyops]# wget http://dl.fedoraproject.org/pub/epel/7/x86_64/Packages/p/php-imap5.4.16-7.el7.x86_64.rpm --2019-01-17 09:35:25-- http://dl.fedoraproject.org/pub/epel/7/x86_64/Packages/p/php-imap5.4.16-7.el7.x86_64.rpm
Install apc extension by following below commands,
[root@osticket ~]# yum -y install php-pecl-zendopcache –y
Now reload the tab and it looks like ,
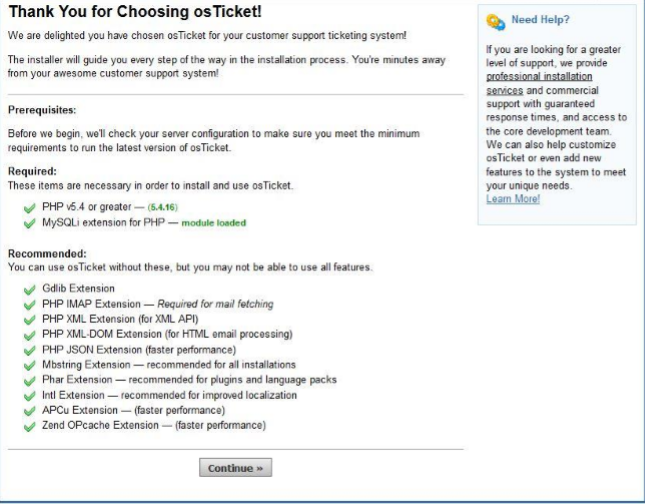
Click the continue button,
Then enter the values in a particular tab and click install,

If the installation is Done the WebUI looks like,
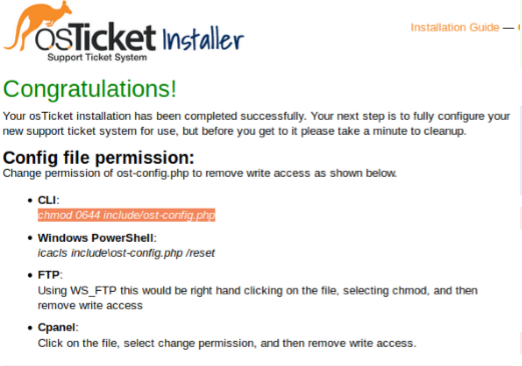
Now we successfully installed the OSTicket in centOS.
Relevant Blogs:
Recent Comments
No comments
Leave a Comment
We will be happy to hear what you think about this post