Protect Your Domain With DNSSEC on AWS Route53 and GoDaddy Registrar
In this article, learn more about how DNSSEC is an important tool for ensuring the security and reliability of the Internet's address book.
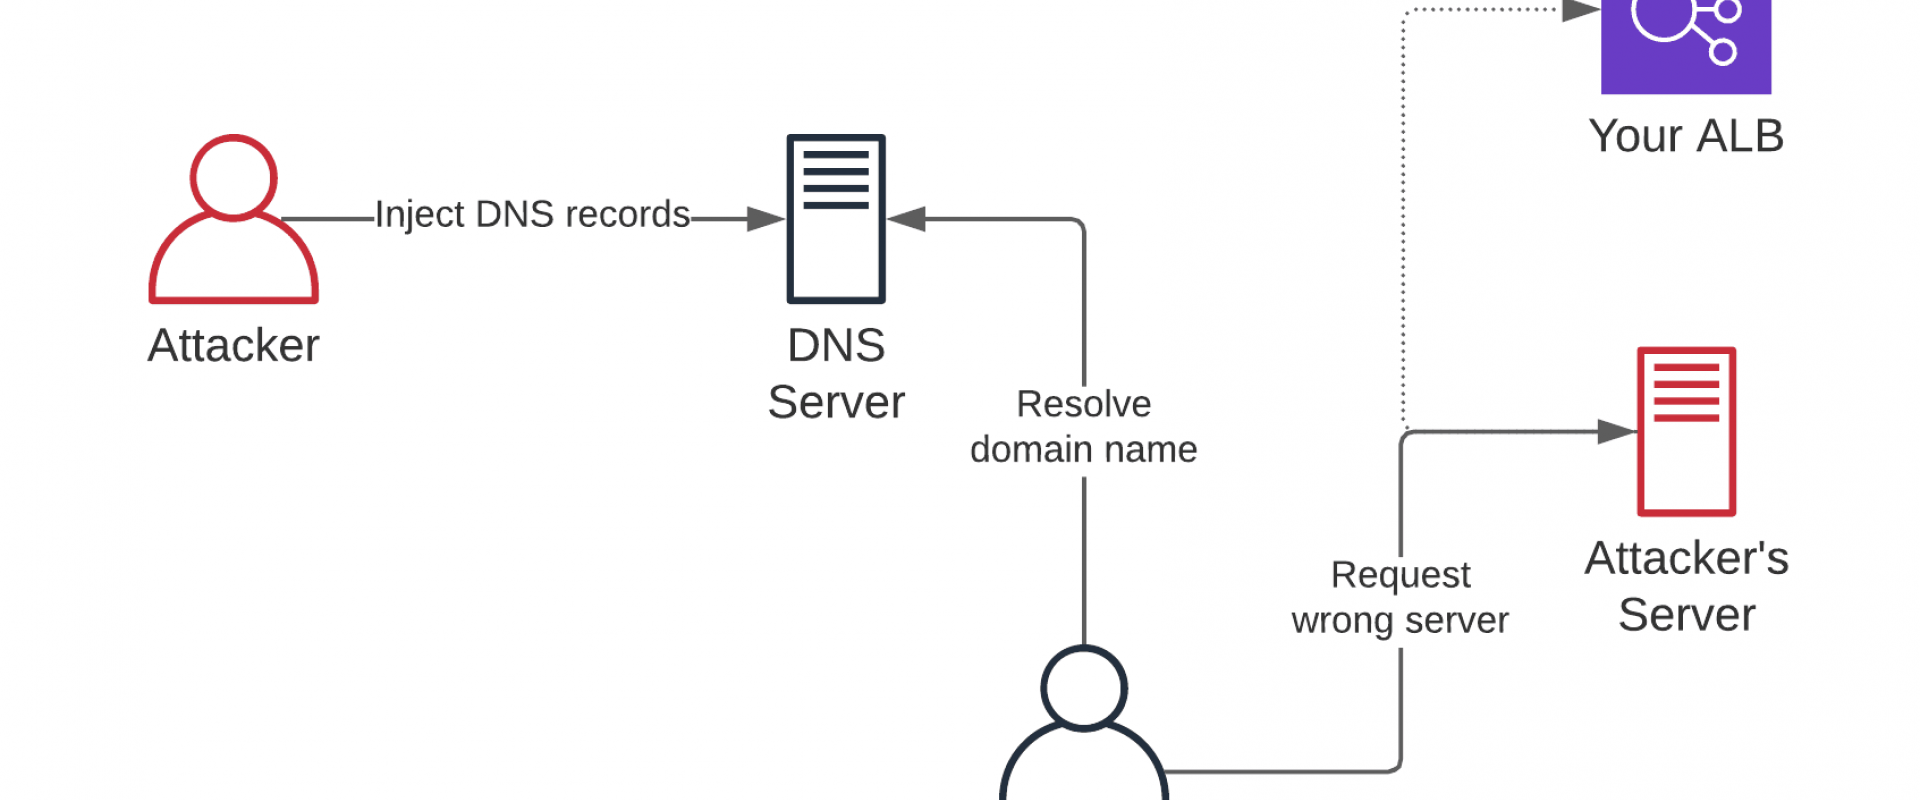
DNSSEC, short for Domain Name System Security Extensions, is a set of protocols that aim to secure the domain name system (DNS) against various security threats such as spoofing, cache poisoning, and eavesdropping. DNSSEC is designed to protect the authenticity and integrity of the information in the DNS, ensuring that users receive the correct information from authoritative sources.
How Does DNSSEC Work?
DNSSEC works by adding cryptographic signatures to DNS data. The signatures are created by a trusted third party, known as a key signing key (KSK), and are stored in the DNS record along with the original data. When a user sends a DNS query, the DNSSEC-enabled server will use the signatures to verify the authenticity of the data and ensure that it has not been altered in transit. If the data is not valid, the server will reject the request and the user will receive an error message.
Understanding DNSSEC can be a bit complicated and confusing, but I will try to explain it in a simple manner with a few steps with a dummy domain.
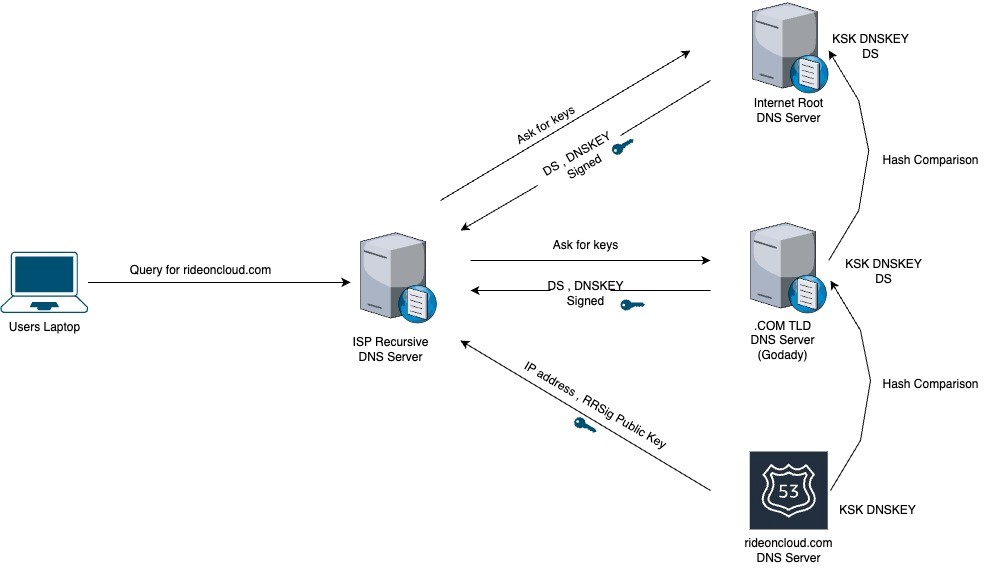
1. The user laptop asks the recursive DNS server for domain IPs. (It follows all DNS standard processes to get the IP from the authoritative DNS server. I will not go into how DNS works here. Instead, I will start when the recursive server gets the final IP from the DNS server.)
2. The recursive DNS server connects to the rideoncloud.com DNS server and gets the IP addresses, signed record (RRSig), and corresponding public key used to sign that information.
3. Various validations are performed. However, anyone can sign the DNS resource records data with public and private key pairs.
4. Therefore, there is an added step to validate this public key with a chain of trust that mimics the same domain tree used to resolve information.
5. The recursive DNS server asks the .com TLD: "I got the public key from the rideoncloud.com DNS server. Do you validate it?"
6. The .com TLD comes back and says, "Yes, my DS info indicates that the key has been provided to me by the rideoncloud.com provider, and here is the hash of that key. I am signing that information with my key."
7. This information is then used to query the root server in the same manner and ask for the .com information.
8. Root servers provide the DS record and signed that information also provides its public key.
9. The recursive server, being configured with the root public key as a trusted key, can now check that key against its configuration and passed information for secure resolution.
Note: The recursive server needs to be configured with the public key of the root, and there is a mechanism to automatically adapt changes made on the internet root server.
Why Is DNSSEC Important?
The DNS is the Internet's address book, mapping human-readable domain names to IP addresses. Without DNSSEC, attackers can easily redirect users to malicious websites, steal sensitive information, or spread malware. By implementing DNSSEC, domain owners and users can be confident that the information they receive from the DNS is accurate and has not been tampered with.
How To Implement DNSSEC
Implementing DNSSEC requires the coordination of several different entities, including domain owners, registrars, and DNS operators. The first step is to generate a key signing key (KSK) and a zone signing key (ZSK). The KSK is used to sign the ZSK, which is used to sign the DNS data. The keys must be securely stored and regularly updated to ensure the security of the DNSSEC implementation.
Once the keys are in place, the domain owner must publish the DNSSEC records in the DNS and configure their DNS servers to use DNSSEC. This process involves creating and publishing DNS Resource Records (RRs), such as the DNSKEY, RRSIG, and DS records, which contain the information necessary for the DNSSEC validation process.
I am using AWS Route53 as the DNS server for my domain, rideoncloud.com, and GoDaddy as the registrar.
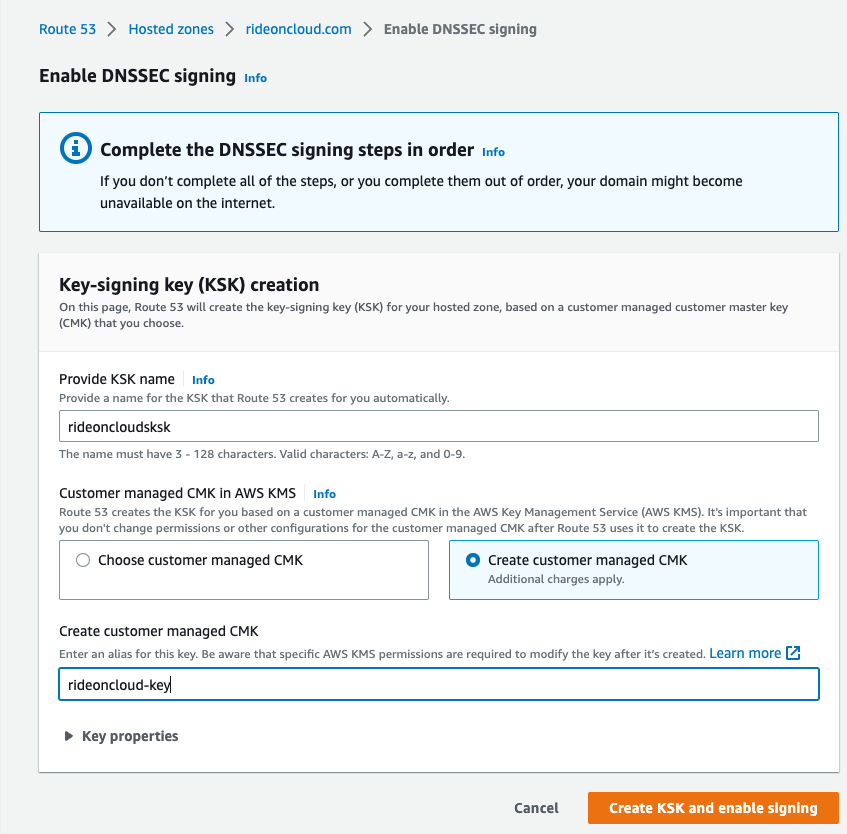
1. I am assuming that you are already using AWS Route53 for your domain. My domain is rideonclouds.com here.
2. To enable DNSSEC on Route53, you will be asked to create a Key Signing Key (KSK) with a customer-managed customer master key (CMK).
3.  After
enabling DNSSEC, click on View
Information to Create DS Record.
After
enabling DNSSEC, click on View
Information to Create DS Record.
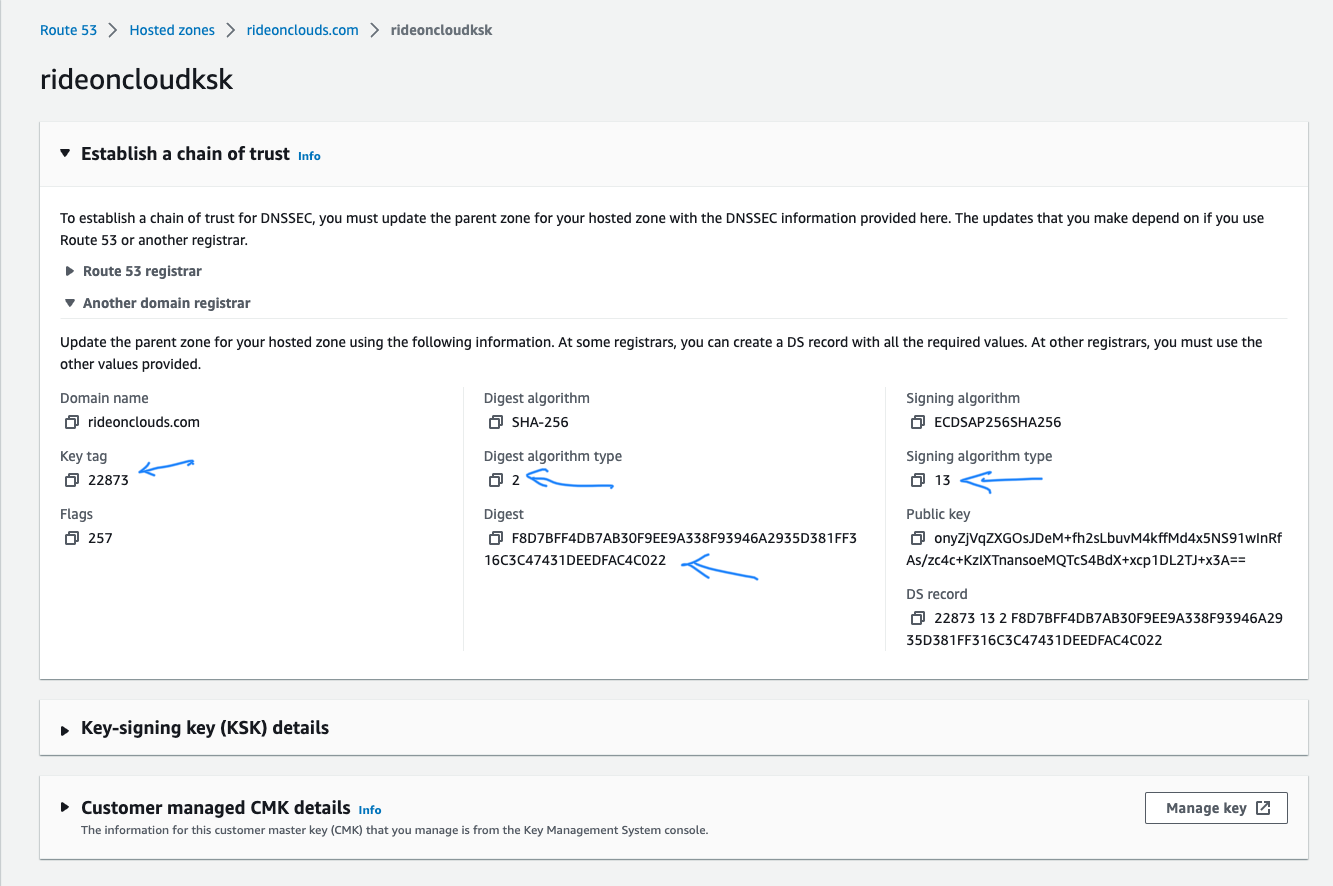
4. You will have two options: Route53 registrar and another domain registrar. Since we are using GoDaddy, we will need to use the information provided under Another Domain Registrar. This information will need to be entered into GoDaddy in the next steps.
5.  Log into
your GoDaddy account. Please note that GoDaddy also provides DNSSEC services in
their Premium DNS plan, but you do not need to purchase this plan since we are
using DNSSEC on AWS Route53.
Log into
your GoDaddy account. Please note that GoDaddy also provides DNSSEC services in
their Premium DNS plan, but you do not need to purchase this plan since we are
using DNSSEC on AWS Route53.
6. Go to Domain Portfolio -> Domain Settings for your domain and select DNSSEC.
7. 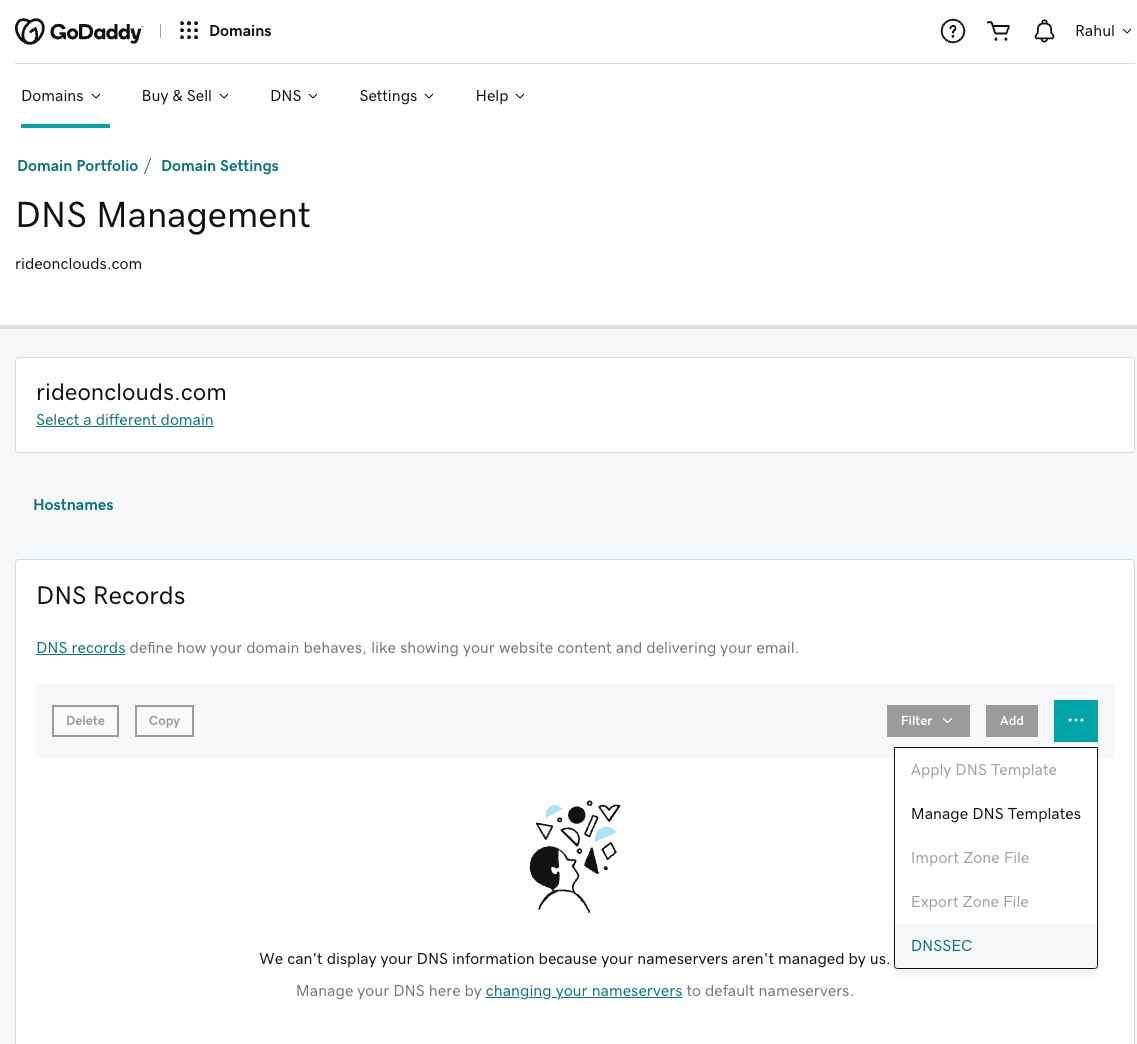 Create a new
DS record with the following information.
Create a new
DS record with the following information.
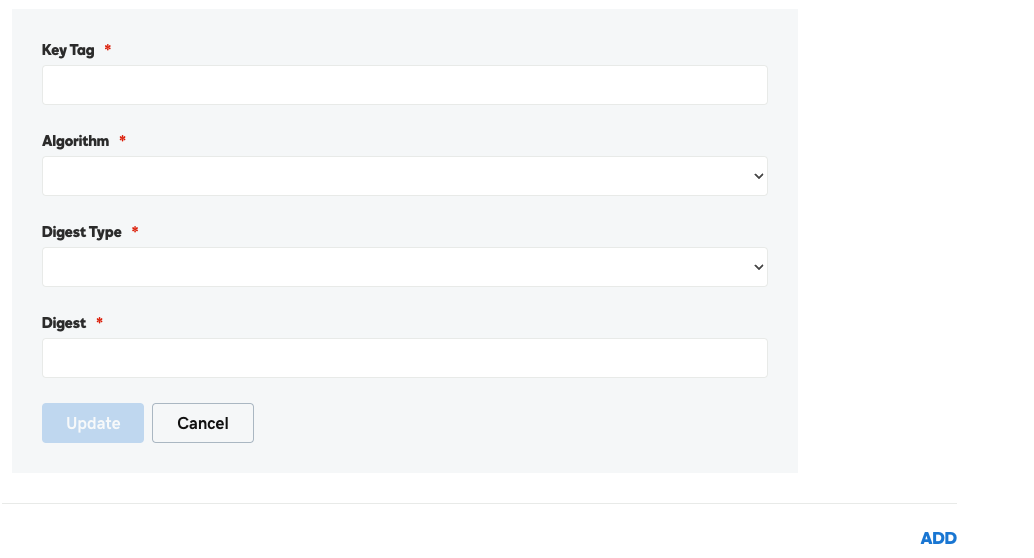
· Key Tag: Key Tag in AWS
· Algorithm: Signing Algorithm Type in AWS
· Digest Type: Digest Algorithm Type in AWS
· Digest: Digest in AWS
Test Your Domain
- Run the following command (replace your domain name) in the command line.
% dig rideonclouds.com dnskey +dnssec
You should get the following output answer section.
![]()
You will receive two DNSKEYs (one for ZSK and another for KSK) and a signed resource record, confirming that your DNS servers are successfully using DNSSEC.
- Check the chain of trust with your TLD. First, get your TLD server name by using the following command.
% dig com NS +short
- Make sure that you get the DS record for your domain from TLD.
%dig rideonclouds.com DS @m.gtld-servers.net.
You should get the following output.
![]()
-
The
last step is to check your resource record sets with signatures. I have
created a dummy
Arecord for my domain. Here is the command to check the RRSIG.
%dig www.rideonclouds.com A +dnssec
You should get the following output for your resource record.
![]()
Alternatively, you can use online free tools to validate your DNSSEC.
Please note: DNS propagation can take anywhere from a few minutes to 24 hours, depending on various factors such as the geographical location of the user, the type of DNS record being updated, and the TTL (time to live) value set for the record. During this time, the updated DNS information may not be available to all users and systems immediately.
Conclusion
DNSSEC is an important tool for ensuring the security and reliability of the Internet's address book. By adding cryptographic signatures to DNS data, DNSSEC helps to protect against various security threats, such as spoofing, cache poisoning, and eavesdropping. By implementing DNSSEC, domain owners and users can be confident that the information they receive from the DNS is accurate and has not been tampered with.
We Provide consulting, implementation, and management services on DevOps, DevSecOps, Cloud, Automated Ops, Microservices, Infrastructure, and Security
Services offered by us: https://www.zippyops.com/services
Our Products: https://www.zippyops.com/products
Our Solutions: https://www.zippyops.com/solutions
For Demo, videos check out YouTube Playlist: https://www.youtube.com/watch?v=4FYvPooN_Tg&list=PLCJ3JpanNyCfXlHahZhYgJH9-rV6ouPro
If this seems interesting, please email us at [email protected] for a call.
Recent Comments
No comments
Leave a Comment
We will be happy to hear what you think about this post