Puppet enterprise installation and configuration

Puppet operates in an agent-master architecture, in which a master node controls configuration information for a fleet of managed agent nodes. The Puppet Server performs the role of the master node. Puppet Server is a Ruby and Clojure application that runs on the Java Virtual Machine (JVM) and provides the same services as the classic Puppet master application. It mostly does this by running the existing Puppet master code in several JRuby interpreters, but it replaces some parts of the classic application with new services written in Clojure.
Prerequisites
Puppetmaster:
OS: CentOS 7 (Server installation)
Vcpu: 1
Ram: 2 GB
Disk: 40 GB
Puppet agent:
OS: CentOS 7 (Server installation)
Vcpu: 1
Ram: 1 GB
Disk: 25 GB
Puppet agent:
OS: Ubuntu 16.04.1 LTS
Vcpu: 1
Ram: 1 GB
Disk: 25 GB
Install puppet
Before we go on install puppet, we need to do first disable or permissive SELinux ,
# setenforce 0
# sestatus
SELinux status: enabled
SELinuxfs mount: /sys/fs/selinux
SELinux root directory: /etc/selinux
Loaded policy name: targeted
Current mode: permissive
Mode from config file: disabled
Policy MLS status: enabled
Policy deny_unknown status: allowed
Max kernel policy version: 31
After that stop the firewall , give a commend to service firewalld stop,
#systemctl stop firewalld
#systemctl status firewalld
firewalld.service - firewalld - dynamic firewall daemon
Loaded: loaded (/usr/lib/systemd/system/firewalld.service; enabled; vendor preset: enabled)
Active: inactive (dead) since Fri 2018-07-06 06:58:57 EDT; 3h 12min ago
Docs: man:firewalld(1)
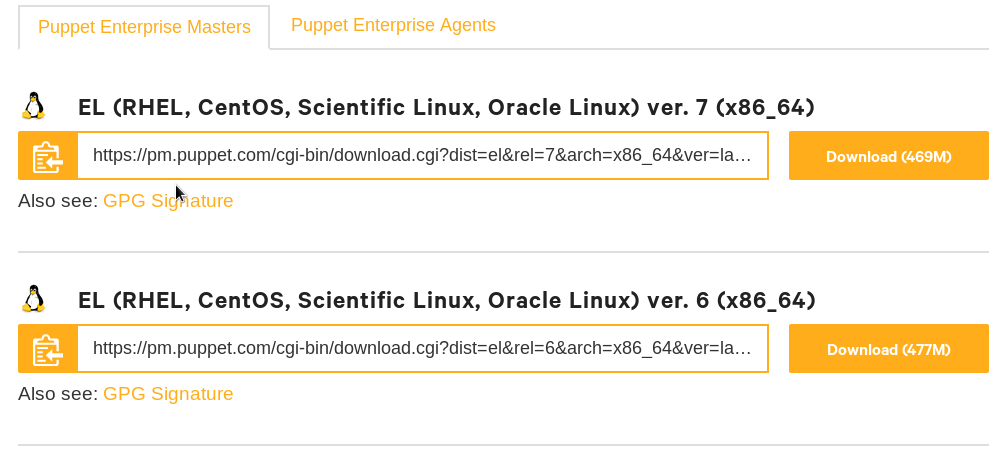
We can download, puppet enterprise on this link: https://puppet.com/download-puppet-enterprise and register email address and get download it tar file
After download tar file for puppet enterprise,extract the file
# ls
puppet-enterprise-2018.1.2-el-7-x86_64.tar.gz
# tar xvf puppet-enterprise-2018.1.2-el-7-x86_64.tar.gz
puppet-enterprise-2018.1.2-el-7-x86_64/VERSION
puppet-enterprise-2018.1.2-el-7-x86_64/LICENSE.txt
puppet-enterprise-2018.1.2-el-7-x86_64/puppet-enterprise-installer
puppet-enterprise-201
8.1.2-el-7-x86_64/puppet-enterprise-uninstaller
puppet-enterprise-2018.1.2-el-7-x86_64/README.markdown
puppet-enterprise-2018.1.2-el-7-x86_64/packages/bootstrap-metadata
puppet-enterprise-2018.1.2-el-7-x86_64/packages/el-7-x86_64-package-versions.json
puppet-enterprise-2018.1.2-el-7-x86_64/packages/el-7-x86_64/pe-activemq-2018.1.5.15.3-1.pe.el7.noarch.rpm
puppet-enterprise-2018.1.2-el-7-x86_64/packages/el-7-x86_64/pe-backup-tools-1.0.2-1.el7.x86_64.rpm
puppet-enterprise-2018.1.2-el-7-x86_64/packages/el-7-x86_64/pe-client-tools-18.1.2-1.el7.x86_64.rpm
puppet-enterprise-2018.1.2-el-7-x86_64/packages/el-7-x86_64/pe-console-services-1.10.266-1.el7.noarch.rpm
puppet-enterprise-2018.1.2-el-7-x86_64/packages/el-7-x86_64/pe-console-services-termini-1.10.266-1.el7.noarch.rpm
puppet-enterprise-2018.1.2-el-7-x86_64/packages/el-7-x86_64/pe-installer-2018.1.1.1-1.el7.x86_64.rpm
puppet-enterprise-2018.1.2-el-7-x86_64/packages/el-7-x86_64/pe-java-2018.1.1.8.0.171-1.b11.pe.el7.x86_64.rpm
puppet-enterprise-2018.1.2-el-7-x86_64/packages/el-7-x86_64/pe-java-devel-2018.1.1.8.0.171-1.b11.pe.el7.x86_64.rpm
puppet-enterprise-2018.1.2-el-7-x86_64/packages/el-7-x86_64/pe-license-2018.1.1.0.1-1.b15.pe.el7.x86_64.rpm
Pe.conf
The pe.conf file is a HOCON-formatted file that declares parameters and values needed to install and configure Puppet Enterprise.
Found in /etc/puppetlabs/enterprise/conf.d.
Sample pe.conf file:
{
"console_admin_password": "password",
"puppet_enterprise::puppet_master_host": "
"pe_install::puppet_master_dnsaltnames": [ "puppet" ]
}
We have add this pe.conf file in root directory ,
#vi /root/pe.conf
#cat /root/pe.conf
{
"console_admin_password": "password_goes_here",
"puppet_enterprise::puppet_master_host": "puppetmaster.zippyops.com"
"pe_install::puppet_master_dnsaltnames": [
"puppet",
"master",
"puppetmaster"
],
"puppet_enterprise::use_application_services": true
}
Now we can start install puppet,
# ls
conf.d locales puppet-enterprise-installer README.markdown
LICENSE.txt packages puppet-enterprise-uninstaller VERSION
# ./puppet-enterprise-installer -c /root/pe.conf
* returned: 2
## Puppet Enterprise configuration complete!
Documentation: https://docs.puppet.com/pe/2018.1/index.html
Release notes: https://docs.puppet.com/pe/2018.1/release_notes.html
If this is a monolithic configuration, run 'puppet agent -t' to complete the setup of this system.
If this is a split configuration, install or upgrade the remaining PE components, and then run puppet agent -t on the Puppet master, PuppetDB, and PE console, in that order.
Where, C – directory for pe.conf file.
Go to the browser then you can browse host DNS name,

Click “Advanced button”
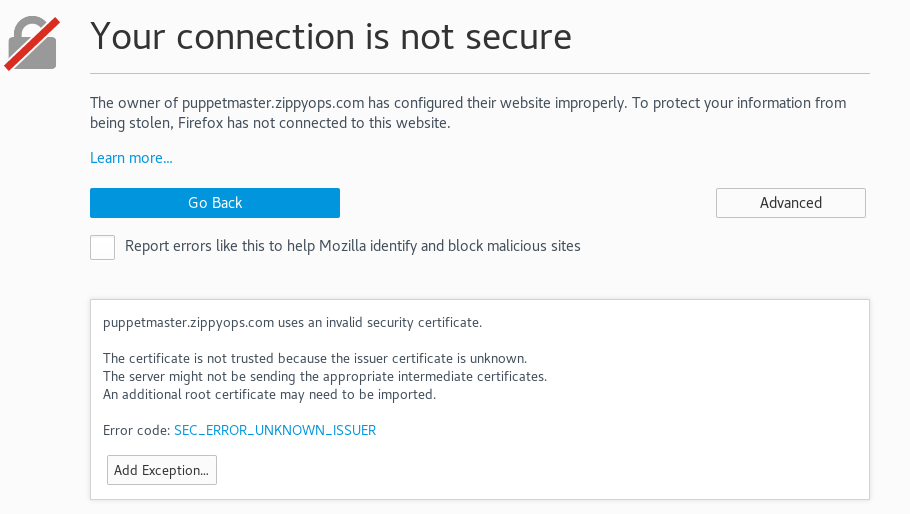
Click “Add Exception”
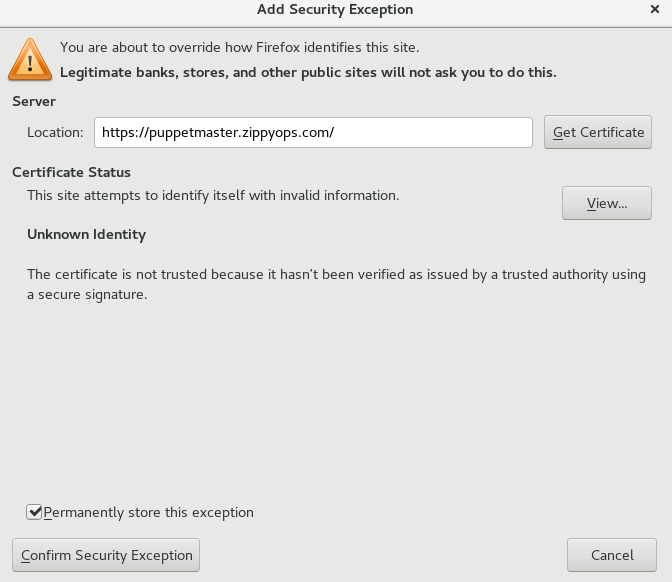
Click “Confirm security Exception” then we can reach login page give your admin user and password as given in pe.conf file.
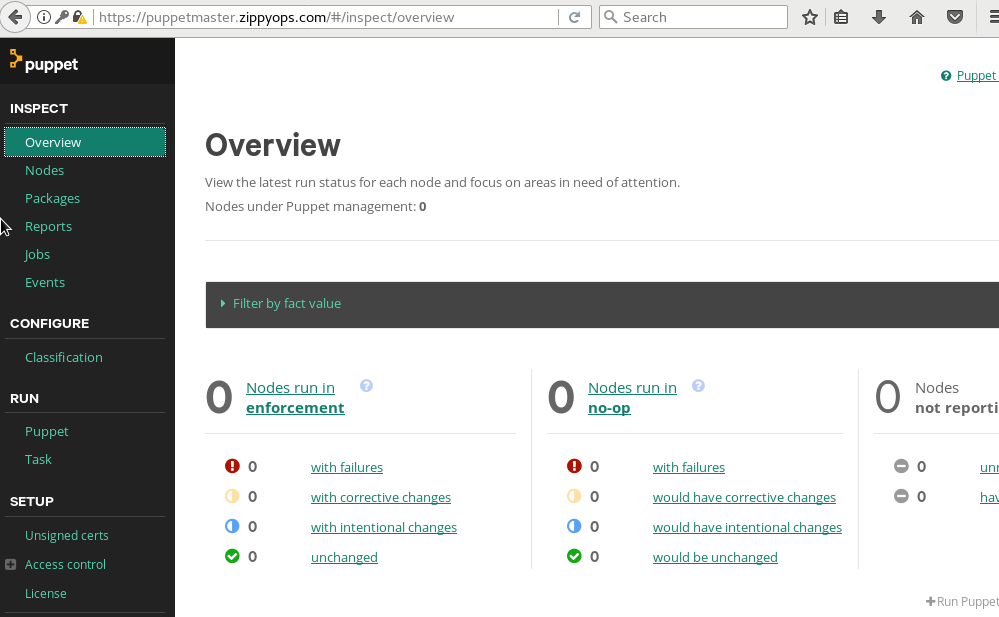
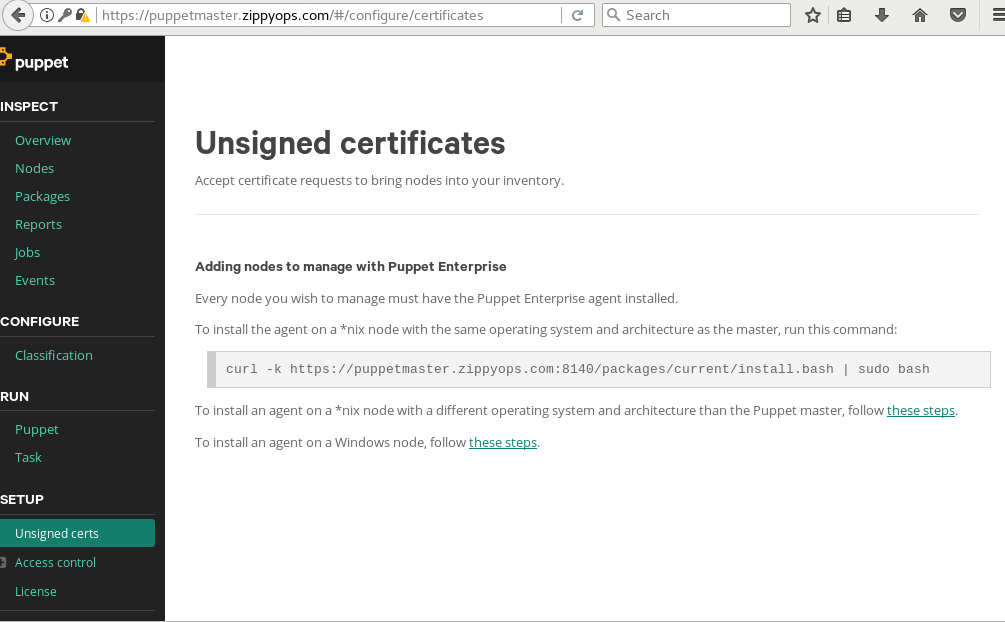
Then click on “unsigned certs”,
We have to use this url to connect to puppetmaster ,
# curl -k https://puppetmaster.zippyops.com:8140/packages/current/install.bash | sudo bash
% Total % Received % Xferd Average Speed Time Time Time Current
Dload Upload Total Spent Left Speed
100 25756 100 25756 0 0 41592 0 --:--:-- --:--:-- --:--:-- 41676
Loaded plugins: fastestmirror, langpacks
Cleaning repos: pe_repo
Cleaning up everything
Maybe you want: rm -rf /var/cache/yum, to also free up space taken by orphaned data from disabled or removed repos
Cleaning up list of fastest mirrors
+ yum list installed puppet-agent
Loaded plugins: fastestmirror, langpacks
Dependencies Resolved
================================================================================
Package Arch Version Repository Size
================================================================================
Installing:
puppet-agent x86_64 5.5.3-1.el7 pe_repo 20 M
Transaction Summary
================================================================================
Install 1 Package
Total download size: 20 M
Importing GPG key 0xEF8D349F:
Userid : "Puppet, Inc. Release Key (Puppet, Inc. Release Key)
Fingerprint: 6f6b 1550 9cf8 e59e 6e46 9f32 7f43 8280 ef8d 349f
From : https://puppetmaster.zippyops.com:8140/packages/GPG-KEY-puppet
Running transaction check
Running transaction test
Transaction test succeeded
Running transaction
Installing : puppet-agent-5.5.3-1.el7.x86_64 1/1
Verifying : puppet-agent-5.5.3-1.el7.x86_64 1/1
Installed:
puppet-agent.x86_64 0:5.5.3-1.el7
Complete!
Go back to console and check unsigned certificate,
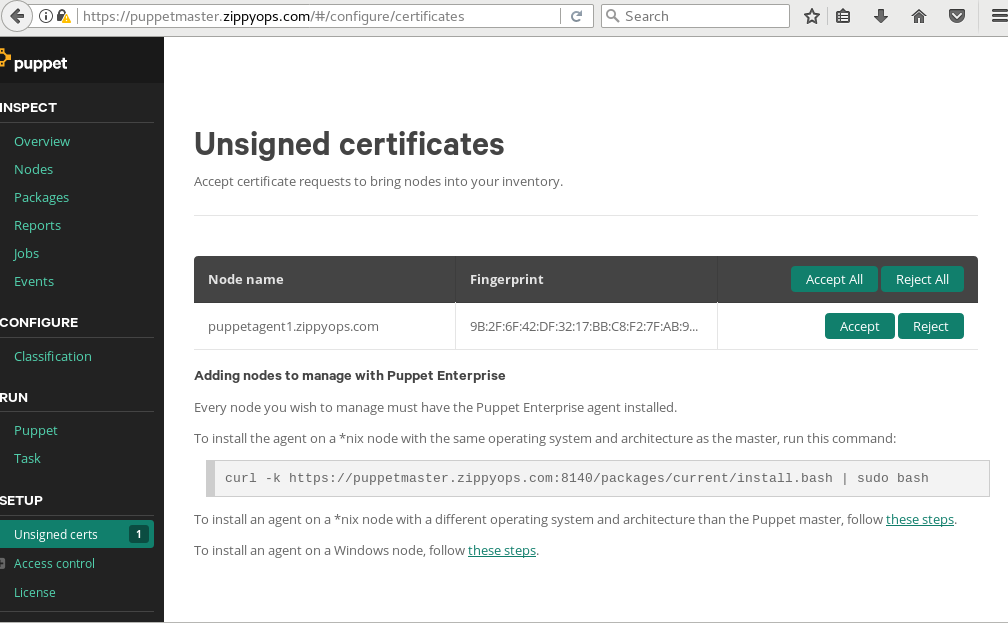
Go to puppet master to check cert list,
# puppetserver ca list
"puppetagent1.zippyops.com"(SHA256) 9B:2F:6F:42:DF:32:17:BB:C8:F2:7F:AB:9A:A9:DF:74:8B:02:38:84:CC:2C:45:D6:1F:77:B0:93:6B:72:73:8
To sign this certificate,
# puppetserver ca sign puppetagent1.zippyops.com
Signing Certificate Request for:
"puppetagent1.zippyops.com" (SHA256) 9B:2F:6F:42:DF:32:17:BB:C8:F2:7F:AB:9A:A9:DF:74:8B:02:38:84:CC:2C:45:D6:1F:77:B0:93:6B:72:73:81
Notice: Signed certificate request for puppetagent1.zippyops.com
Notice: Removing file Puppet::SSL::CertificateRequest puppetagent1.zippyops.com at '/etc/puppetlabs/puppet/ssl/ca/requests/puppetagent1.zippyops.com.pem'
Go back to our agent terminal,
# puppet agent -t
Info: Using configured environment 'production'
Info: Retrieving pluginfacts
Info: Retrieving plugin
Info: Retrieving locales
Info: Loading facts
Info: Caching catalog for puppetagent1.zippyops.com
Info: Applying configuration version '1530957940'
Notice: Applied catalog in 0.09 seconds
Go to check the dashboard,
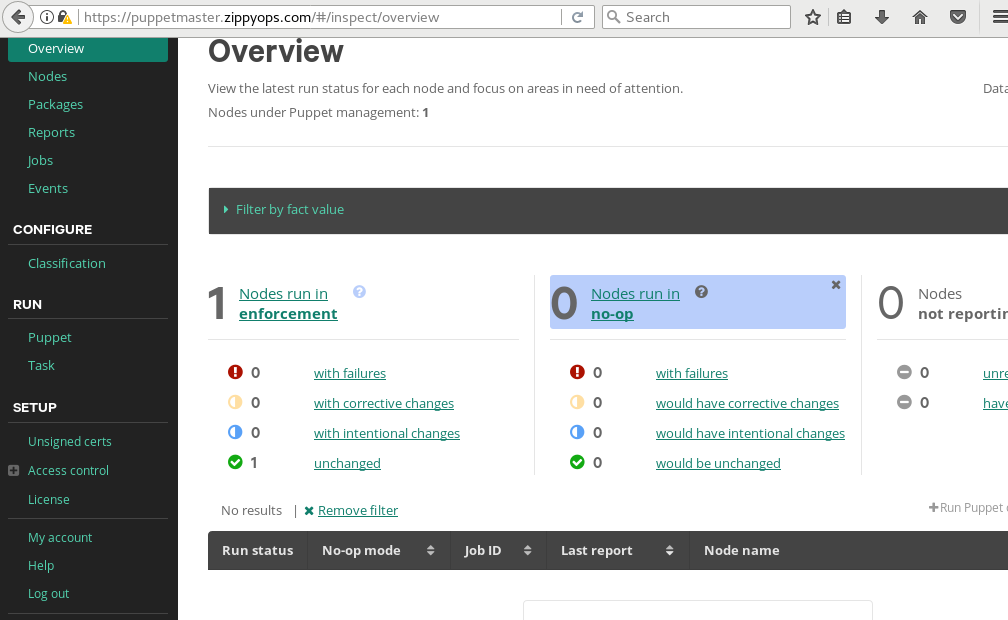
We have added our node to our web console.
Relevant Blogs:
Recent Comments
No comments
Leave a Comment
We will be happy to hear what you think about this post