Rundeck window node

Rundeck is an open-source software Job scheduler and Run Book Automation system for automating routine processes across development and production environments. It combines task scheduling, multi-node command execution, workflow orchestration, and logs everything that happens.
adding a Windows host and manage it using the Rundeck Winrm plugin that uses WinRM to connect to Windows Hosts and execute commands with a Basic or Kerberos authentication over HTTP / HTTPS.
Download and Install Rundeck Winrm plugin
#wget https://github.com/rundeck-plugins/rundeck-winrm-plugin/releases/download/v1.3.4/rundeck-winrm-plugin-1.3.4.jar -P /var/lib/rundeck/libext/
#chown -R rundeck. /var/lib/rundeck/libext/
Restart the Rundeck daemon
#/etc/init.d/rundeckd restart
Configure a Windows Server for WinRM
On the remote host, open a PowerShell using the Run as Administrator option and execute the following commands to enable the WinRM
#C:\Users\Administrator> winrm qc
WinRM service is already running on this machine.
WinRM is already set up for remote management on this computer.
Run this below command in PowerShell on Remote Node windows
#winrm set winrm/config/client/auth '@{Basic="true"}'
#winrm set winrm/config/service/auth '@{Basic="true"}'
#winrm set winrm/config/service '@{AllowUnencrypted="true"}'
#winrm set winrm/config/client '@{AllowUnencrypted="true"}'
we will use Kerberos authentication means that we will use Windows domain accounts. we need to add a domain user account to the Administrators group on the remote host.
Configure Kerberos on the Rundeck Server
To use Windows domain accounts to access the remote host, we need to configure Kerberos on our Rundeck server, we have two options
Kerberos authentication requires you to edit the kb5.conf file or to set up some Java System Properties in the /etc/rundeck/profile file to define which domains map to which Domain Controllers.
to configure the /etc/rundeck/profile file to define our Domain Controllers. Make sure to replace the values with the name of your domain/realm and the hostname of your domain controller as below.
#vi /etc/rundeck/profile
################# BEFORE ###################################
RDECK_JVM="-Drundeck.jaaslogin=$JAAS_LOGIN \
-Djava.security.auth.login.config=$JAAS_CONF \
-Dloginmodule.name=$LOGIN_MODULE \
-Drdeck.config=$RDECK_CONFIG \
-Drundeck.server.configDir=$RDECK_SERVER_CONFIG \
-Dserver.datastore.path=$RDECK_SERVER_DATA/rundeck \
-Drundeck.server.serverDir=$RDECK_INSTALL \
-Drdeck.projects=$RDECK_PROJECTS \
-Drdeck.runlogs=$RUNDECK_LOGDIR \
-Drundeck.config.location=$RDECK_CONFIG_FILE \
-Djava.io.tmpdir=$RUNDECK_TEMPDIR \
-Drundeck.server.workDir=$RUNDECK_WORKDIR \
-Dserver.http.port=$RDECK_HTTP_PORT \
-Drdeck.base=$RDECK_BASE"
#
################# AFTER #####################################
RDECK_JVM="-Drundeck.jaaslogin=$JAAS_LOGIN \
-Djava.security.krb5.realm=YOUR_DOMAIN \
-Djava.security.krb5.kdc=YOUR_DOMAIN_CONTROLLER_IP \
-Djava.security.auth.login.config=$JAAS_CONF \
-Dloginmodule.name=$LOGIN_MODULE \
-Drdeck.config=$RDECK_CONFIG \
-Drundeck.server.configDir=$RDECK_SERVER_CONFIG \
-Dserver.datastore.path=$RDECK_SERVER_DATA/rundeck \
-Drundeck.server.serverDir=$RDECK_INSTALL \
-Drdeck.projects=$RDECK_PROJECTS \
-Drdeck.runlogs=$RUNDECK_LOGDIR \
-Drundeck.config.location=$RDECK_CONFIG_FILE \
-Djava.io.tmpdir=$RUNDECK_TEMPDIR \
-Drundeck.server.workDir=$RUNDECK_WORKDIR \
-Dserver.http.port=$RDECK_HTTP_PORT \
-Drdeck.base=$RDECK_BASE"
Create a Key Storage
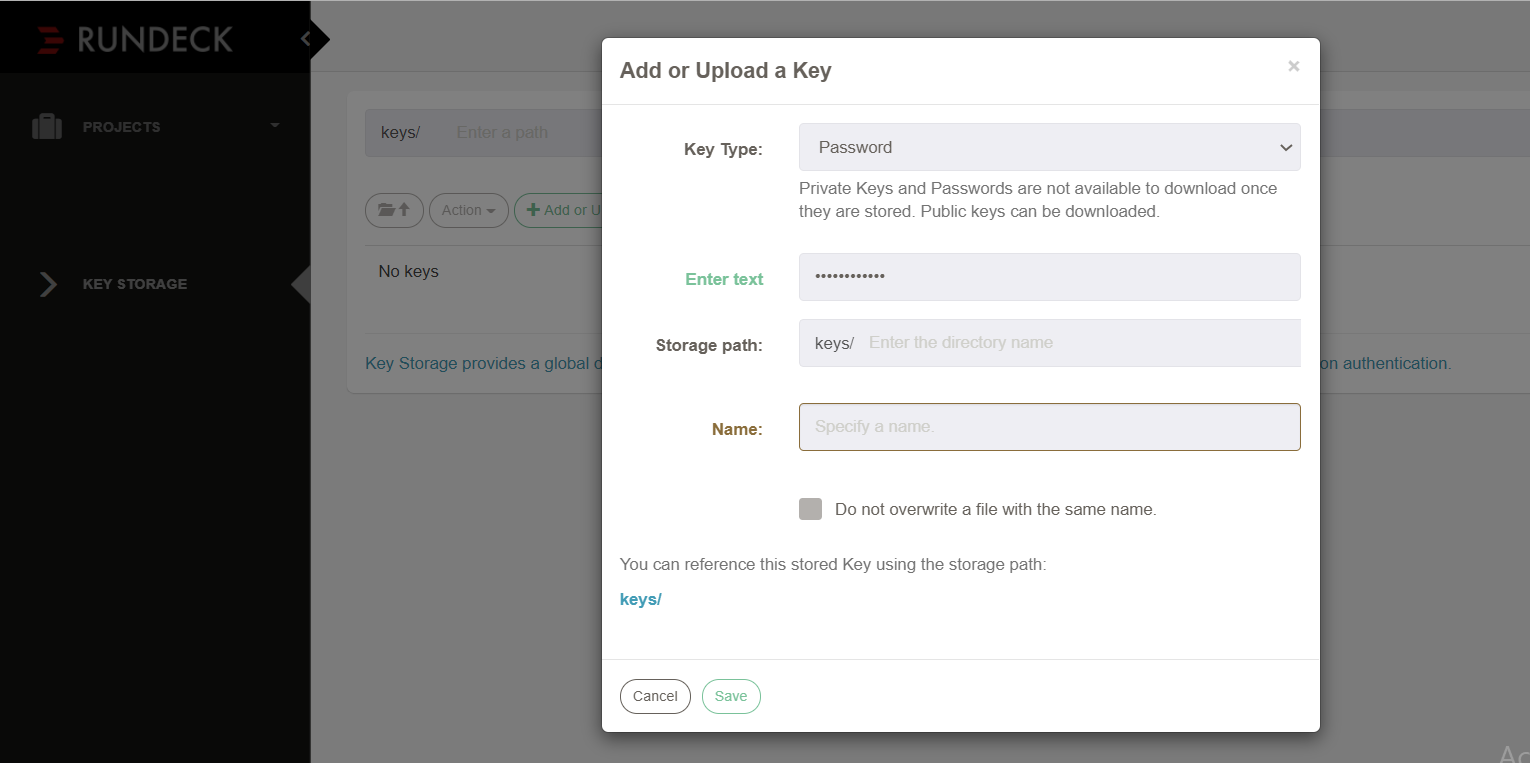
Rundeck’s Key Storage is a set of functionality that allows you to securely store private keys, public keys, passwords, and other secrets for use in your Rundeck jobs. We need to configure the Key Storage of our project. This option is a way to save the password of the authentication user of our remote machine, without having to pass the password directly in the resources.xml file
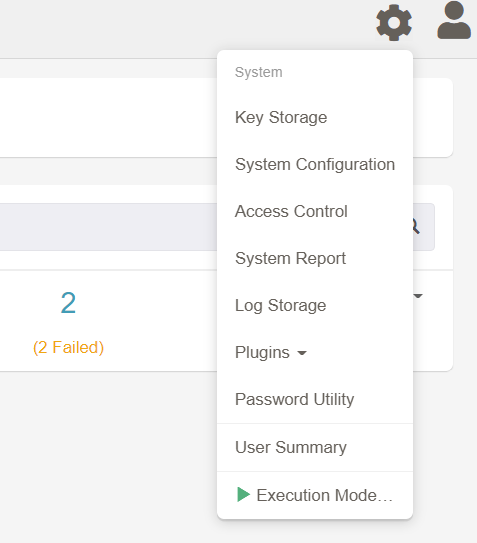
Click on the upper right setting in the rundeck server and go to key storage

In Key Type select Password option, in entering Text set the password of your domain user account, Storage path is optional, you can set a folder name for password storage, and the Name is the name of the file in which to store the desired password. Enter all the details and click the save button.

Add a Windows Node to your Project
Open the resources.xml file present in your project folder and add the below entry to add the windows remote host node to the resource list.
hostname="192.168.1.2" username="demo"
osFamily="Windows" osName="Microsoft Windows Server 2012 R2 Standard" osArch="amd64"
node-executor="overthere-winrm" winrm-auth-type="kerberos" winrm-protocol="http"
winrm-cmd="CMD" winrm-kerberos-debug="true"
winrm-domain="demo.LOCAL" winrm-password-storage-path="keys/winrmuser.password">
name: Specify the node name of the remote server
hostname: Remote host node, can be the IP address and include a port number the default port is 5985/5986 (HTTP/HTTPS).
username: Remote username to get access to the remote host
winrm-cmd: Execute commands using Cmd or PowerShell
winrm-password-storage-path: Specifies a Key Storage Path to look up the authentication password from
winrm-protocol: Determine the protocol to use, can be HTTP or HTTPS
winrm-auth-type: Type of authentication to use, can be basic or Kerberos
winrm-domain: Kerberos domain
Execute test command
To test the functionality run a simple command "ipconfig" on the remote host.
Recent Comments
No comments
Leave a Comment
We will be happy to hear what you think about this post