Weblogic Installation and Configuration

INTRODUCTION TO WEBLOGIC SERVER
WebLogic Server is an application server: a platform for developing and deploying multitier distributed enterprise applications. WebLogic Server centralizes application services such as Web server functionality, business components, and access to backend enterprise systems. It uses technologies such as caching and connection pooling to improve resource use and application performance. WebLogic Server also provides enterprise-level security and powerful administration facilities.
WebLogic Server operates in the middle tier of a multitier (or n-tier) architecture. A multitier architecture determines where the software components that make up a computing system are executed with each other and to the hardware, network, and users. Choosing the best location for each software component lets you develop applications faster; eases deployment and administration; and provides greater control over performance, utilization, security, scalability, and reliability.
WebLogic Server implements J2EE, the Java Enterprise standard. Java is a network-savvy, object-oriented programming language, and J2EE includes component technologies for developing distributed objects. This functionality adds a second dimension to the WebLogic Server application architecture—a layering of application logic, with each layer selectively deployed among WebLogic Server J2EE technologies.
WebLogic Server Domains
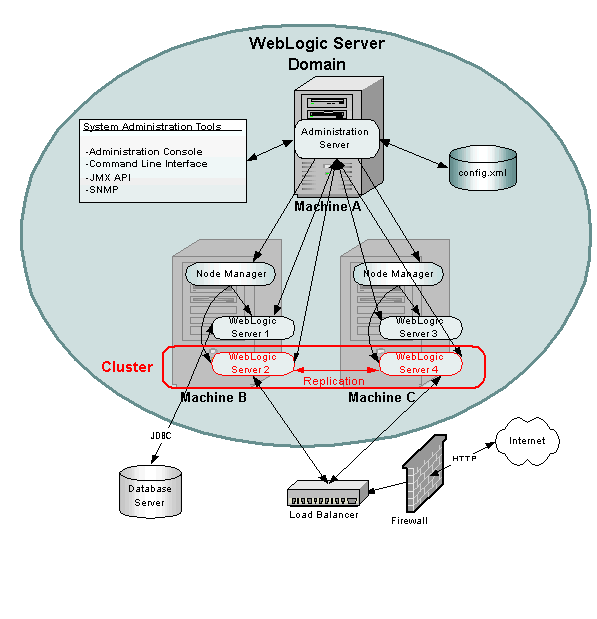
The basic administrative unit for a WebLogic Server installation is called a domain. A domain is a logically related group of WebLogic Server resources that you manage as a unit. A domain always includes only one instance of WebLogic Server called the Administration Server. The Administration Server serves as a central point of contact for server instances and system administration tools. A domain may also include additional WebLogic Server instances called Managed Servers.
You can configure some or all of these Managed Servers to be part of a WebLogic Server cluster. A cluster is a group of WebLogic Server instances that work together to provide scalability and high availability for applications. A Managed Server in a cluster can act as a backup for services such as JMS and JTA that are hosted on another server instance in the cluster. Your applications are also deployed and managed as part of a domain. A Managed Server can also function as a virtual host.
You can organize your domains based on criteria such as:
Logical divisions of applications. For example, a domain devoted to end-user functions such as shopping carts and another domain devoted to back-end accounting applications.
Physical location. Domains for different locations or branches of your business.
Size. Domains are organized in small units that can be managed more efficiently, perhaps by different personnel.
WebLogic Server Domain
Application Formats
You deploy applications in one or more of the following J2EE application formats:
Web applications
Enterprise JavaBeans (EJB)
Enterprise applications
J2EE connectors
Web services. Web services are deployed as a Web Application or Enterprise Application that includes a special deployment descriptor that configures the Web Service.
Weblogic server installation
First, we will need to install the JAVA package on our admin server. Now we are installing the Java Jdk version of 1.8.0_131.


Now java 1.8.0_131 is installed in the server machine. Now set Java home in the .bash_profile file.
Before we proceed further, let's configure the environment variables for Weblogic owner-user for required variables. Below are the best practice variables that need to be assigned:

Now download the Weblogic server installer 12.2.1.3 by accepting the license. Download quick installer of 231MB.
Then create a user Weblogic and set a password. Before we proceed further, let's configure the environment variables for Weblogic owner-user for required variables. Below are the best practice variables that need to be assigned: set Oracle Home, WLS Home, Domain Home in the .bash_profile file.

Create all the directories and files mentioned in bash_profile.

Once done, let's create a file called oraInst.loc and wls.rsp. For filename oraInst.loc: this file is needed to define an inventory location during the Oracle Weblogic installation. For filename wls.rsp, it is optional as it acts as a response file that will be used during the installation. Yet, as moving along we will make the installation from the command-line interface (CLI), the wls.rsp would be compulsory for us to have. Now, let's proceed with the steps as per below:

let's proceed with downloading the Oracle Weblogic installer. You can go to the Oracle website accept the license and download it.
In our case, we will proceed with downloading Oracle Weblogic version 12.2.1.0

Now unzip the downloaded file which will be a jar file. Next, proceed with the installation. Steps are as shown below:


We completed the installation phase. Next, we will proceed with the configuration phase.
Now we are in the configuration part, there will be 2 level of configuration that needs to be made which are:
1) Weblogic Configuration 2) Domain Configuration
For a Weblogic Administration server, we need to make both of the configurations as the main command of Weblogic are under Weblogic configuration. But for every Weblogic managed server that will act as the instance node, it just needs to set up for Weblogic Configuration only as during the initialization of the domain, the administrator can decide which instance node will be used for which project domain.
For every Weblogic managed server, you can create as many instance nodes as you need, this depends on your server resource allocation because each instance node will be a point to its dedicated project domain. To point which domain to which instance node can easily be done by administration server dashboard.
As per the brief, now let's set up the configuration for Weblogic and domain configuration for the admin server part. Just to simplify the tutorial process, we will only create 1 domain called TEST. Below are the steps:-
[weblogic@weblogic wls]$ cd $WL_HOME
[weblogic@weblogic wlserver]$ cd common/bin/
[weblogic@weblogic bin]$ ./commEnv.sh
[weblogic@weblogic bin]$ ./wlst.sh
Java HotSpot(TM) 64-Bit Server VM warning: ignoring option MaxPermSize=256m; support was removed in 8.0
Initializing WebLogic Scripting Tool (WLST) ...
Jython scans all the jar files it can find at first startup. Depending on the system, this process may take a few minutes to complete, and WLST may not return a prompt right away.
Welcome to WebLogic Server Administration Scripting Shell
Type help() for help on available commands
wls:/offline> readTemplate('/home/weblogic/wls/wls12210/wlserver/common/templates/wls/wls.jar')
wls:/offline/base_domain>cd('Servers/AdminServer')
wls:/offline/base_domain/Server/AdminServer>set('ListenAddress','192.168.1.238')
wls:/offline/base_domain/Server/AdminServer>set('ListenPort',7001) ## Port that will be assign to each domain
wls:/offline/base_domain/Server/AdminServer>create('AdminServer','SSL')
Proxy for AdminServer: Name=AdminServer, Type=SSL
wls:/offline/base_domain/Server/AdminServer>cd('SSL/AdminServer')
wls:/offline/base_domain/Server/AdminServer/SSL/AdminServer>set('Enabled','True')
wls:/offline/base_domain/Server/AdminServer/SSL/AdminServer>set('ListenPort',7002)
wls:/offline/base_domain/Server/AdminServer/SSL/AdminServer>cd('/')
wls:/offline/base_domain>cd('Security/base_domain/User/weblogic')
wls:/offline/base_domain/Security/base_domain/User/weblogic>cmo.setPassword('zippy0ps')
wls:/offline/base_domain/Security/base_domain/User/weblogic>setOption('OverwriteDomain','true')
wls:/offline/base_domain/Security/base_domain/User/weblogic>writeDomain('/home/weblogic/wls/oracle/config/domains/TEST')
wls:/offline/TEST/Security/TEST/User/weblogic>closeTemplate()
wls:/offline>exit()
Exiting WebLogic Scripting Tool.
now we've done the configuration for both, now let's start the Weblogic and TEST services on the admin server. Below are the steps:


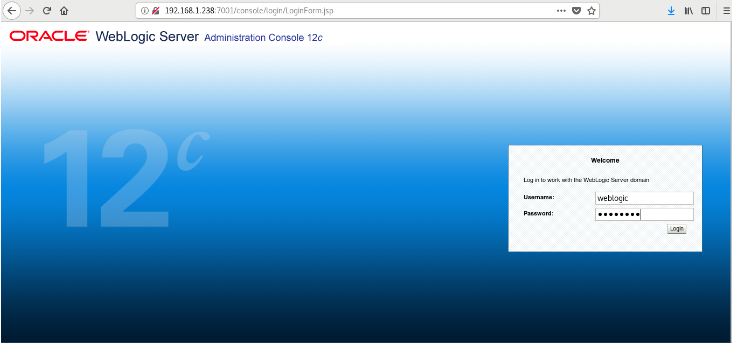
Now, let's open up our admin dashboard via http://192.168.1.238:7001/console. As mentioned before, for this test, we are have just creating only 1 DOMAIN which is TEST therefore the default port 7001 is dedicated for this domain. Once you have launched the URL in the browser, you should see the console like below, enter the username and password that we've defined during the configuration above.
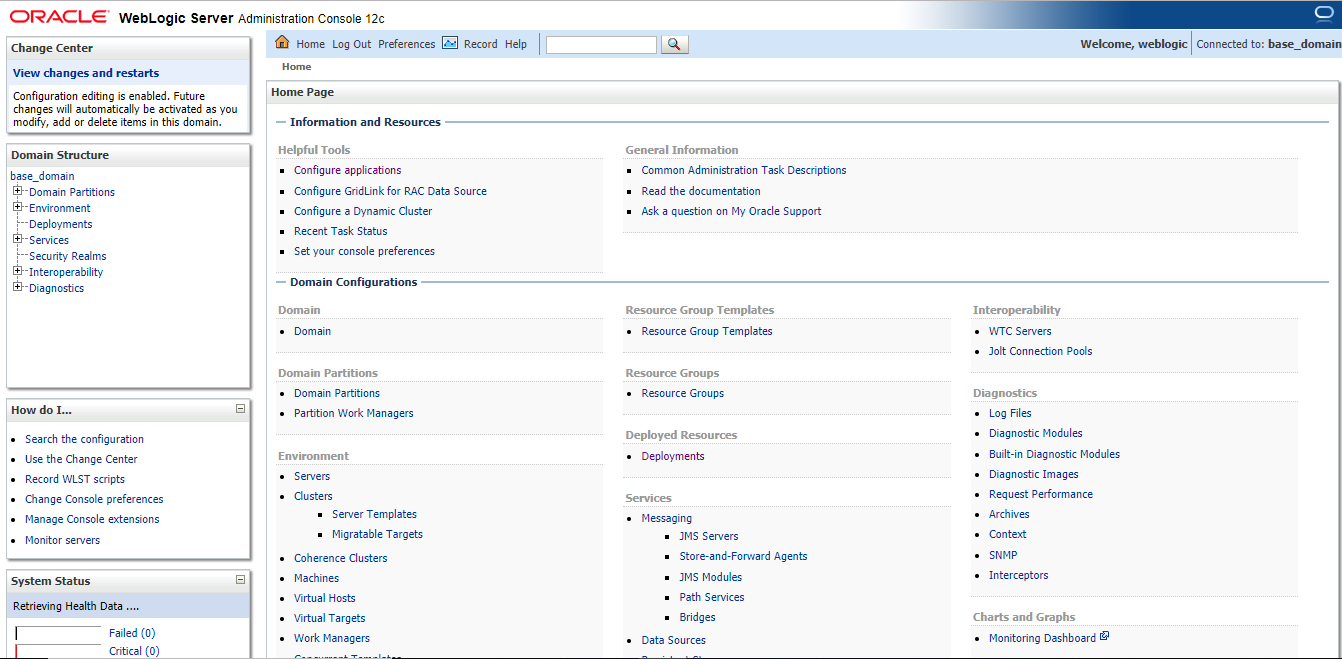
Once you have login successfully, you will see a complete dashboard like shown below:
Deployment of the application can be done through command and also by using the console.
Deployment through the command:
Before running the command, We need to set the classpath.
When we run the command without setting the classpath it will show the error
[root@weblogic bin]#java weblogic.Deployer -adminurl t3://192.168.1.238:7001 -username weblogic -password zippy0ps -deploy -name calendar -targets AdminServer -source /home/weblogic/calendar.war
Error: could not find or load the main class Weblogic.Deployer
we have to run the script setWLSENv.sh which is present in the location /home/weblogic/wls/wls12210/wlserver/server/bin and then run the java Weblogic. Deployer command. The application war should be present whatever the location we have given in the command.

After the command is executed successfully, we can see the calendar.war deployment in console

Select the calendar and then click install in the console.

Then click testing and get the application URL.

Click the URL, the application will be displayed.

Another way to run the command by directly mention the classpath along with that command.
[root@weblogic bin]#java -cp /opt/weblogic/wlserver/server/lib/weblogic.jar weblogic.Deployer -adminurl t3://192.168.1.238:7001 -username weblogic -password zippy0ps -deploy -name zippyops -targets AdminServer -source /home/weblogic/java-sample-app2.war


In the console, Deployment click the application and then click install

Click on the URL to get the application.

The application deployment can also be done through the console.
In Deployment give the path of the build war file select the file to be deployed and then click next.

Then give the name of the Application
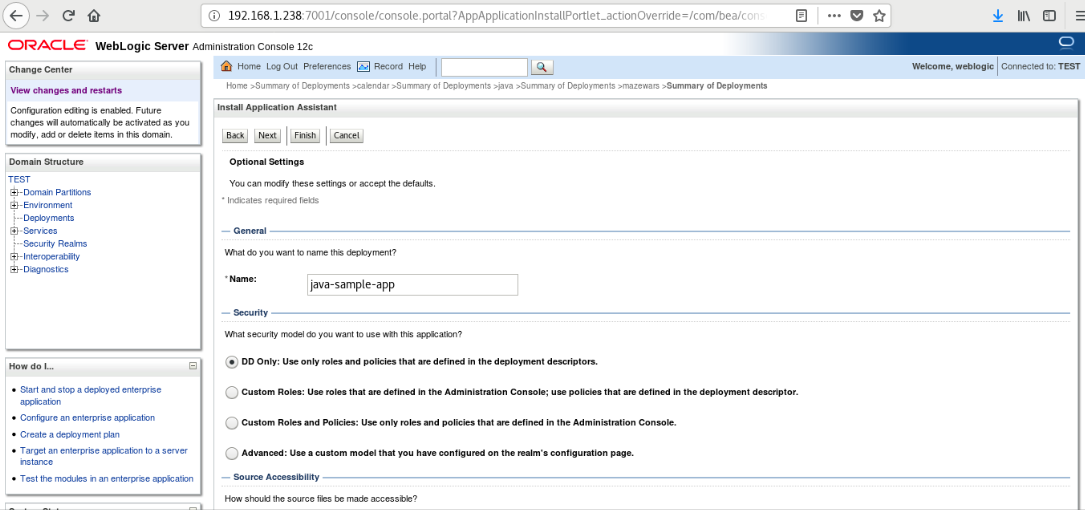

Click finish and give the URL to get the application.
Relevant Blogs:
Recent Comments
No comments
Leave a Comment
We will be happy to hear what you think about this post