What Are the EKS Best Practices for Your SAAS Product?
In this blog, we will be looking at 10 AWS EKS best practices that will help you configure, deploy, use, and manage the Kubernetes Cluster on AWS.
When it comes to Container Orchestration, there’s a good chance you may already be aware of Kubernetes, an open-source solution for automating the deployment, scaling, and management of containerized applications that aggregate the containers comprising an application into logical units allowing for simple management and discovery. You may also know of the AWS Elastic Kubernetes Service (AWS EKS), a managed Kubernetes service that enables you to run Kubernetes on AWS easily. Knowing about these things is not enough to leverage the best out of Kubernetes using AWS EKS; you must know about AWS EKS Best Practices.
In this blog, we will be looking at 10 AWS EKS Best Practices that will help you configure, deploy, use, and manage the Kubernetes Cluster on AWS for high security, reliability, availability, and more. We will also explain how and why you should save your EKS cluster as code.
What Features Does EKS Include?
We won’t get into the details of what Kubernetes is and how it works, as you probably already know. That said, it’s worth addressing a few of the features that AWS EKS provides, as the best practices we will present in this article revolve around these features.
- You can use Amazon EKS to execute your Kubernetes apps on AWS Fargate and Amazon EC2.
- A scalable and highly available Kubernetes control plane running across multiple AWS Availability Zones is provided by Amazon EKS.
- For Kubernetes clusters, EKS offers an integrated console.
- With just one command, Amazon EKS enables you to create, update, scale and terminate nodes for your cluster.
- Cluster management and operations, including managing nodes and add-ons, can be made simpler with eksctl.
- AWS CloudTrail and Amazon EKS have been connected to give users visibility into EKS administration activities, including audit history.
These are just a few of the features that AWS EKS provides.
What Are the Prerequisites for Setting up an EKS Cluster?
Before you go ahead and try out these AWS EKS Best Practices on your own, you need to meet the following requirements. If you don’t meet these requirements, we still recommend reading through the article to get a theoretical understanding of these AWS EKS Best Practices to have them in place when you set up your EKS cluster.
-
AWS Account:
Since we are looking at AWS EKS Best practices, it’s no surprise that you will need an AWS Account. If you already have one, that’s great! If not, click here to register for a free tier. -
AWS-CLI Command:
You will need this command to configure kubectl so you can connect to your AWS EKS cluster from the CLI. Click here to learn how to install or update AWS-CLI on your machine. -
Kubectl Command:
You will need kubectl to run commands against your AWS EKS clusters. Click here to learn how to install it on your machine. -
Terraform Command:
In order to use Terraform to create your AWS EKS clusters, you will need to install it. Click here to install and use it.
Now, without further ado, let’s go ahead and dive into the top 10 AWS EKS Best Practices.
What Are the AWS EKS Best Practices?
Use a Version Control System
When you are just starting with EKS or any other AWS service, you usually immediately go to the AWS Console to create the required resources. This is how infrastructure was managed traditionally on-cloud or on-premise, and it works fine when you are just getting started; however, this is no longer the best way of going about things. Nowadays, the Infrastructure as Code has taken over the manual process of creating the required resources and infrastructure. The same applies to AWS EKS clusters.
In the same way, you store configuration files related to your Kubernetes deployments, ingresses, services, and other objects in a Version Control System before pushing them to a cluster; you should also save the Infrastructure as Code (IaC) files used to create your EKS cluster to a Version Control System in order to benefit from the advantages of Infrastructure as Code (IaC). This helps you keep track of who made what changes to your EKS cluster and when such changes were made.
E.g., If you want to create an EKS cluster, you can use Terraform, Cloudformation, or any other Infrastructure provisioning tool. That said, you must also save the files or code that you used to create the EKS cluster to a Version Control System, like GitHub, in order to have a complete history of the changes you made to your EKS cluster.
Additionally, IaC guarantees that you will always provide the same environment, i.e., your EKS cluster. Furthermore, IaC facilitates configuration management and allows you to prevent ad hoc, undocumented configuration changes by codifying and documenting your configuration standards.
The configuration files you used to create your EKS cluster should be subject to source control just like any other software source code file, seeing as version control is a crucial component of IaC. By deploying your EKS as code, it may also break it into modular components that can be automatedly joined in various ways.
Tip 1: We recommend creating your EKS cluster using an IaC approach and storing its Infrastructure as Code (IaC) files in a Version Control System as a first AWS EKS Best Practice.
Kubernetes Cluster Version
Kubernetes is a frequently updated open-source project that is continually expanding. Because Kubernetes doesn’t adhere to the Long Term Support (LTS) philosophy, Kubernetes-adopting enterprises must conduct routine upgrades.
The deployed components are simply one part of the Kubernetes upgrading process. The versioning of the Kubernetes API must also be monitored. In order to take advantage of the most recent security, new features, and bug fixes, it’s important to update the cluster and deployed solutions.
In the case of EKS, launching new API server nodes with the upgraded Kubernetes version to replace the outdated ones is part of the upgrading process. You can’t directly update to the newest version of Kubernetes, seeing as the procedure is gradual.
We strongly advise that you select the most recent version of Kubernetes
supported by AWS for your EKS clusters in order to take advantage of new
features and enhancements unless your containerized applications require a
specific version of Kubernetes. As of August 26, 2022, 1.23 is the latest
version supported by EKS.
Tip 2: The next AWS EKS Best Practice we
have on our list for you is to keep your EKS cluster up to date and take
advantage of the benefits Kubernetes provides in its new releases.
Sample Terraform Snippet:
resource “aws_eks_cluster” “my_eks_cluster” {
name = “sample-eks-cluster”
version = <Unless your application requires a specific version of Kubernetes for your workloads, we recommend you to choose the latest available Kubernetes version supported by Amazon EKS for your cluster.>
}
Configuration in the EKS Cluster Configuration Console:
You will find this configuration under EKS -> Add Cluster -> Create
-> Configure cluster-> Cluster configuration -> Kubernetes version
Enable Envelope Encryption for EKS Kubernetes Secrets
Using the Kubernetes API, you can store and manage sensitive data such as passwords, docker registry credentials, and TLS keys, thanks to Kubernetes secrets. In order to safeguard your data from unauthorized access and satisfy compliance requirements for data-at-rest encryption within your business, we strongly advise that you enable encryption of Kubernetes secrets when working with security-critical data. Kubernetes store all secret object data in etcd, and all etcd volumes used by Amazon EKS are encrypted on the disk using encryption keys managed by AWS.
AWS Key Management Service (KMS) keys can provide envelope encryption for Kubernetes secrets stored in Amazon Elastic Kubernetes Service (EKS). Implementing envelope encryption is regarded as an AWS EKS Security Best Practice for applications that store sensitive data.
Without needing to install or administer extra software, you can utilize KMS keys that you generate or import keys generated by another system to AWS KMS in order to encrypt Kubernetes secrets and use them with the cluster. Envelope encryption for secrets is available for Amazon EKS clusters using Kubernetes versions 1.13 and later.
Keep in mind that there is no way to restore the cluster if you enable secret encryption for your EKS cluster and the KMS key you used is removed. Indeed, the cluster becomes irreversibly damaged if the KMS key is deleted.
Tip 3: To safeguard your data from illegal access and to satisfy compliance standards for data-at-rest encryption, we highly recommend that you enable secret encryption of Kubernetes secrets in your EKS cluster.
Sample Terraform Snippet:
resource “aws_eks_cluster” “my_eks_cluster” {
name = “sample-eks-cluster”
version = “1.23”
#use this block you enable Envelope encryption encryption_config {
resources = [ “secrets” ]
provider {
key_arn = <ARN of the Key Management Service (KMS) customer master key (CMK)>
}
}
}
Configuration in the EKS Cluster Configuration Console:
You will find this configuration under EKS -> Add Cluster -> Create -> Configure cluster -> Cluster configuration -> Secrets encryption
VPC Layout
For each cluster, Amazon EKS runs a single-tenant Kubernetes control plane. In no event do clusters or AWS accounts share the control plane infrastructure. A minimum of two API server instances, three etcd instances, and three Availability Zones inside an AWS Region make up the control plane fully managed by AWS.
That said, when it comes to worker nodes, the user is responsible for taking care of its networking, and VPC is the first component required for building the EKS cluster.
Worker nodes and Kubernetes Pods require networking capabilities; therefore, when building a cluster, you must define a different VPC for each cluster with at least two subnets in different Availability Zones allowing for high availability. You can create an EKS Cluster using the default VPC, Subnet, and Security Groups. However, in order to stay on the safe side of things, we recommend always creating your own VPC, Subnet, and SGs with particular IP ranges for Ingress and Egress as a best practice.
To ensure zone-independent architecture while deploying worker nodes on private subnets, consider setting up a NAT Gateway in each Availability Zone.
The Amazon VPC Container Network Interface (CNI) plugin for Kubernetes provides native VPC networking capabilities for Amazon EKS. The CNI plugin enables Kubernetes Pods to share an IP address between their internal and VPC networks. Hence, the subnets you’ll use for pod networking should be sized for expansion, seeing as your pods won’t obtain an IP address if the subnet that the CNI uses doesn’t have enough IP addresses available. Furthermore, until an IP address becomes available, the pods will stay pending, potentially affecting application autoscaling and compromising its availability.
Tip 4: We recommend using different VPCs with subnets that span multiple Availability Zones for different clusters. When choosing the appropriate CIDR, consider the number of IPs required for your pods in the cluster. As a best practice, think of a VPC that will provide high availability for your EKS cluster.
Sample Terraform Snippet:
resource “aws_eks_cluster” “my_eks_cluster” {
name = “sample-eks-cluster”
version = “1.23”
encryption_config {
resources = [ “secrets” ]
provider {
key_arn = <ARN of the Key Management Service (KMS) customer master key (CMK)>
}
}
vpc_config {
subnet_ids = [<private_subnet_1_id>,<private_subnet_2_id>,<private_subnet_3_id>] #Add you subnets here
}
}
Configuration in the EKS Cluster Configuration Console:
You will find this configuration under EKS -> Add Cluster -> Create -> Next -> Specify networking -> Networking -> VPC and Subnets
<!--[if !supportLineBreakNewLine]-->
<!--[endif]-->
EKS Security Groups
It is not recommended to open all of the ports inside your Amazon EKS security groups. Indeed, doing so will enable attackers to use port scanners and other probing techniques to identify the services and apps operating on your EKS clusters and exploit their vulnerabilities. To get around this, make sure that the security groups connected to your Amazon Elastic Kubernetes Service (EKS) clusters are set up to only allow inbound traffic on TCP port 443 (HTTPS). This will shield your clusters from malicious actions like brute-force attacks and help you adhere to organizational compliance standards.
Please be aware that you may limit the rules. We, therefore, advise that you test every one of your pods properly before implementing your modified rules in a production cluster.
E.g. The ports that you anticipate that your nodes will use for inter-node communication, outbound internet access (so that nodes can access the Amazon EKS APIs for cluster introspection and node registration at launch time), and node access to pull images from registries (to pull container images from the Amazon ECR or other container registry APIs needed to pull images from, such as DockerHub), must all be added.
Tip 5: According to EKS Security Best Practices, only the ports needed by your EKS cluster must be opened. Do not unnecessarily open ports if you are unsure of their function.
Sample Terraform Snippet:
resource “aws_eks_cluster” “my_eks_cluster” {
name = “sample-eks-cluster”
version = “1.23”
encryption_config {
resources = [ “secrets” ]
provider {
key_arn = <ARN of the Key Management Service (KMS) customer master key (CMK)>
}
}
vpc_config {
subnet_ids = [<private_subnet_1_id>,<private_subnet_2_id>,<private_subnet_3_id>]
security_group_ids = [<security_group_1_id>,<security_group_n_id>] #Add your Security Groups here
}
}
Configuration in the EKS Cluster Configuration Console:
You will find this configuration under EKS -> Add Cluster -> Create -> Next -> Specify networking -> Networking -> Security groups
<!--[if !supportLineBreakNewLine]-->
<!--[endif]-->
EKS Cluster Endpoint Private Access
After each cluster launch, you can utilize the managed Kubernetes API server endpoint that Amazon EKS generates for you to communicate with your newly established cluster. Every machine on the Internet can reach your EKS cluster through its public endpoint, seeing as this API server endpoint (managed by AWS EKS) can be directly accessed by default outside of a Virtual Private Cloud (VPC). This can potentially increase the risk of malicious activities and attacks.
In order to reduce security risks and protect sensitive information, ensure that the Kubernetes API server endpoint for your Amazon EKS cluster is not publicly accessible via the Internet. Your EKS application use cases will determine the extent of access to your Kubernetes API server endpoints. However, for most use cases, we recommend that the API server endpoints only be accessible from within your AWS Virtual Private Cloud (VPC).
In such a case, to run kubectl commands, you can launch an Amazon EC2 instance into a public subnet in the VPC of your cluster. To accept ingress traffic on port 443 from your bastion host, you first need to ensure that your Amazon EKS control plane security group contains the required rules.
Tip 6: In accordance with EKS Security Best Practices, entirely disable public access to your API server endpoint, making it unreachable from the Internet, and use a bastion host to run kubectl commands.
Sample Terraform Snippet:
resource “aws_eks_cluster” “my_eks_cluster” {
name = “sample-eks-cluster”
version = “1.23”
encryption_config {
resources = [ “secrets” ]
provider {
key_arn = <ARN of the Key Management Service (KMS) customer master key (CMK)>
}
}
vpc_config {
subnet_ids = [<private_subnet_1_id>,<private_subnet_2_id>,<private_subnet_3_id>]
security_group_ids = [<security_group_1_id>, <security_group_n_id>]
endpoint_private_access = “true” #Make this true so as to have the cluster endpoint accessible only through your VPC.
}
}
Configuration in the EKS Cluster Configuration Console:
You will find this configuration under EKS -> Add Cluster -> Create -> Next -> Specify networking -> Cluster endpoint access -> Private
Kubernetes Cluster Logging
The Kubernetes control plane is a collection of parts that controls Kubernetes clusters and generates logs for auditing and troubleshooting. Logs for various control plane components can be enabled using Amazon EKS and then sent to CloudWatch. In order to publish API, audit, controller manager, scheduler, or authenticator logs to AWS CloudWatch Logs, control plane logs must be enabled in your AWS EKS clusters.
Amazon EKS transmits audit and diagnostic logs straight to AWS CloudWatch Logs after the EKS Control Plane Logging capability is activated. You can use these logs to operate your EKS clusters securely and effectively.
Cluster control plane logs are not usually transmitted to CloudWatch Logs by default. Therefore, we advise that you enable each log type separately when submitting in order to submit logs for your cluster.
You should also be aware that if you utilize Amazon EKS control plane logging, you will be charged the usual Amazon EKS price for each cluster you run, in addition to the standard CloudWatch Logs data ingestion and storage charges you will need to pay for any logs transmitted to CloudWatch Logs from your clusters.
Tip 7: Logs are usually ignored, but we highly recommend enabling logs for your EKS cluster as an AWS EKS Best Practice.
Sample Terraform Snippet:
resource “aws_eks_cluster” “my_eks_cluster” {
name = “sample-eks-cluster”
version = “1.23”
encryption_config {
resources = [ “secrets” ]
provider {
key_arn = <ARN of the Key Management Service (KMS) customer master key (CMK)>
}
}
vpc_config {
subnet_ids = [<private_subnet_1_id>,<private_subnet_2_id>,<private_subnet_3_id>]
security_group_ids = [<security_group_1_id>, <security_group_n_id>]
endpoint_private_access = “true”
enabled_cluster_log_types = [“api”, “audit”, “authenticator”, “controllerManager”, “scheduler”] #Enable required logs using this configuration
}
}
Configuration in the EKS Cluster Configuration Console:
You will find this configuration under EKS -> Add Cluster -> Create -> Next -> Next -> Configure logging -> Control plane logging -> API server, Audit, Authenticator, Controller manager and Scheduler
Control SSH Access to Node
There should never be a necessity for the workloads operating in the cluster’s pods to SSH directly to the nodes. By preventing pods from using the SSH port, it becomes harder for a malicious pod to gain direct access to the node.
SSH access shouldn’t be enabled for node instances. In rare instances, not being able to SSH to the node may make troubleshooting more challenging. However, system and EKS logs typically provide sufficient information for problem diagnosis.
When logging into a host, utilize SSM Session Manager rather than activating SSH access. Session Manager may use IAM to restrict access to EC2 instances, unlike SSH keys, which can be misplaced, copied, or distributed. Additionally, IAM offers an audit trail and commands log, which are very useful.
In light of the above, the bottom line is that a crucial safeguard for your cluster is to isolate the nodes to the fullest extent possible from the containers they host and limit SSH access to the node from outside sources.
Tip 8: Do not enable SSH access to your nodes. Instead, use AWS Systems Manager Session Manager to gain access to the nodes from the AWS Console.
Sample Terraform Snippet:
resource “aws_eks_node_group” “my_eks_node_group” {
cluster_name = “sample-eks-cluster”
node_group_name = “sample-eks-cluster-node-group-1”
remote_access {
ec2_ssh_key = “<your-key>”
source_security_group_ids = “<your-sg-that-does-not-allow-connection-on-port-22>”
}
}
Please note that if you specify ec2_ssh_key, but forget to specify source_security_group_ids when you create your EKS Node Group using Terraform, port 22 on the worker nodes will be opened to the Internet (0.0.0.0/0). Hence, always explicitly restrict access to port 22 if you need to use the remote_access block in your node group configuration.
Identity and Access Management
Your Kubernetes cluster’s authentication is handled by Amazon EKS using IAM, while authorization is still handled by the native Kubernetes Role-Based Access Control (RBAC). As a result, IAM is only used to authenticate legitimate IAM entities. The native Kubernetes RBAC system controls all permissions with respect to your Amazon EKS cluster’s Kubernetes API.
AWS Identity and Access Management (IAM) is a free AWS solution that enables administrators to securely manage access to your AWS EKS cluster and other AWS services. After being authenticated and granted access, IAM administrators control who can utilize Amazon EKS resources.
By default, Amazon EKS resources cannot be created or modified by IAM users or roles. They can also not use the AWS Management Console, AWS CLI, or AWS API to perform tasks. In order to allow users and roles to execute particular API actions on the designated resources they require, you, as an IAM administrator, must create IAM policies. Once the IAM policies are created, you must associate the policies with the IAM users or groups that require permissions.
It’s important to note that the IAM user or role that builds the cluster is automatically granted system:masters permissions in the cluster’s RBAC setup when you create an Amazon EKS cluster. Therefore, it’s wise to designate a specific IAM role when creating the cluster and periodically check who is authorized to take on it.
Also, to access the Kubernetes API, an IAM User does not need access rights to AWS resources. Hence, if you need to provide an IAM user access to an EKS cluster, create an entry in the aws-auth ConfigMap for the user that corresponds to a particular Kubernetes RBAC group.
You must also be prepared to routinely audit the aws-auth ConfigMap in order to determine who has been granted access and the rights they have been given because the list of people who need access is likely to change over time.
Additionally, as the service account token is a persistent, static credential, we advise against using it. An attacker may be enabled to carry out all of the operations connected to a particular token up until the service account is terminated if it is hacked, lost, or stolen.
Tip 9: Avoid using service account tokens, provide the least privileged AWS Resources access to the user that requires access to the EKS cluster and create the cluster with a dedicated IAM user/role. These are a few of our recommendations that constitute our EKS Best Practices.
Sample Read-Only Access:
The following configuration provides read only access to arn:aws:iam::AWSAccountID:user/IAMUserName
cluster-role.yaml
kind: ClusterRole
apiVersion: rbac.authorization.k8s.io/v1
metadata:
name: read-only-cluster-role
rules:- apiGroups: [“”]
resources: [“pods/log”]
verbs: [“get”, “watch”, “list”]
– apiGroups: [“”]
resources: [“pods”]
verbs: [“get”, “watch”, “list”]
cluster-role-binding.yaml
kind: ClusterRoleBinding
apiVersion: rbac.authorization.k8s.io/v1
metadata:
name: read-only-cluster-role-binding
subjects:
– kind: Group
name: “read-only-group”
apiGroup: rbac.authorization.k8s.io
roleRef:
kind: ClusterRole
name: read-only-cluster-role
apiGroup: rbac.authorization.k8s.io
aws-auth configmap
kubectl edit configmap aws-auth -n kube-system
apiVersion: v1
kind: ConfigMap
metadata:
name: aws-auth
namespace: kube-system
data:
mapUsers: |
– groups:
– read-only-group userarn: arn:aws:iam::AWSAccountID:user/IAMUserName
username: IAMUserName
Reference:
Click here to learn how to enable IAM user and role access to your cluster.
Cluster Autoscaling
Thanks to the auto-scaling capability, your resources can be dynamically scaled up or down to meet shifting demands. This is a crucial Kubernetes operation that, if done manually, requires a lot of labor. Autoscaling ensures that your EKS cluster has enough nodes to schedule your pods without wasting resources.
Cluster autoscaling is essential in a Kubernetes cluster as it ensures that sufficient computing resources are available by adding nodes to a cluster and reduces infrastructure expenses by eliminating nodes. An environment’s total availability and uptime are maintained through Cluster Autoscaling. Cluster Autoscaling should be thought of as a great initial step to maintaining optimal sizing on your EKS cluster in order to minimize expenses and preserve the environment’s uptime.
There are two products for autoscaling that Amazon EKS supports: The open source autoscaling initiatives Karpenter and the Kubernetes Cluster Autoscaler. While Karpenter works directly with the Amazon EC2 fleet, the Cluster Autoscaler uses AWS scaling groups.
The Kubernetes Cluster Autoscaler looks out for unscheduled pods and underutilized nodes. Before implementing the actual modification in your cluster, it simulates the addition or deletion of nodes. Usually, the Cluster Autoscaler is implemented as a Deployment in your cluster.
Karpenter is a versatile, high-performance Kubernetes cluster autoscaler that boosts cluster effectiveness and application availability. Karpenter can provide just-in-time compute resources that precisely match the demands of your workload by connecting Kubernetes with AWS. Based on the particular needs of your cluster workloads, Karpenter automatically creates additional compute resources.
Tip 10: Depending on the requirements of your organization, you can choose to go with Karpenter or the Kubernetes Cluster Autoscaler. That said, choosing an autoscaling product is a must and that’s why it’s one of our AWS EKS Best Practices.
Reference:
Click here to learn more about Autoscaling on AWS EKS.
Conclusion
New security obligations arise when workloads are run on AWS EKS or any Kubernetes cluster. Creating an AWS EKS cluster is as simple as clicking a few clicks on the AWS Console. However, it’s important that it be created optimally. In this article, we presented you with 10 AWS EKS Best Practices, which will help you create your EKS cluster in accordance with standard practices.
We strongly recommend that you follow these AWS EKS Best Practices right from the start, i.e., from the moment you start creating your cluster.
These AWS EKS Best Practices cover a broad range of topics, including IaC, Networking, Security, Access Control, Accessibility, and more. Each section begins with an introduction of the main ideas, followed by specific suggestions based on AWS EKS Best Practices that have been implemented and approved by our Kubernetes experts and the Kubernetes technical teams.
EKS Best Practices Summary
|
EKS Best Practices |
|
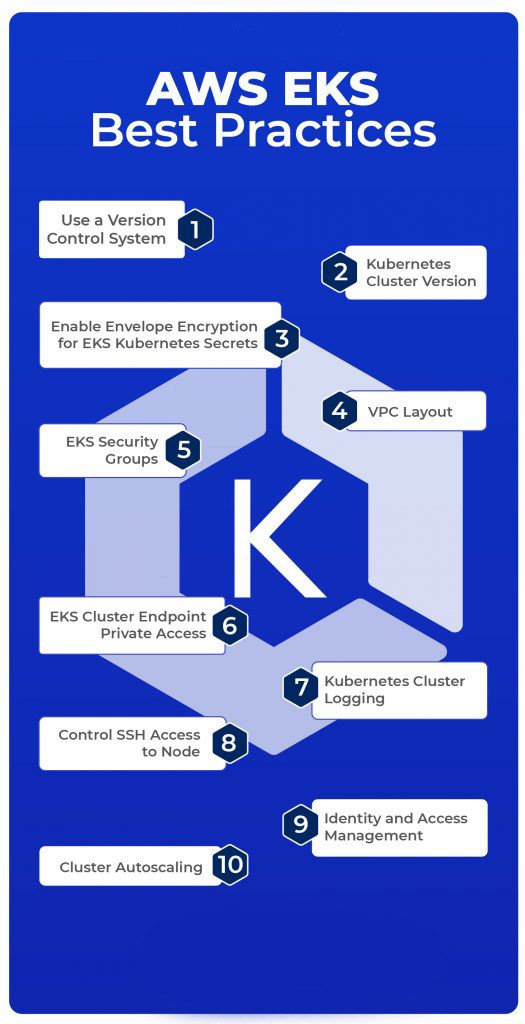
#1 Use a Version Control System to store your cluster’s IaC files. |
|
#2 Keep your EKS up to date and take advantage of Kubernetes’ new releases. |
|
#3 Enable secret encryption of Kubernetes secrets in your EKS cluster. |
|
#4 Use different VPCs that provide high availability for your cluster. |
|
#5 For EKS Security, only open the ports needed by your EKS. |
|
#6 Disable public access to your EKS Cluster Endpoint for more security. |
|
#7 Enable logs for your EKS cluster. |
|
#8 Use AWS Systems Manager Session Manager to gain access to the nodes from the AWS Console. |
|
#9 Avoid using service account tokens, provide the least privileged AWS Resources access to the user that requires access to the EKS cluster and create the cluster with a dedicated IAM user/role. |
|
#10 Depending on the requirements of your organization, choose the best autoscaling product (Karpenter or Kubernetes Cluster Autoscaler). |
We Provide consulting, implementation, and management services on DevOps, DevSecOps, DataOps, Cloud, Automated Ops, Microservices, Infrastructure, and Security
Services offered by us: https://www.zippyops.com/services
Our Products: https://www.zippyops.com/products
Our Solutions: https://www.zippyops.com/solutions
For Demo, videos check out YouTube Playlist: https://www.youtube.com/watch?v=4FYvPooN_Tg&list=PLCJ3JpanNyCfXlHahZhYgJH9-rV6ouPro
If this seems interesting, please email us at [email protected] for a call.
Recent Comments
No comments
Leave a Comment
We will be happy to hear what you think about this post